NorthStar 4.8: Features and Improvements (Server/App)
Internal only: Active links to tickets are only available to internal CBS users. (Permission required to access Jira.)
Ticket No. | Summary | Configuration | Operation |
|---|---|---|---|
CashoutDocumentation: Time Clock | |||
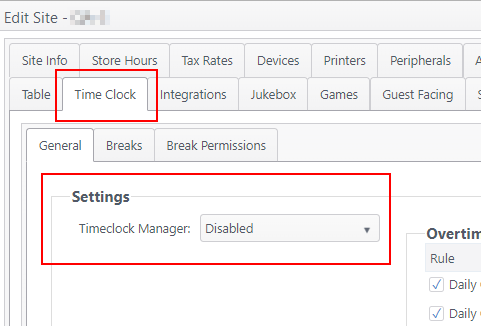
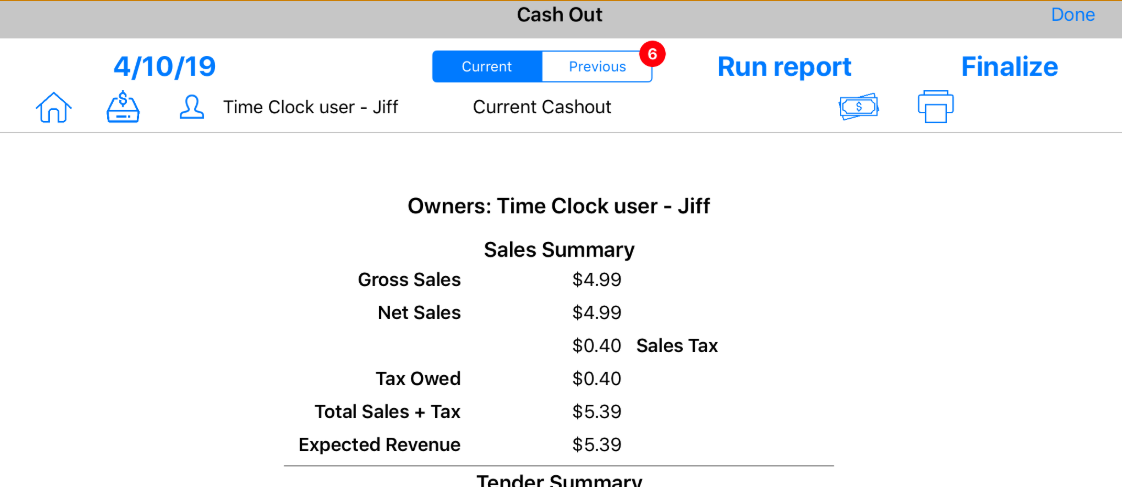
| OE-11929 | Cashout: Allow cashout when timeclock manager is disabled Previously, when timeclock manager was disabled, users could not cash out. This improvement allows them to cash out when timeclock manager is disabled. | Path: Sites and Groups > edit a site > Time Clock
Employees are allowed to cash out.
| |
ECM Admin/Configuration | |||
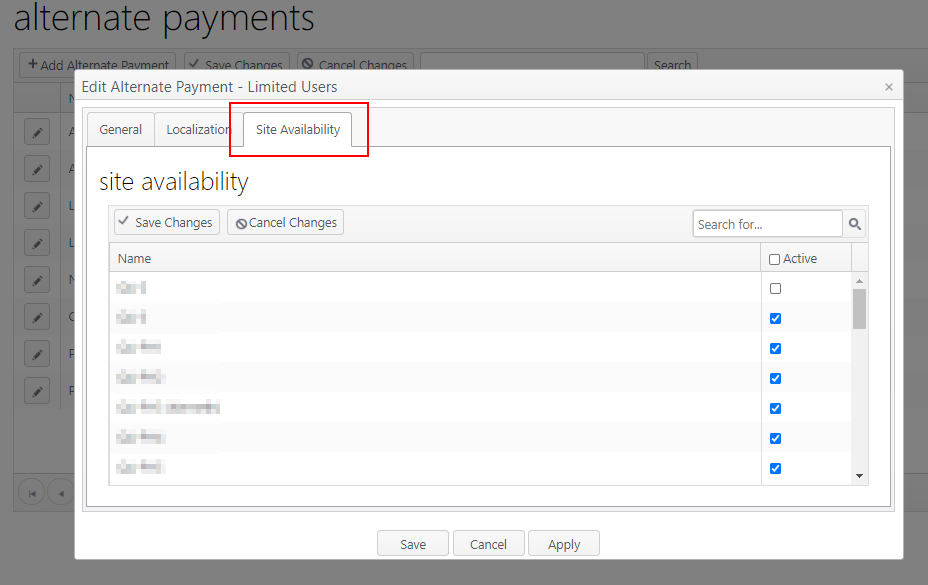
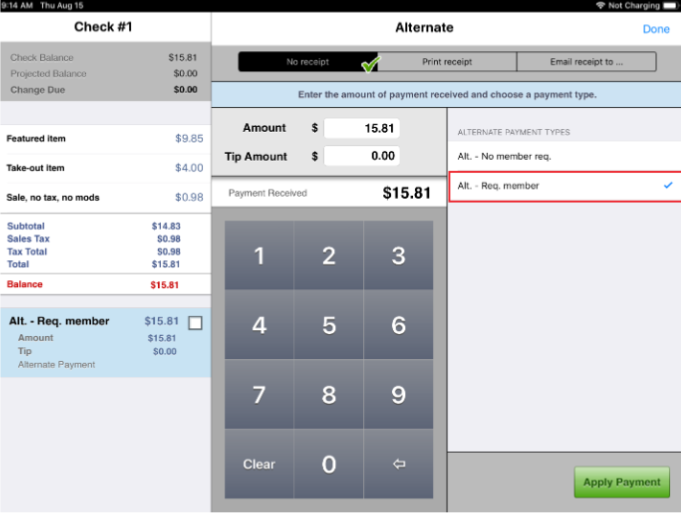
| OE-11454 | Alternate Payments: Set availability by site When feature toggle is enabled, sites can set alternate payments by individual sites, instead of to all sites. Documentation: Alternate Payments | Account feature toggle required* Alternate payments controlled by site | ECM Path: Financial > Alternate Payments When feature toggle is enabled, the Site Availability tab is shown on the Edit Alternate Payment window.
|
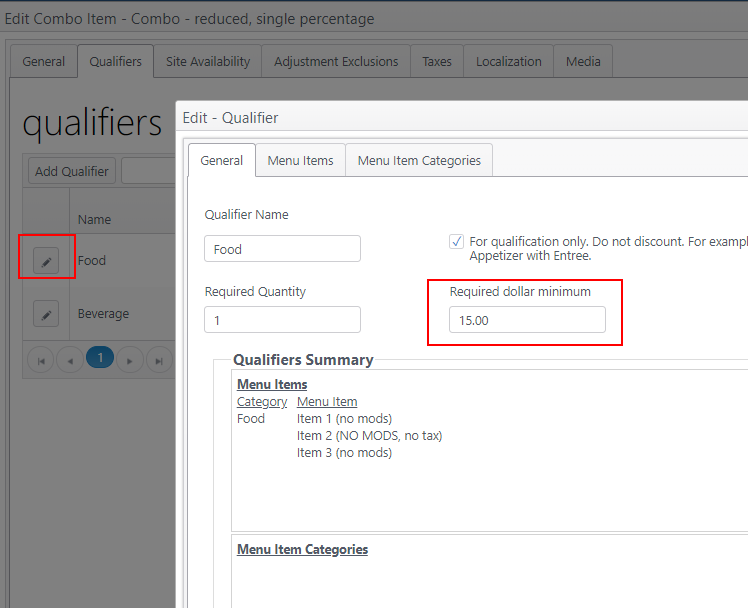
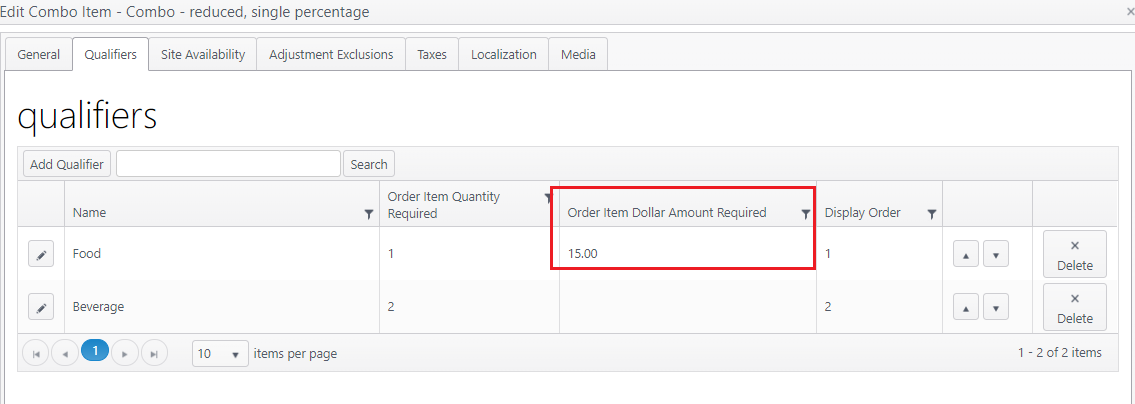
| OE-8966 | Combo: Require minimum dollar amount threshold to qualify for combo Combo menu items can be configured to require a minimum dollar threshold be met in order to create a combo. | ECM Path: Products > Menu Items > combo menu item
The amount will also be shown on the qualifiers grid.
| Workflow:
|
iDynamo 6 for iOS | |||
Related: | Payment: Allow iDynamo 6 to process payment cards Added ability to use iDynamo 6 mobile card reader with Order Entry app. |
| |
iPad as Customer Display (Advanced Customer Display/ACD)For complete information, see: Advanced Customer Display | |||
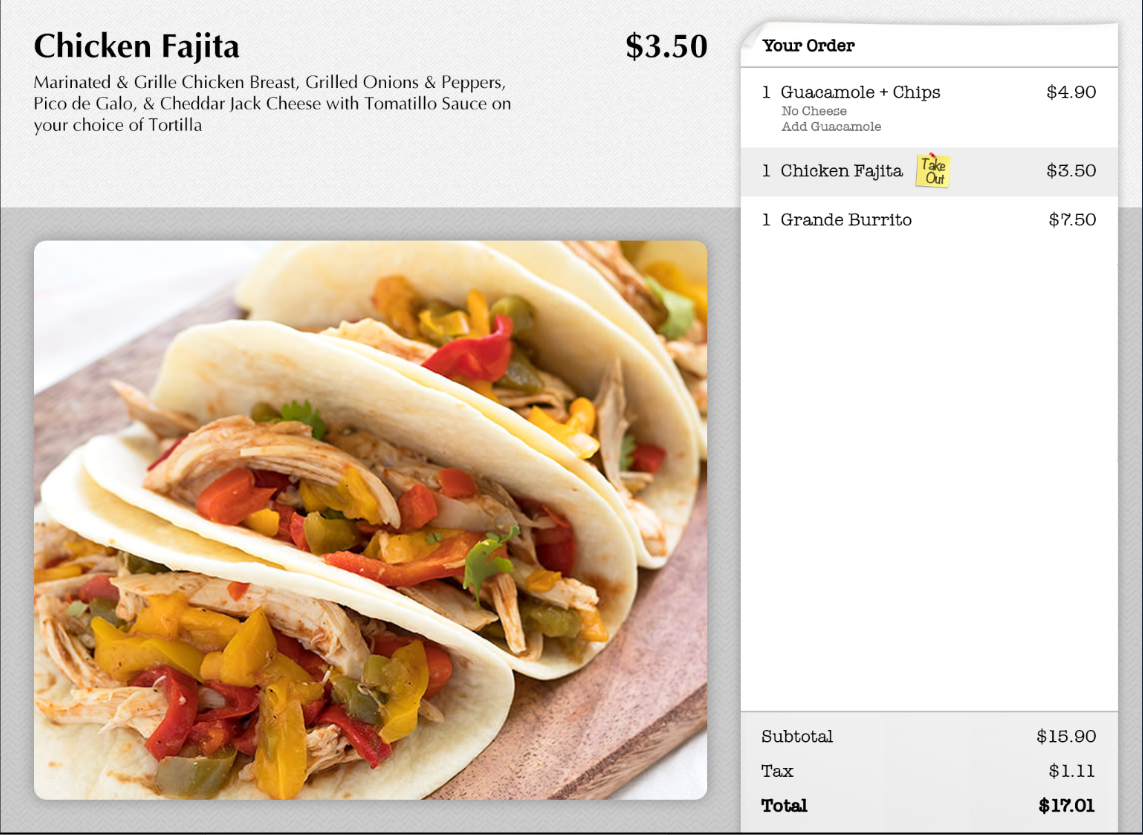
Related: | Advanced Customer Display: Use an iPad as a customer display An iPad can be configured as a customer-facing terminal where the customer can view items as they are ordered and see check total. There's an option to allow customers to pay from the customer-facing screen using a PAX device (credit card/gift card) or eDynamo card reader (credit card). | General config:
| For complete information, see: Ordering
Payment
|
Link To | |||
Related: |
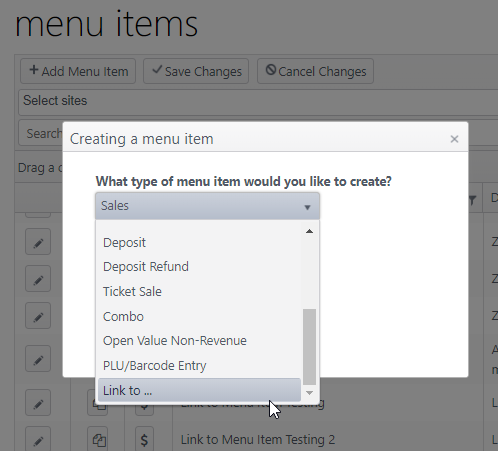
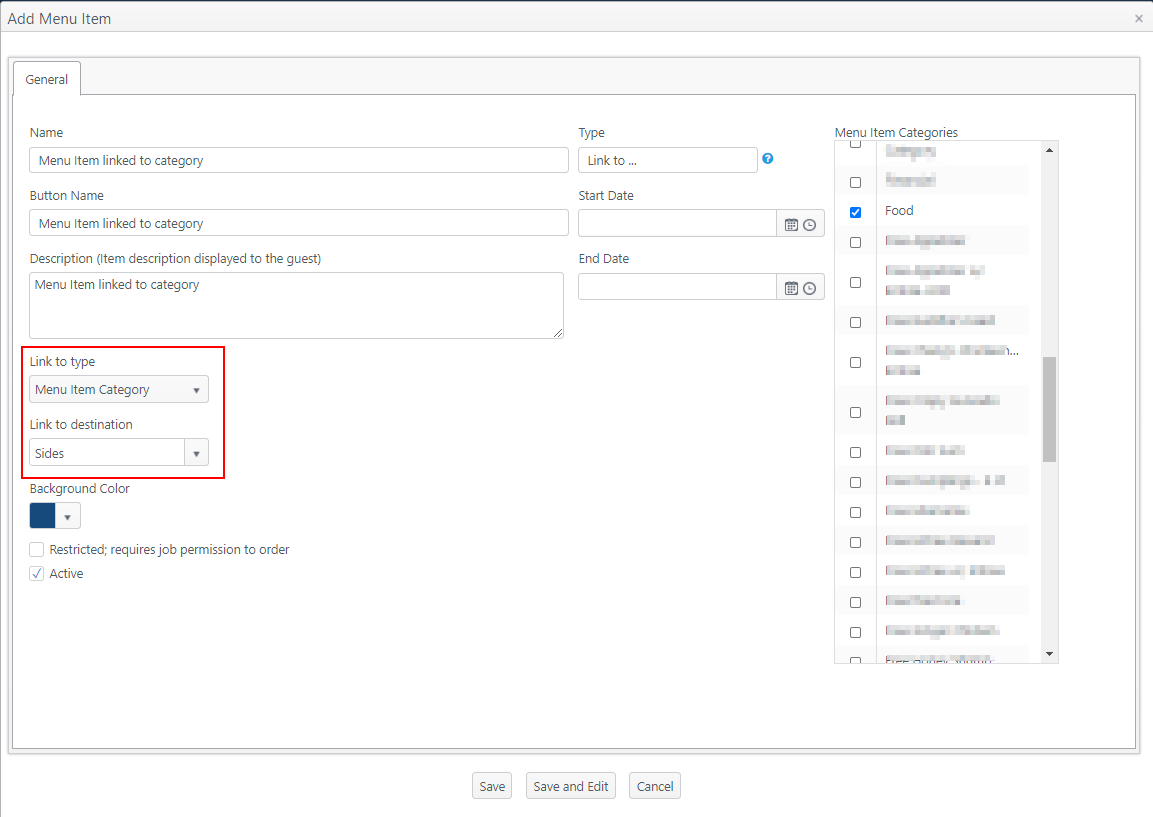
| Account feature toggle required* 4.8 Enable "Link to" menu item type Path: Products > Menu Items
| Workflow:
Example:
|
Member Service/Loyalty | |||
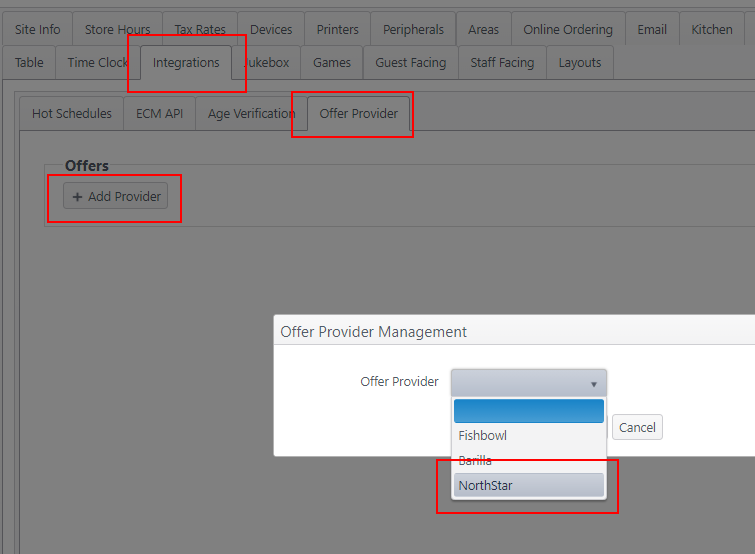
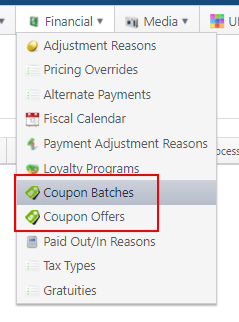
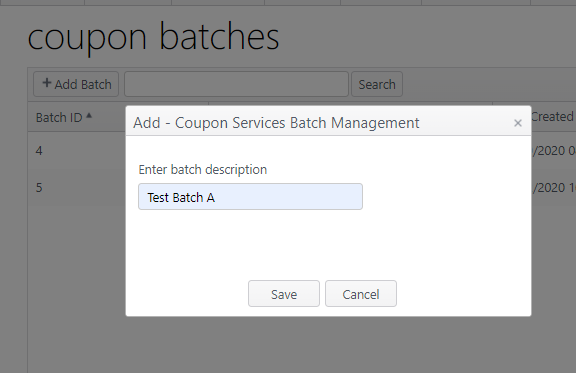
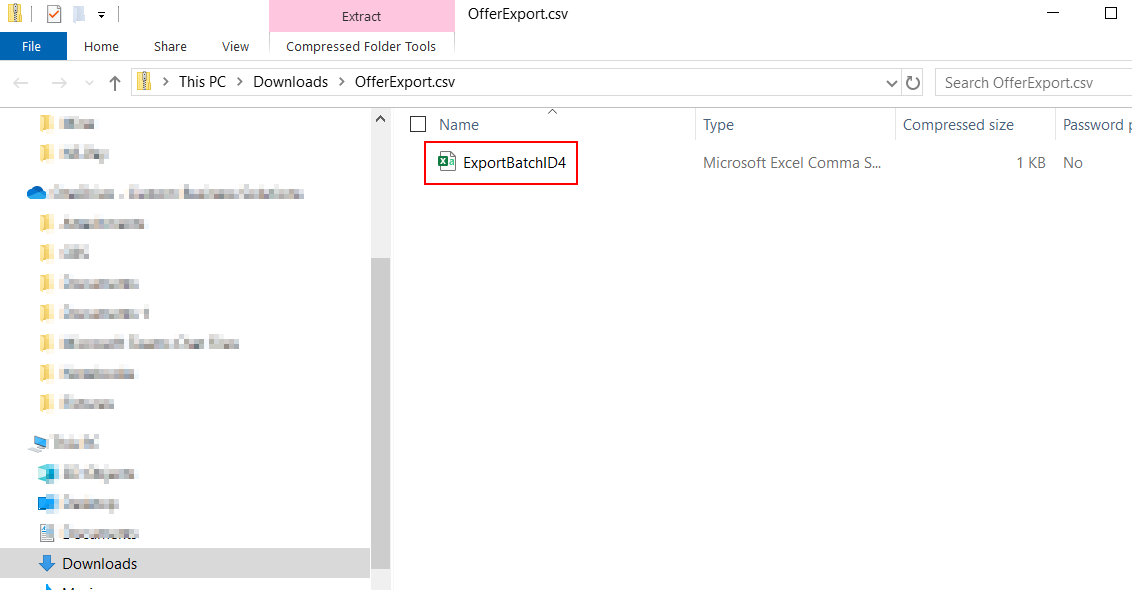
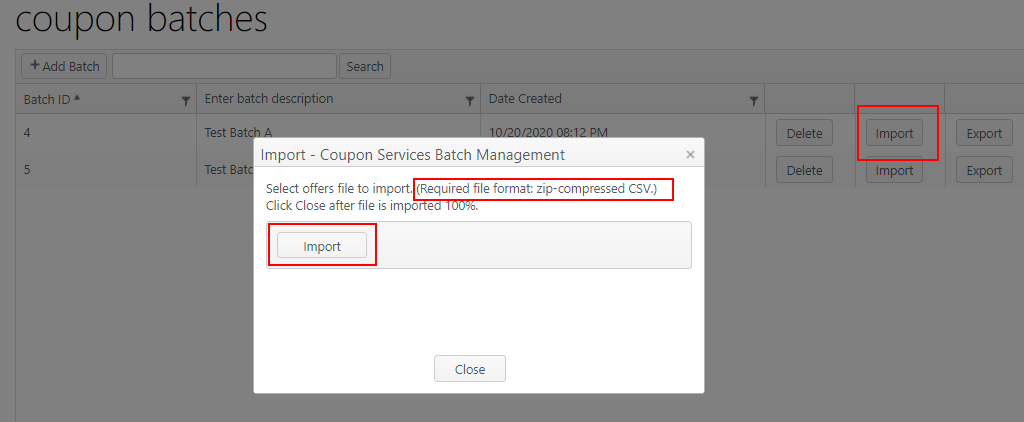
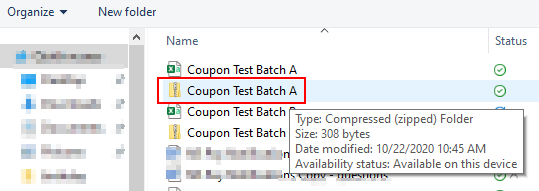
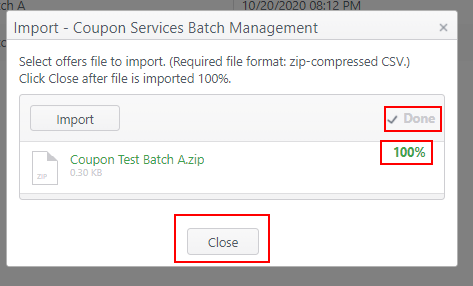
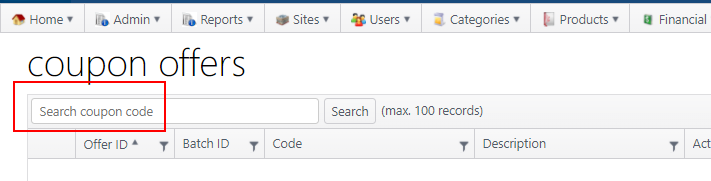
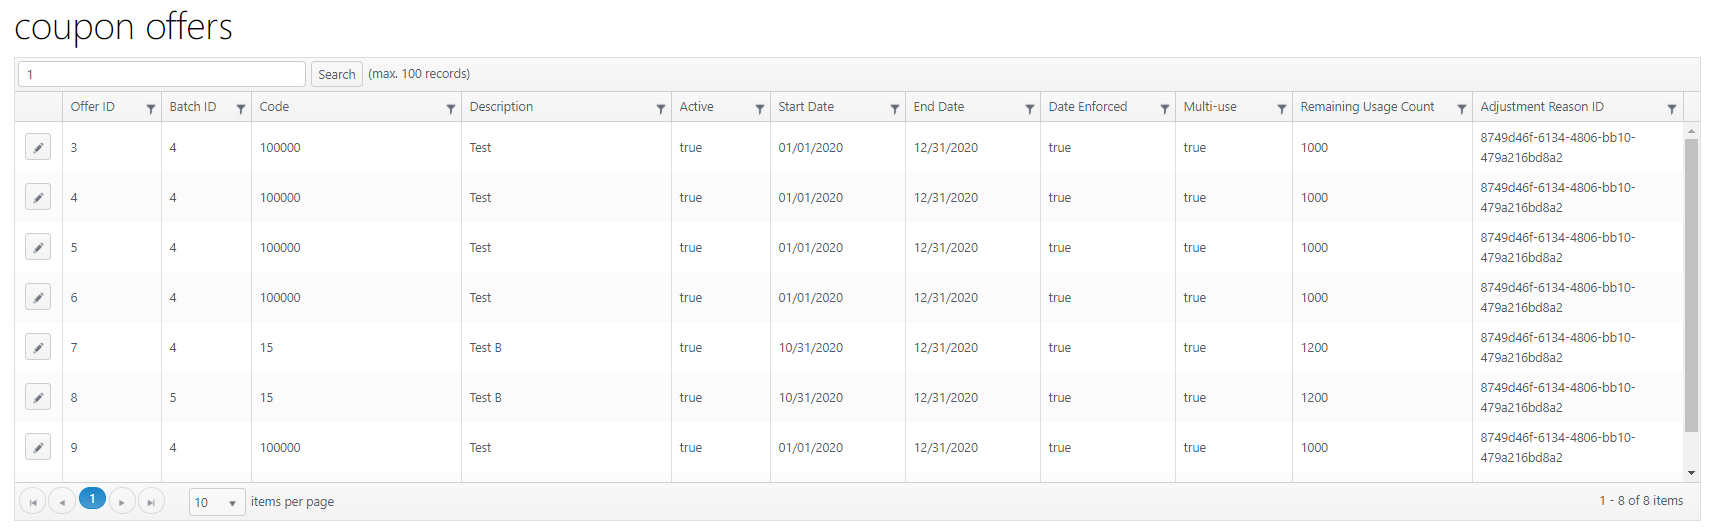
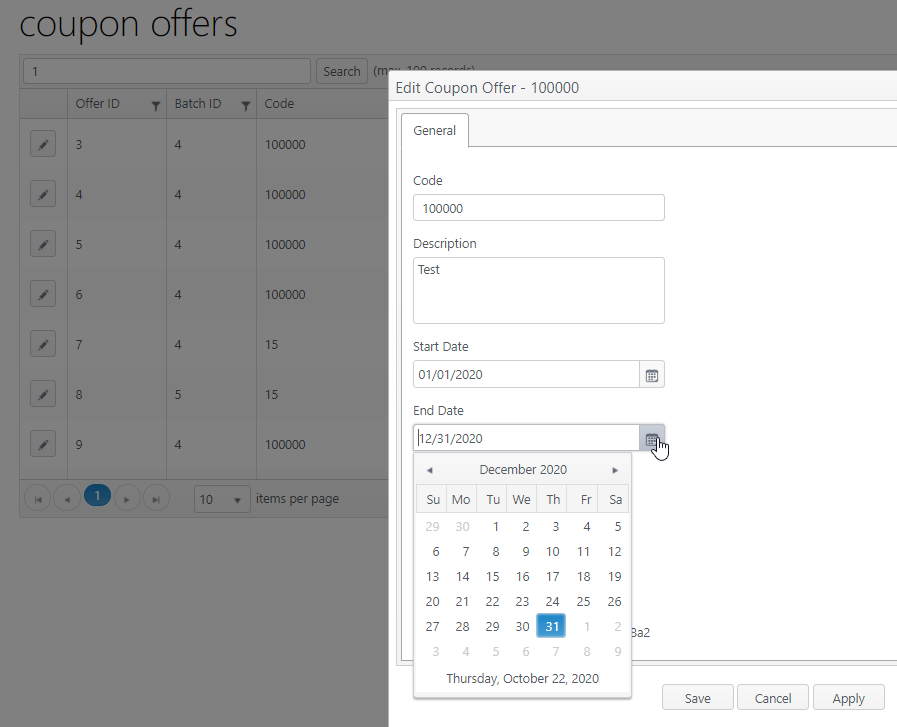
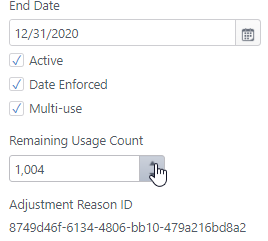
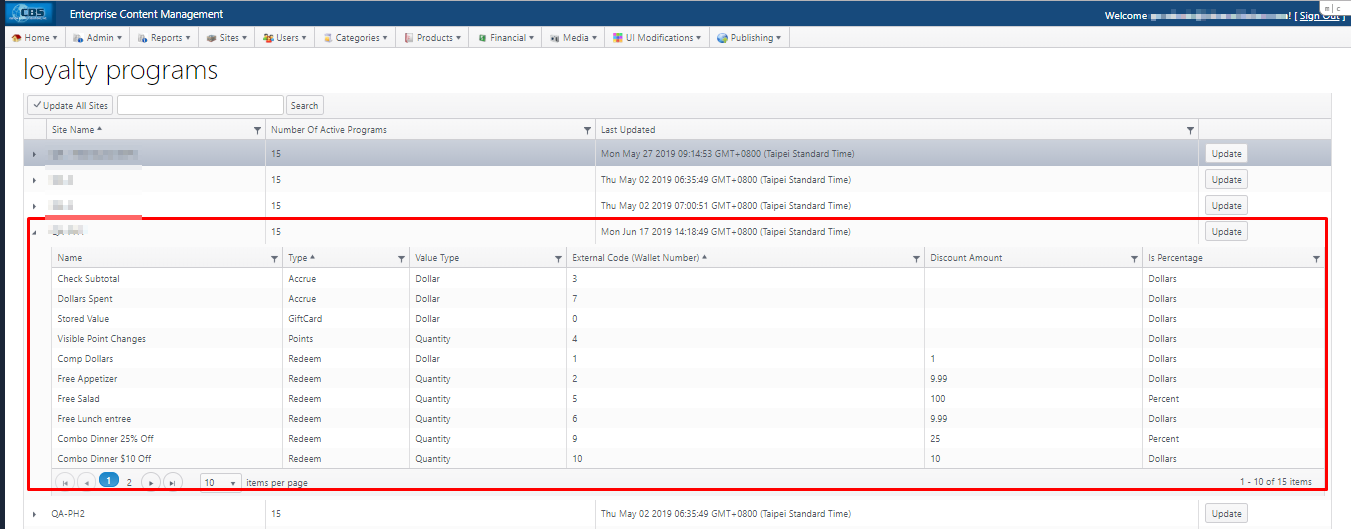
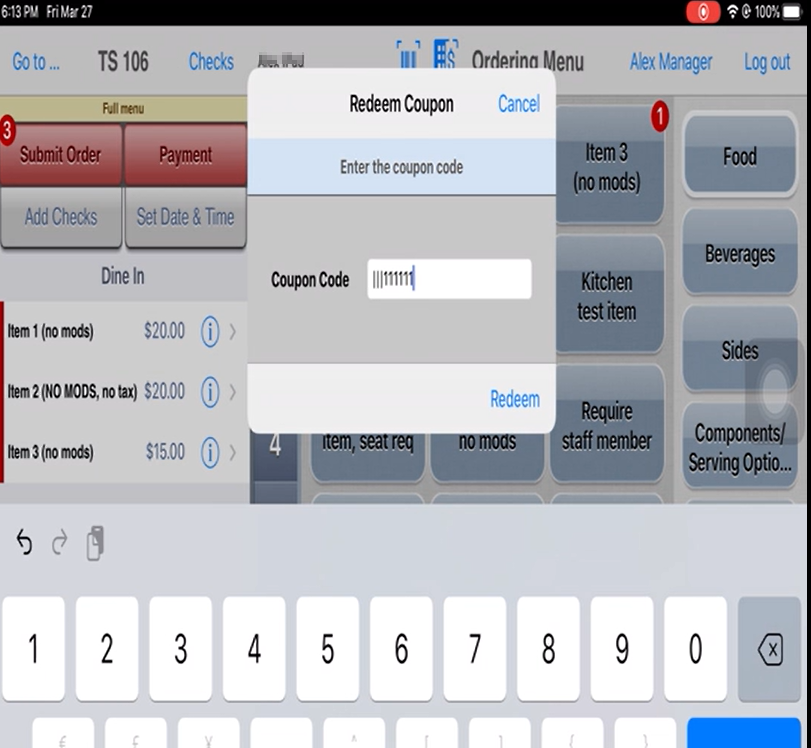
Also: | NorthStar Offer Provider Service NorthStar now provides offer services for clients with an offer program. Client coupons can be validated, redeemed and usage tracked and reported for optimum coupon management. Clients can create batches of offers with start and end dates for each offer and a total number of offers available to be used. After batches are uploaded, clients can make changes to individual coupon codes (e.g., changing dates or quantities available) on the Coupon Offers page. | Account feature toggle required* Allow user to leverage NorthStar coupon services Configure NorthStar as the Offer Provider: Path: Edit a site > Integrations > Offer Provider
| Two menu options added to the Financial menu:
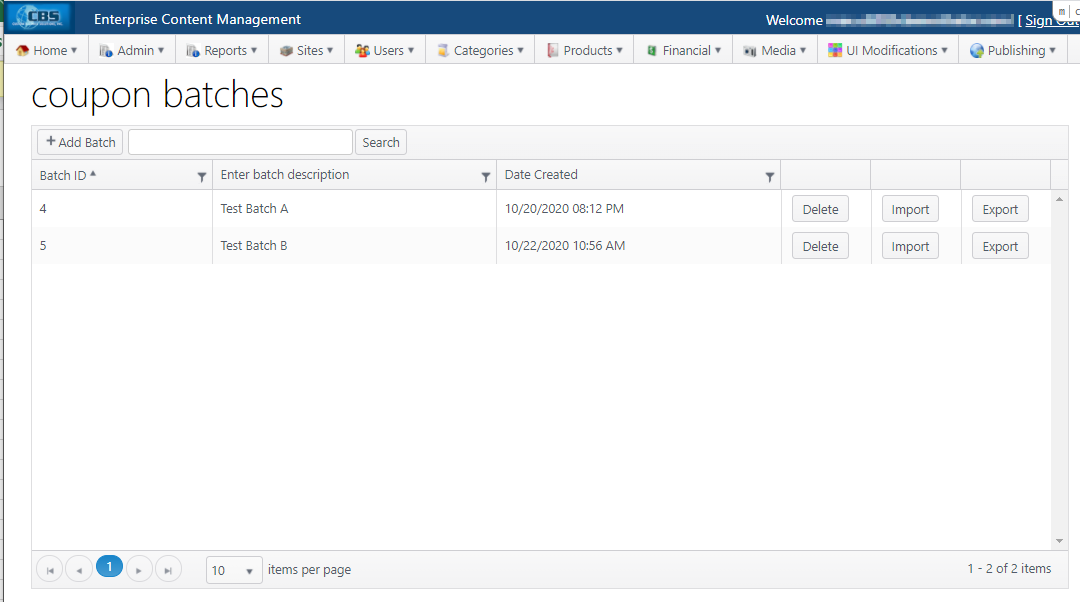
Path: Financial > Coupon Batches
Sample file: Note: The Adjustment Reason ID is created automatically when creating an adjustment reason. It is not shown on the UI. The Adjustment Reason ID can be retrieved through the ECM API. (Select Adjustment Reason in grid, tap F12 to go into developer mode, "find a UI element" and look for offer name. data-uid will have the ID.)
|
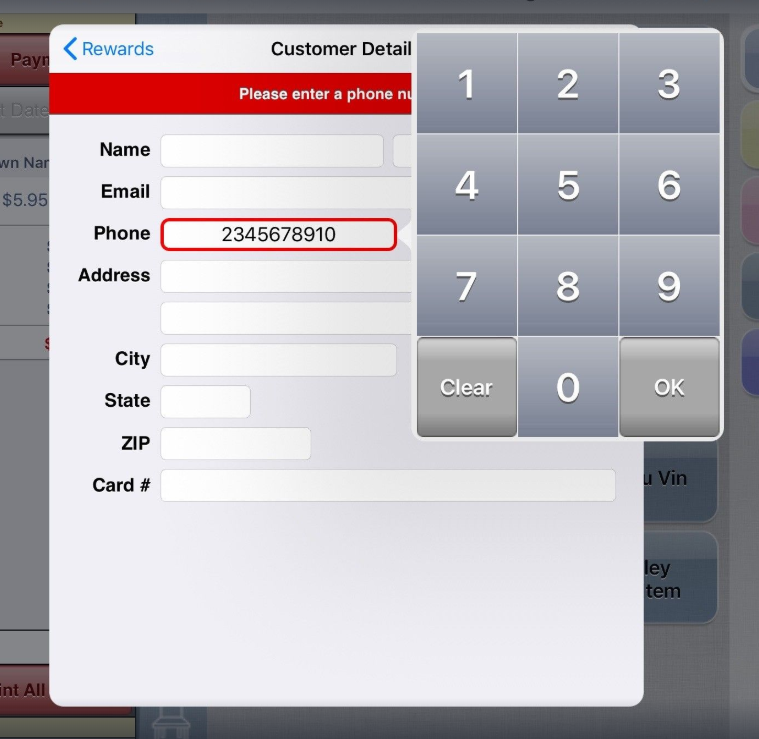
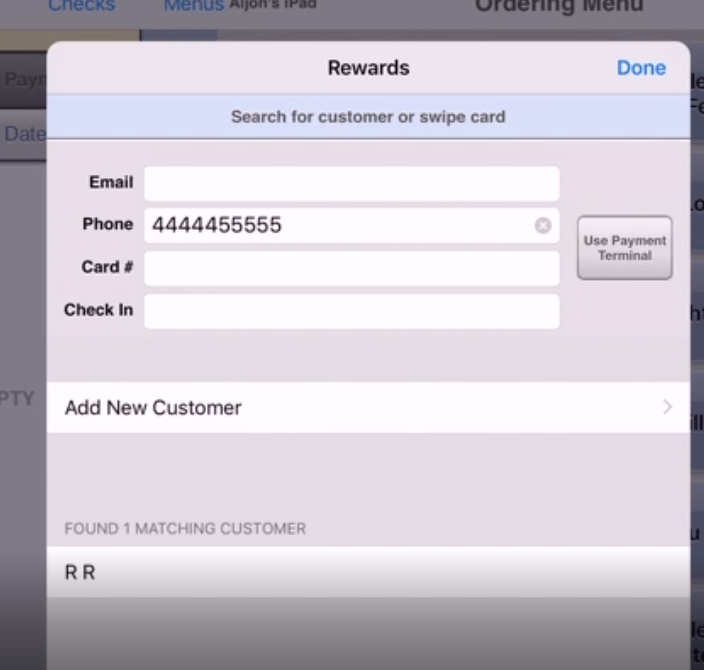
| OE-12424 | Loyalty: Create new account with phone number only With this improvement, a Paytronix loyalty account can be created with a phone number only. | Account feature toggle required* Paytronix loyalty using phone number only | Create loyalty account:
|
NorthStar PayThese are the Order Entry functions related to the NS Pay app. (The NS Pay app is documented separately.) See NorthStar Pay Setup for setup instructions. | |||
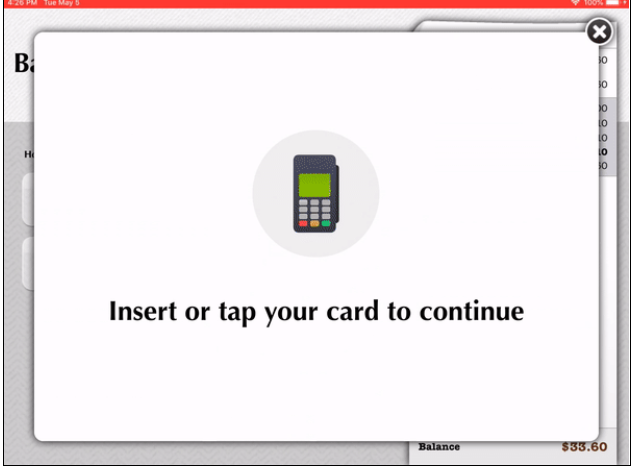
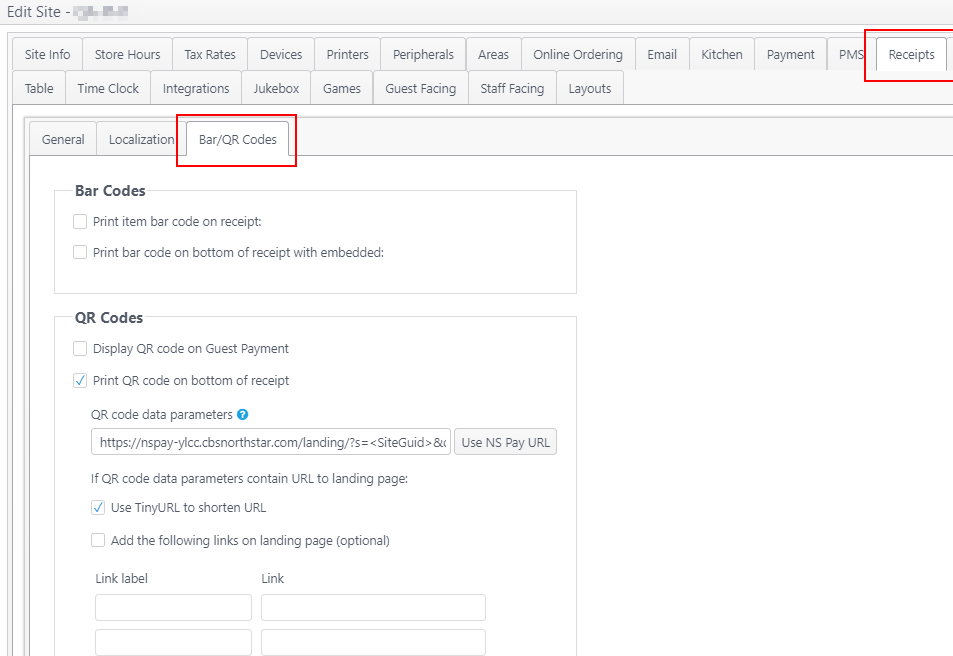
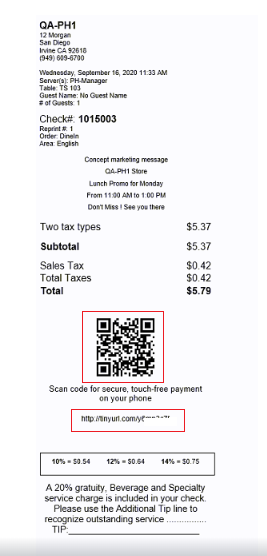
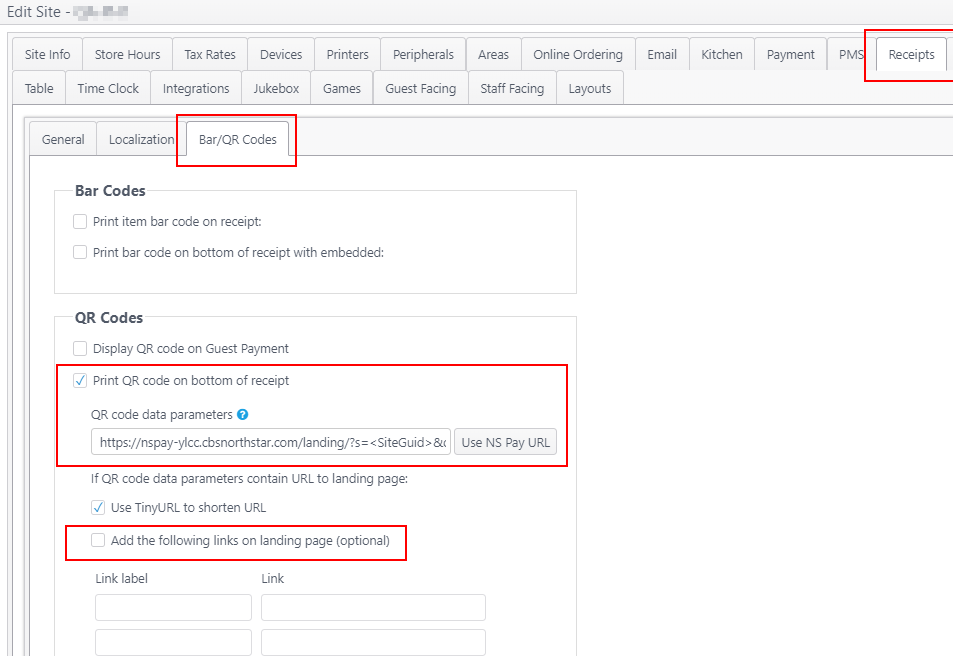
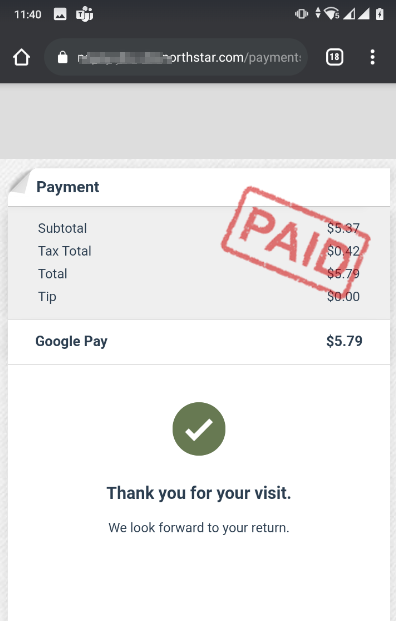
| OE-14549 | Receipts: Generate QR code for NorthStar Pay app link and print on guest receipt This feature provides the site configuration settings for NorthStar Pay, which allows guests to pay their check from their mobile device. (Contactless payment.) When the site is configured for NS Pay, a QR code and URL are printed on the receipt. Guests can scan the code or enter the URL manually to pay from their personal device. | Account feature toggle required* 4.8 Allow NorthStar Pay Path: Edit a site > Receipts > Bar/QR Codes When the account feature toggle is enabled, the NS Pay settings are shown. To print a QR code for NS Pay on the receipt:
|
|
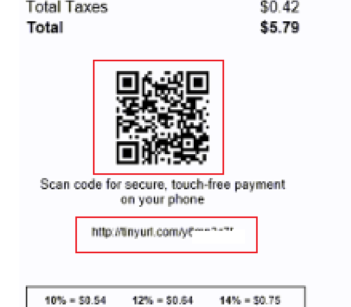
| OE-14815 | NS Pay: Do not print QR code linked to NS Pay on receipt when check is fully paid After a check has been paid in full through NS Pay, any receipt printed afterward will not show the QR code or NS Pay text. | Path: Edit a site > Receipts > Bar/QA Codes To generate a QR code for NS Pay, settings are configured as follows:
|
|
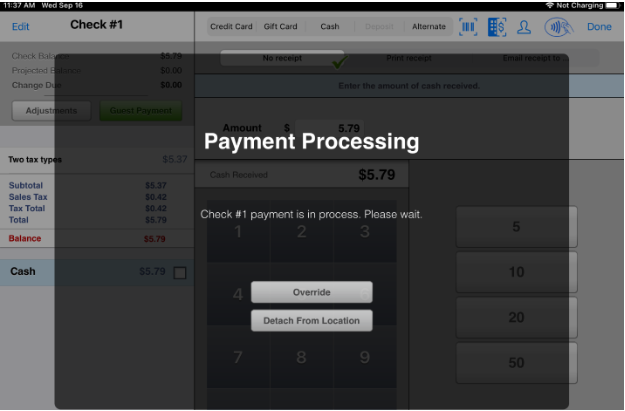
| OE-14803 | NS Pay: Lock location when check is locked by NS Pay; allow manager to release check lock When the guest accesses NS Pay to complete their payment, the Order Entry app locks the table location to prevent any actions on it (additions, adjustments, etc.) during payment processing. | Site is configured to use NS Pay. (Path: Edit a site > Receipts > Bar/QR Codes) |
|
NS Online Ordering | |||
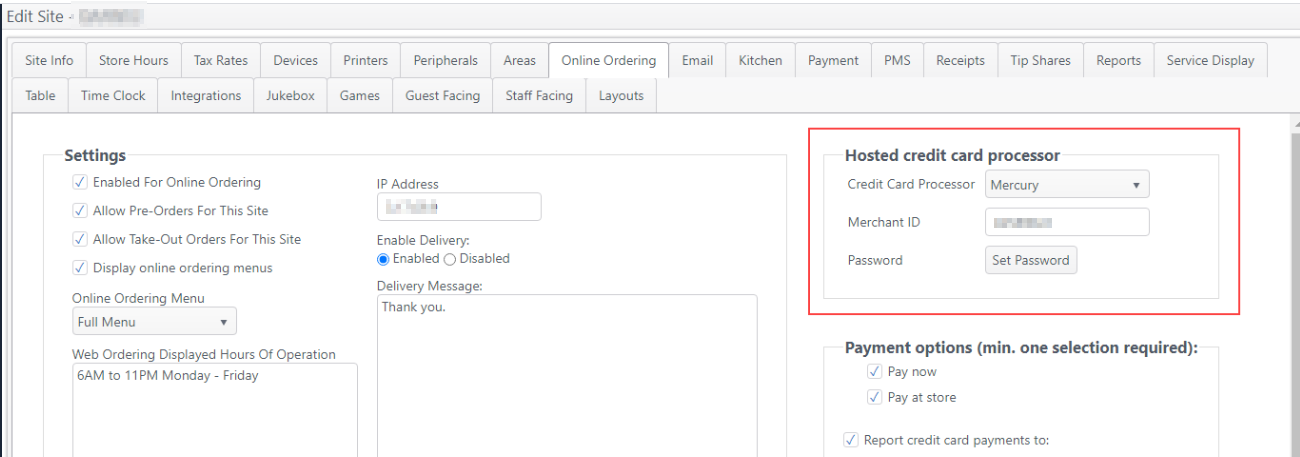
| OE-14279 | Improvement allows Worldpay to be set as the hosted credit card processor for online ordering | Path: Edit a site > Online Ordering
|
|
Pay RatesFor documentation, go to: Schedule New Pay Rate | |||
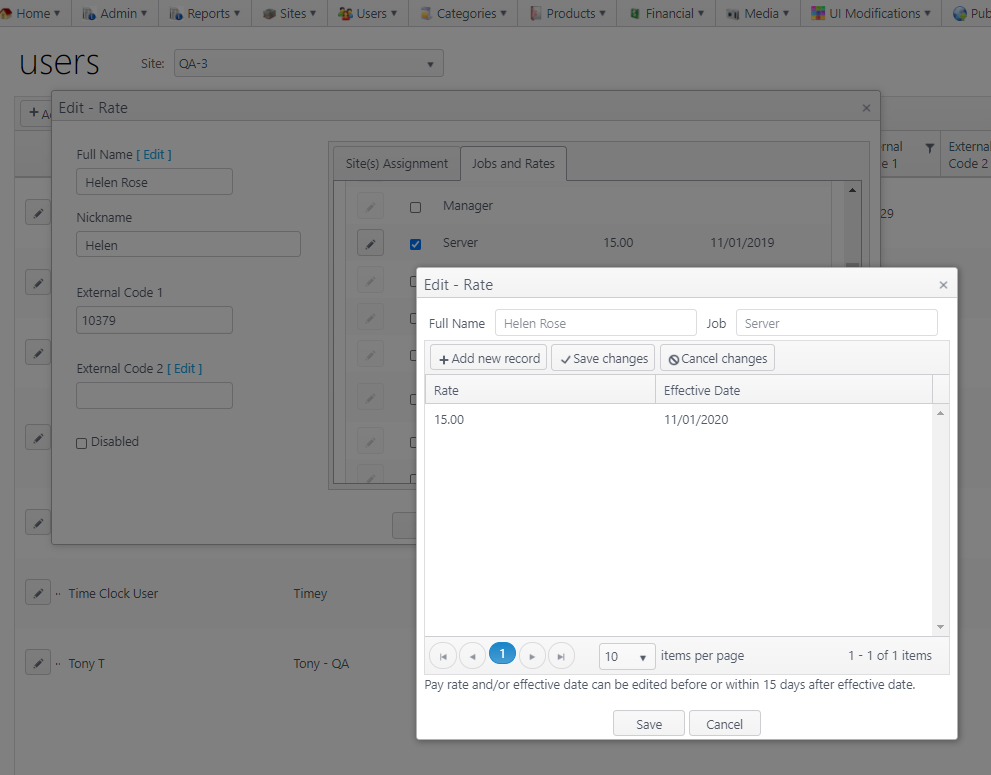
Related: | User Pay Rate: Set effective date for pay rate change Admins can schedule a pay rate change to take effect on an effective date that is equal to or greater than the current date. | Account feature toggle required* Schedule Jobs and Rates Path: Users > edit a user > Jobs and Rates tab
Note: Pay rate and/or effective date can be edited before the effective date or within 15 days after the effective date.
| Reporting When new pay rate takes effect, it will be reflected on the following reports:
|
Payment Processing | |||
| OE-14528 | Gift Cards: Transmit entire check number to Slipstream Improvement to send entire check number (rather than the last 6 digits) to Slipstream for auditing purposes | N/A | N/A |
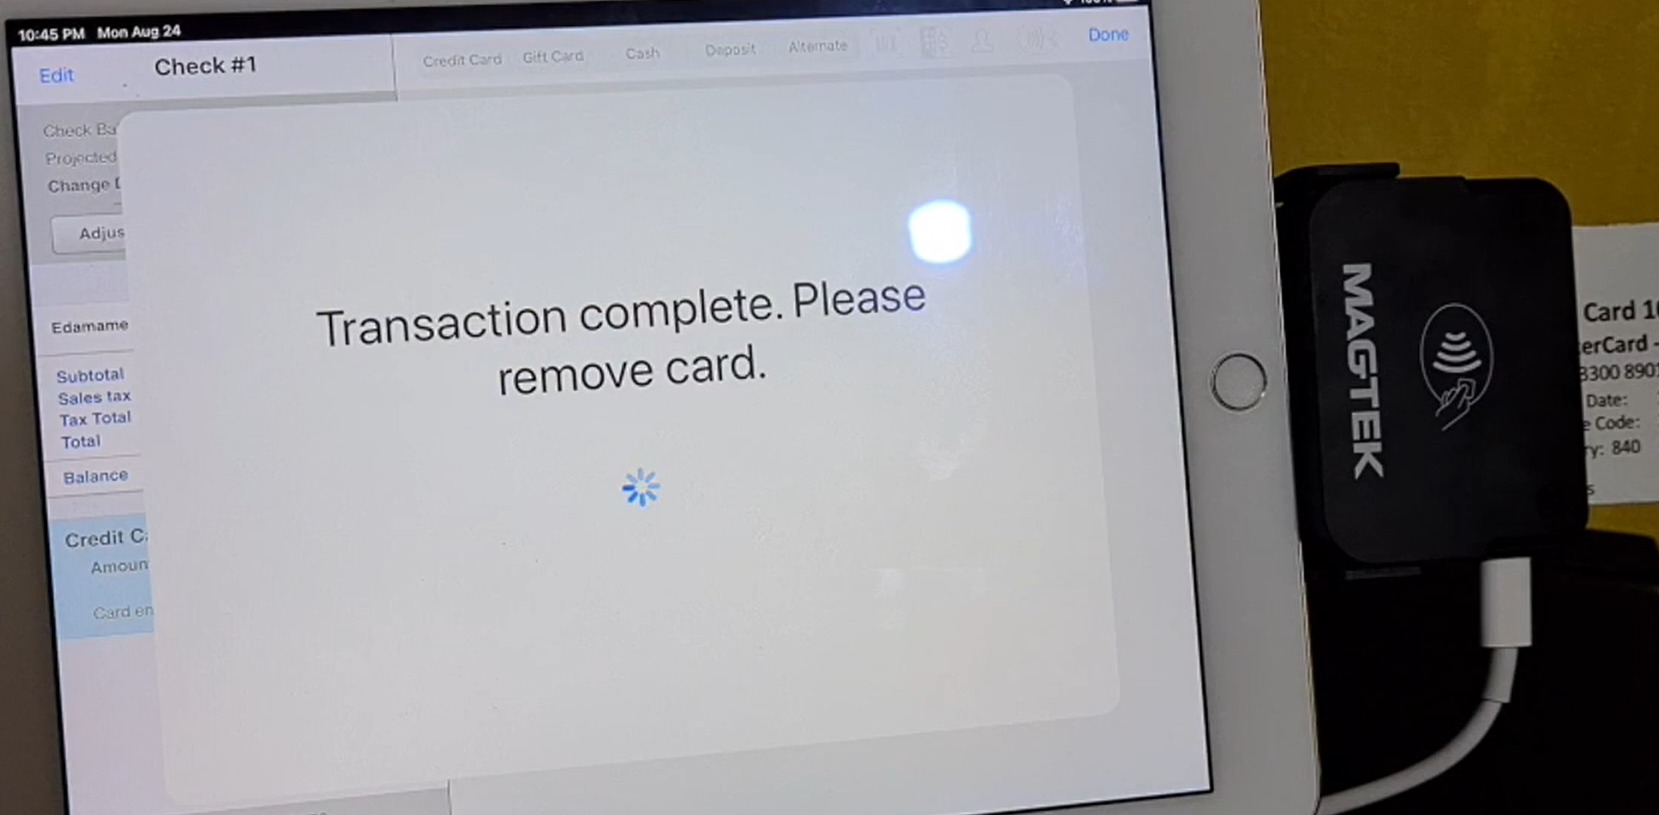
| OE-13596 | Gift Cards: Process gift cards swiped on eDynamo card reader This technical improvement allows gift cards can be swiped on an eDynamo card reader for payment | N/A | N/A |
| OE-12930 | Payment processing: Add ability to process EMV and swipe transactions via MPPG to Heartland This technical improvement allows EMV and swipe transactions to be processed via MPPG to Heartland | N/A | N/A |
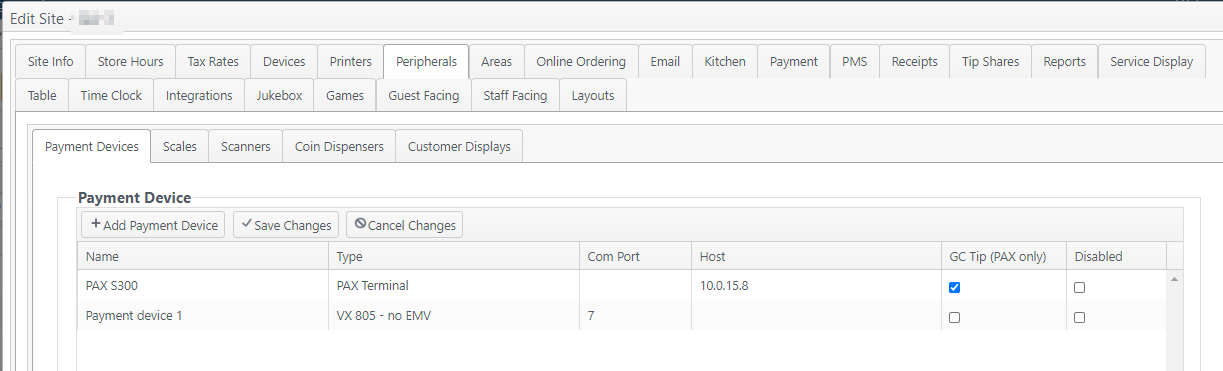
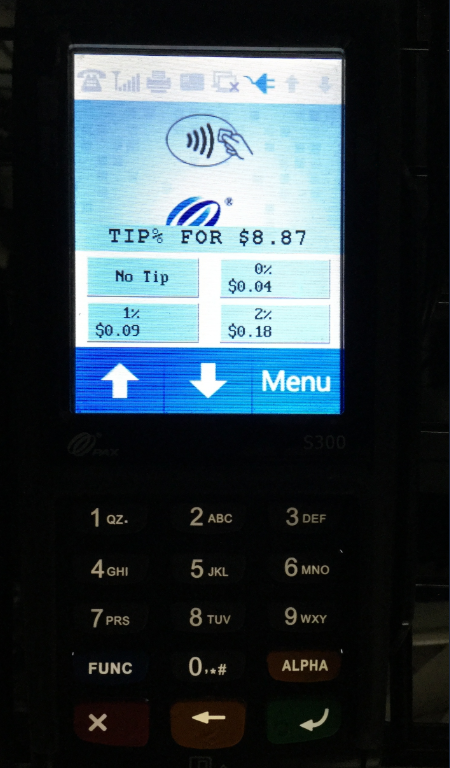
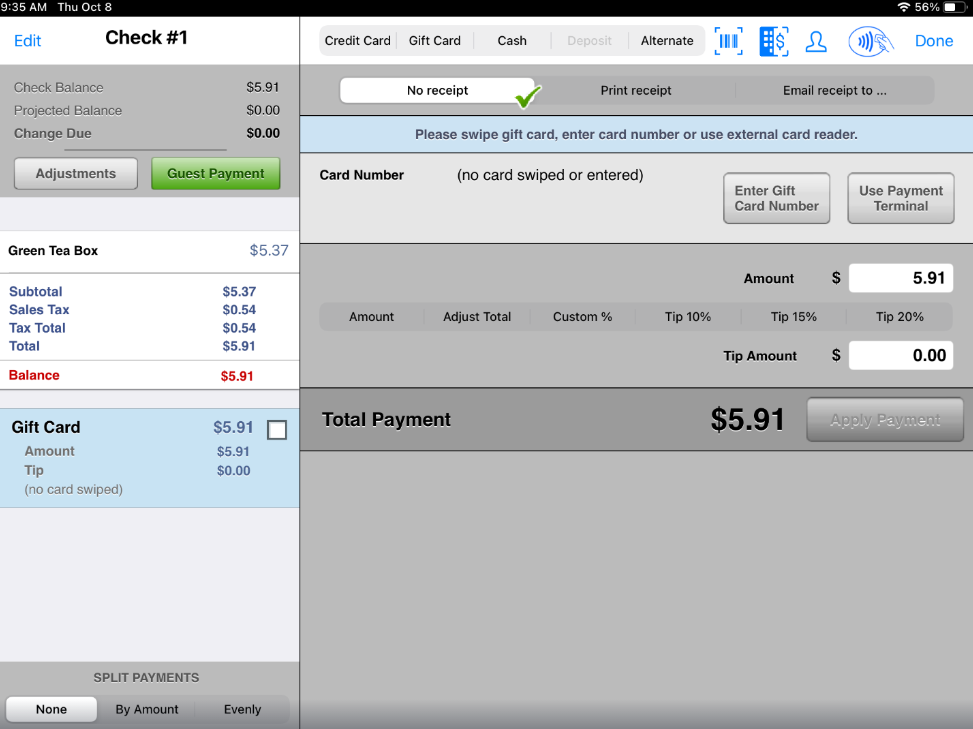
| OE-12657 | Gift card payment: Prompt for tip amount on PAX device With this improvement, the PAX device will prompt customers for tip from the device when paying with a gift card. The tip amount is sent to the app and applied to the payment. | Account feature toggle required* 4.8 GC tip on PAX device Path: Edit a site > Peripherals > Payment Devices
|
|
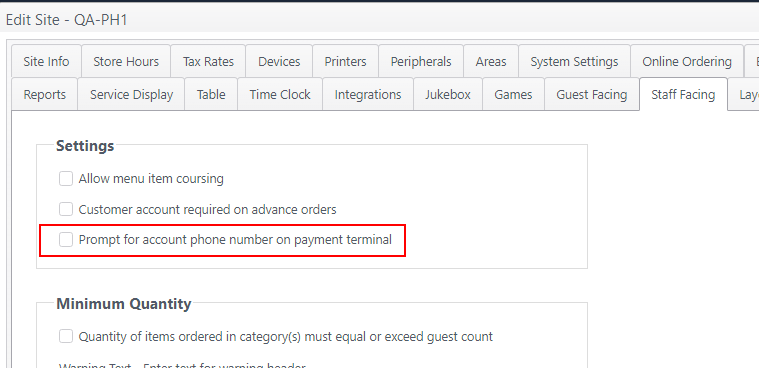
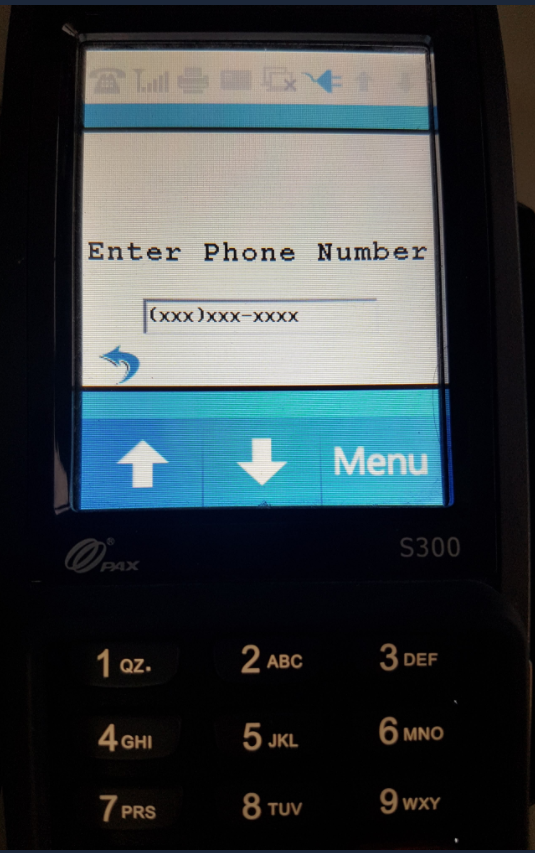
| OE-12542 | Member Account: Prompt for entry of member phone number on payment terminal Instead of the server asking for the guest's loyalty account phone number to attach their account to the check, this setting allows the guest to enter their phone directly on the payment terminal instead, reducing error and improving service. | Account feature toggle required* Prompt for phone number on payment terminal Path: Edit a site > Staff Facing
|
|
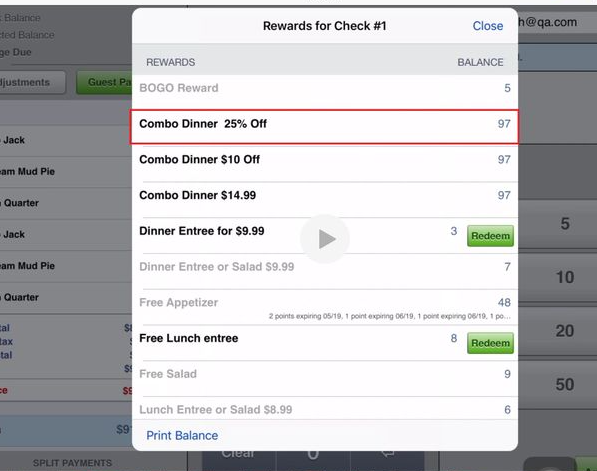
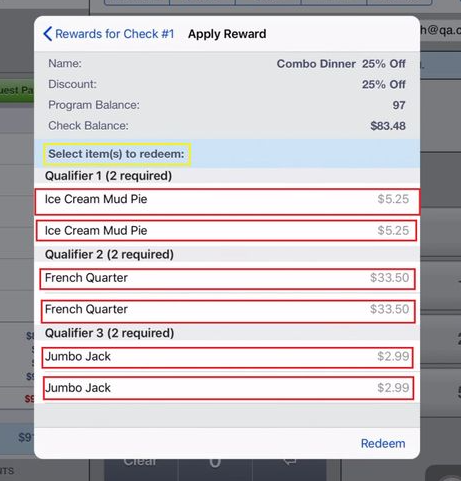
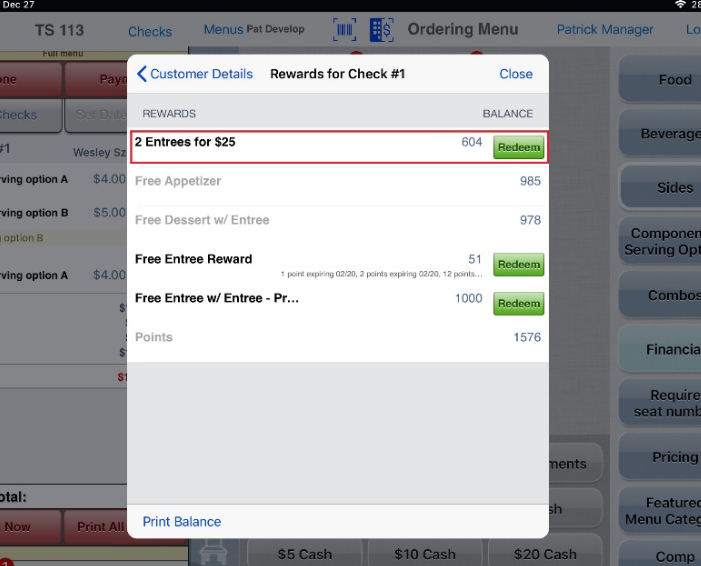
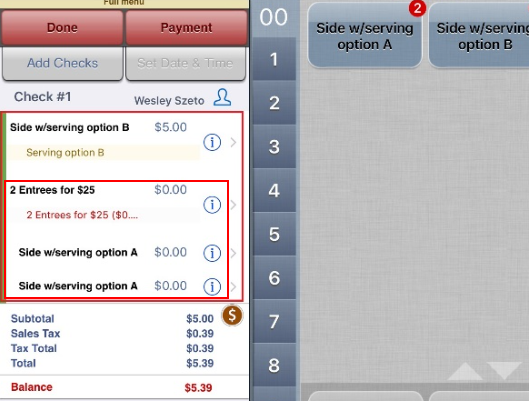
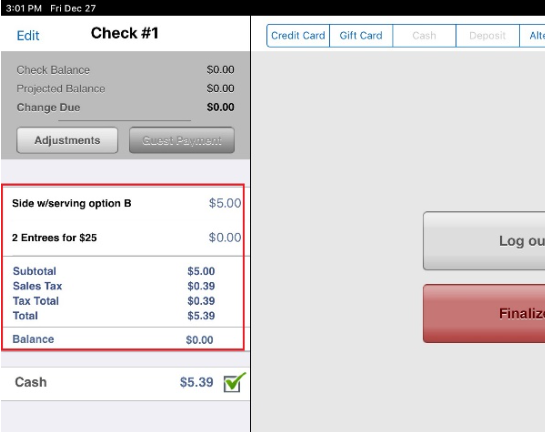
| OE-12530 | Rewards (Paytronix): Allow single reward to be applied to entire combo item With this improvement, rewards functionality is expanded to now apply to combo menu items that meet the reward criteria. | No ECM settings required.
| The workflow is essentially the same as for a single menu item.
|
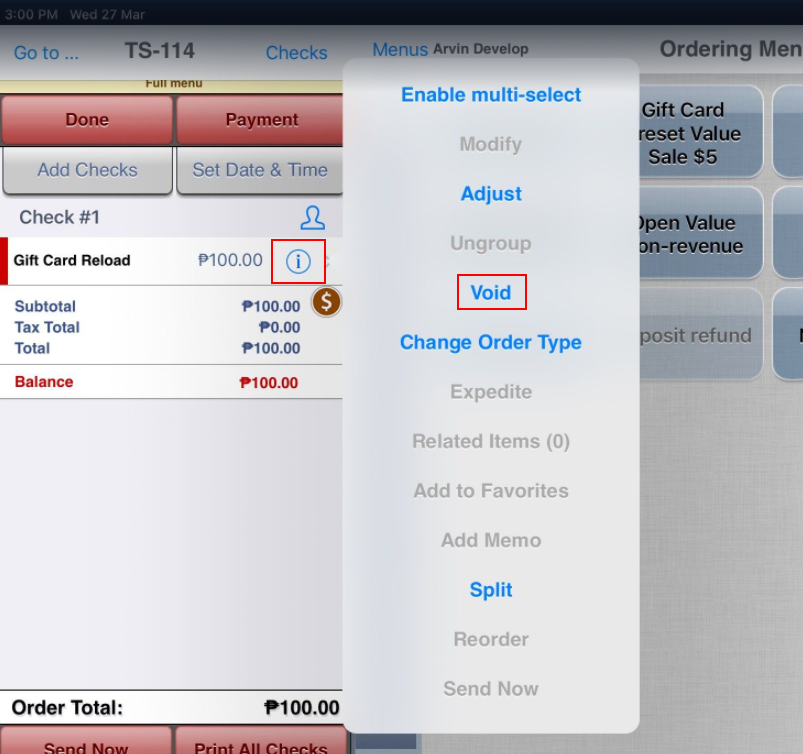
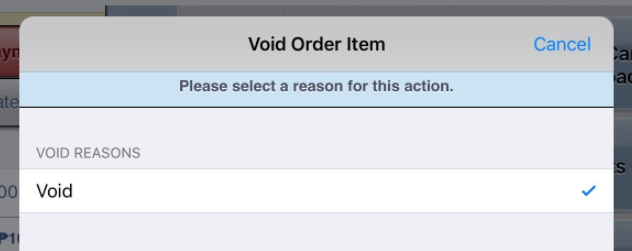
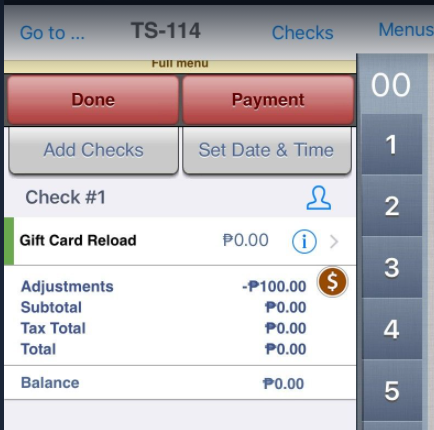
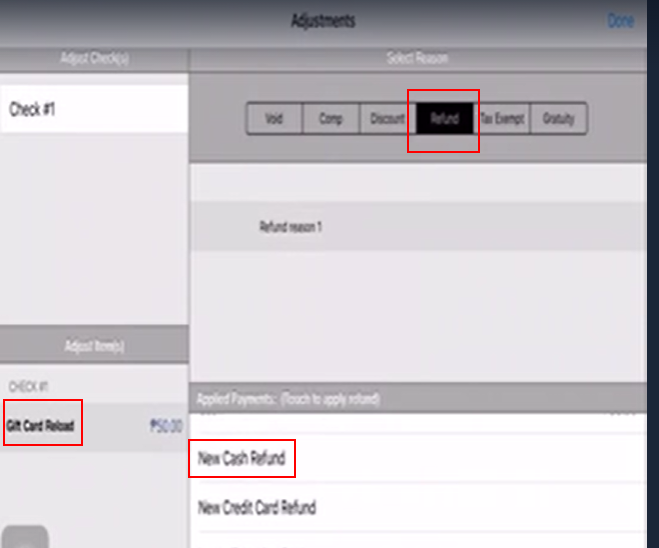
| OE-12477 | Gift Cards: Allow gift card load to be voided/refunded without swiping card again Allows the transaction to be voided or refunded when a gift card has funds added to it (load). Per void/refund rules, this action has to be done on the same day of the transaction. | N/A | Void gift card load
Refund gift card load
|
| OE-12270 | Payment processing: Add support for TSYS processor via MPPG This technical improvement allows transactions to be processed via MPPG to TSYS | N/A | N/A |
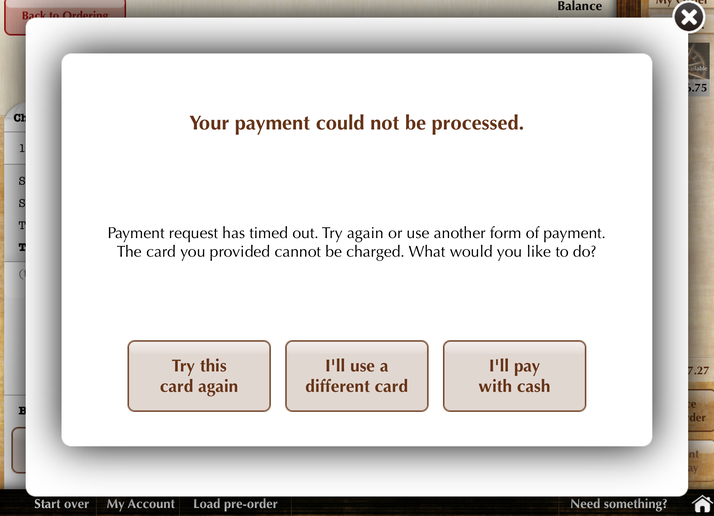
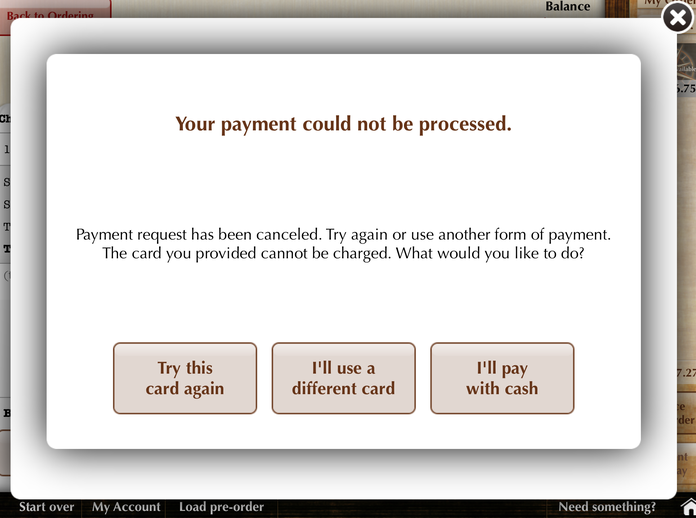
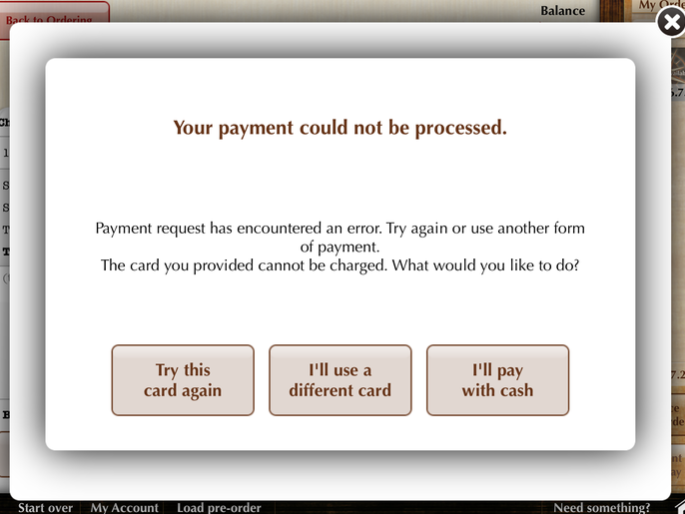
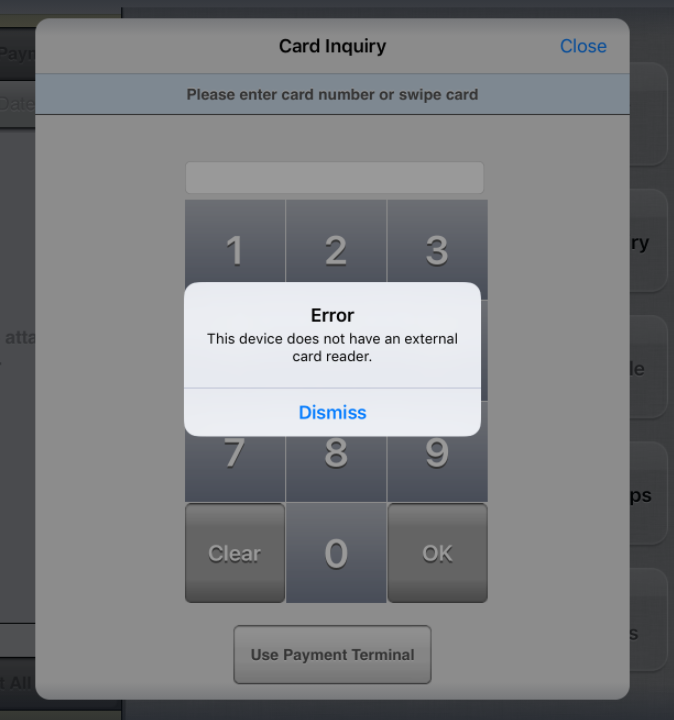
| OE-10403 | Guest UI: Display payment error messages on guest UI In the guest-facing UI, when a payment request sent to the PAX payment terminal encounters an error, the type of error and instructional text are provided to the guest. | N/A |
Connection expired Payment aborted Unable to connect to the external card reader |
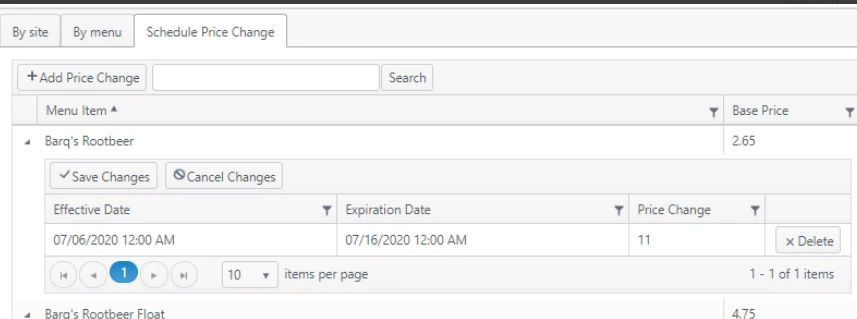
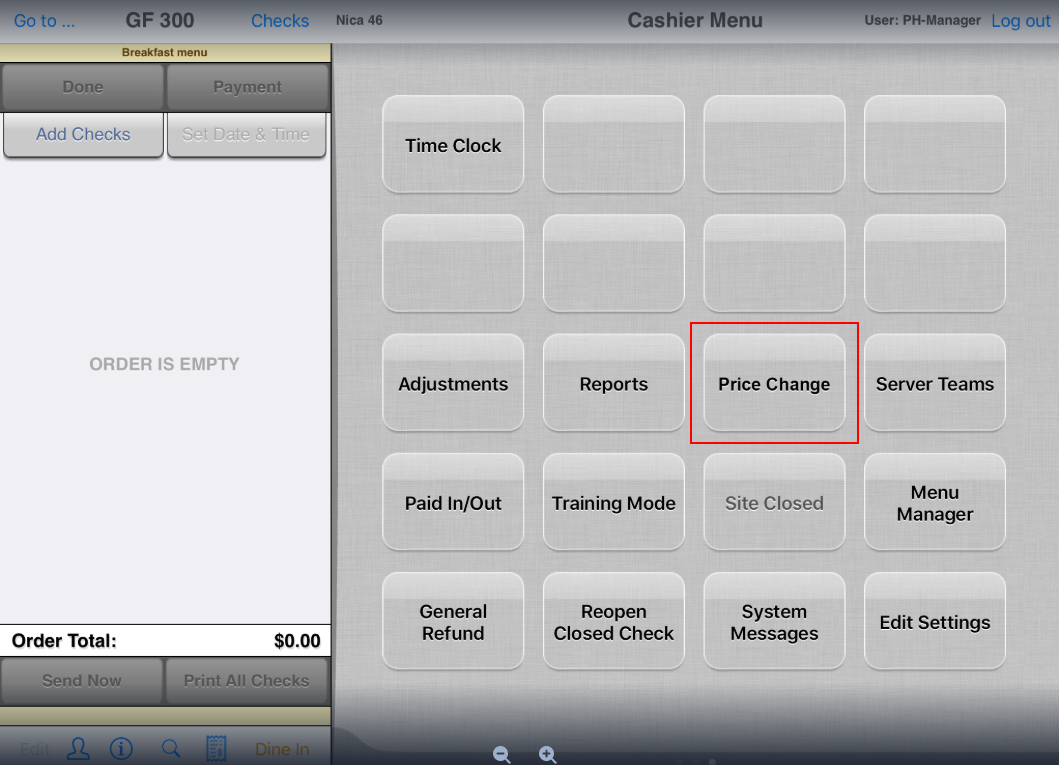
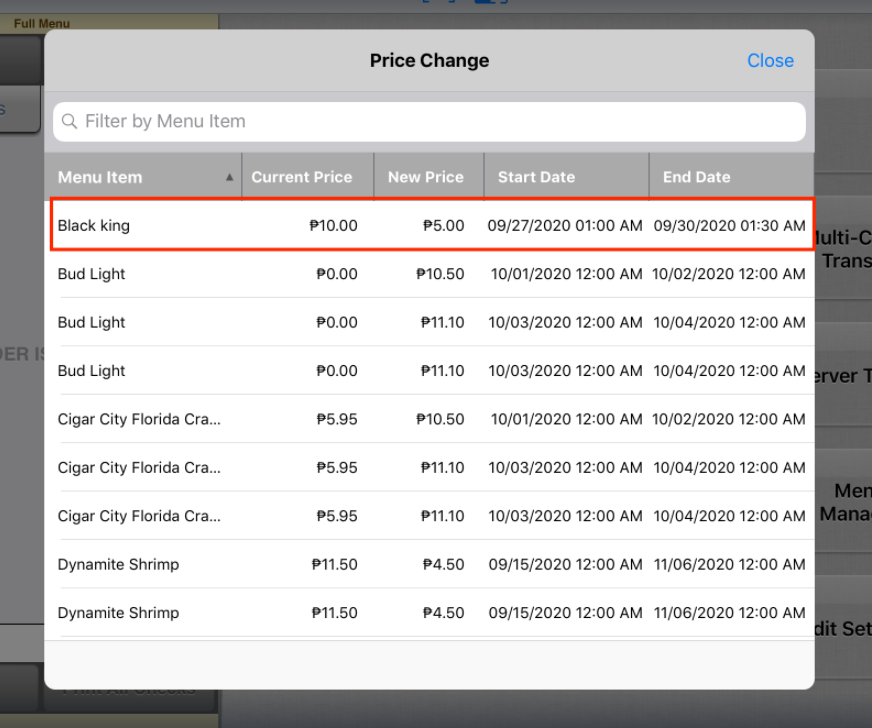
Price ChangeFor more complete information, see Menu Item Pricing - Schedule Price Change | |||
| OE-14871 | Scheduled Price Change: Add Price Change button and Price Change view on iOS app When a price change has been scheduled in ECM for one or more menu items, these scheduled price changes can be viewed from the iOS app. | The ECM configuration was included the ECM 2020-08-18 release. Account feature toggle required* 4.8 Schedule menu item price changes Path: Products > Menu Item Pricing > Schedule price change
| View scheduled price changes in the Order Entry app
|
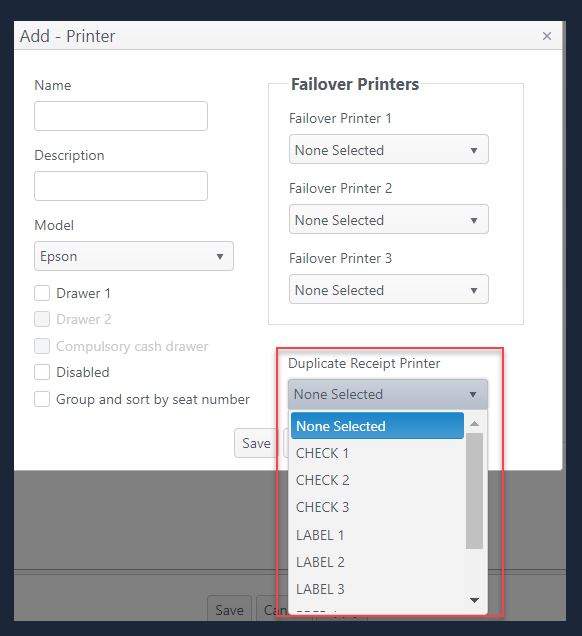
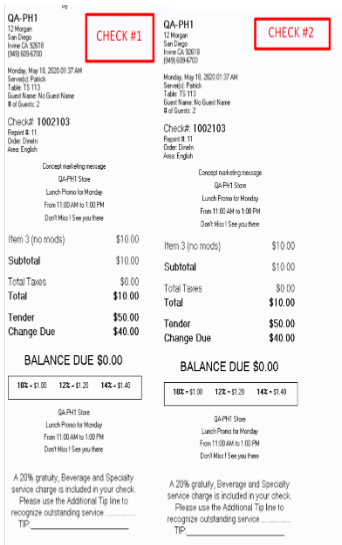
Printing/KitchenFor complete documentation, go to: Print Duplicate Receipt | |||
| OE-14068 | Printers: Print duplicate receipt at secondary printer With this improvement, a site can configure printer A to have a duplicate receipt print at secondary printer B. This second receipt can facilitate third-party delivery systems where items are picked up at more than one place in a restaurant. | Account feature toggle required* Print duplicate receipt Path: Edit a site > Printers > edit printer
| In the Order Entry app:
|
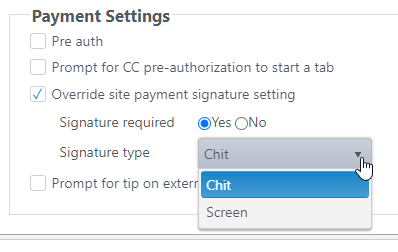
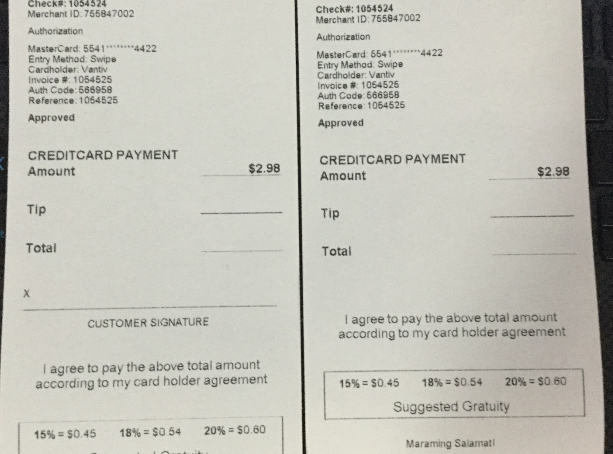
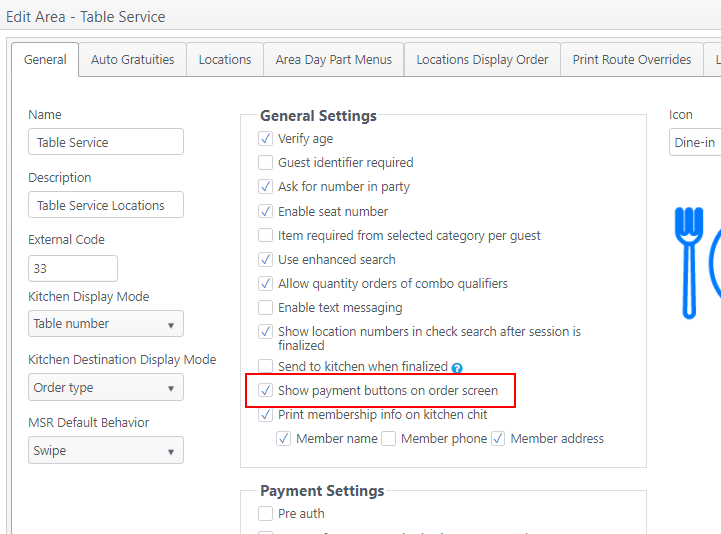
| OE-13119 | Credit card signature: Set option by area for signature; override site payment setting With this area setting, sites can choose to require or not require a signature on payment in specified areas of a site. (Staff facing mode only.) If signature is required, site can choose to require signature on chit or on screen in that area. Note: The area setting will take priority over the site setting (on site Payment tab): Signature is required
| Account feature toggle required* 4.8 Override site payment signature setting The ECM work was completed in the 2019-09-11 ECM release. Path: Edit a site > Areas > edit an area
| Area setting:
|
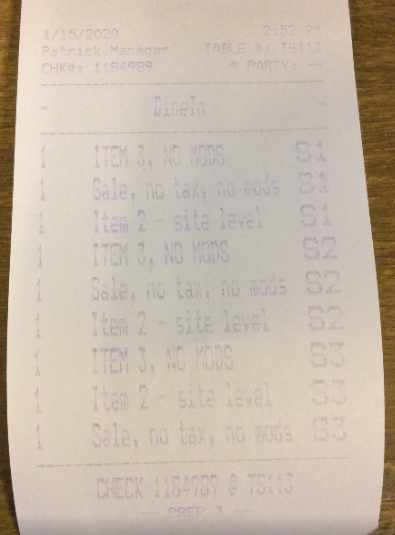
| OE-13072 | Kitchen chit: Optimize spacing to reduce length of chit Several improvements to reduce spacing on the kitchen chit and the way seat numbers are shown to reduce the length of the chit. | N/A | Sample reduced-length kitchen chit with seat numbers: |
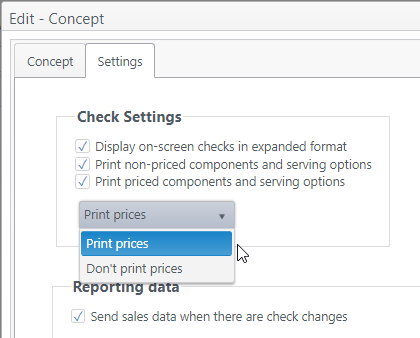
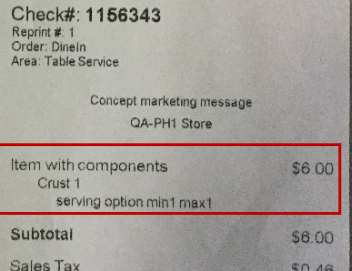
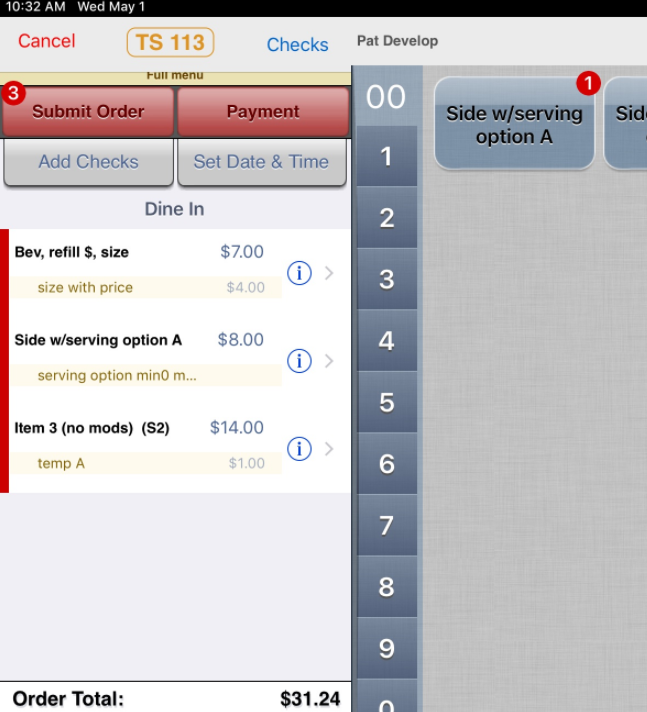
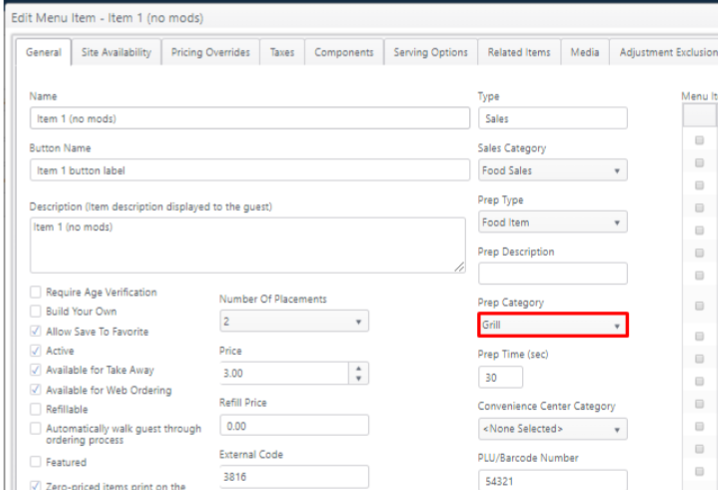
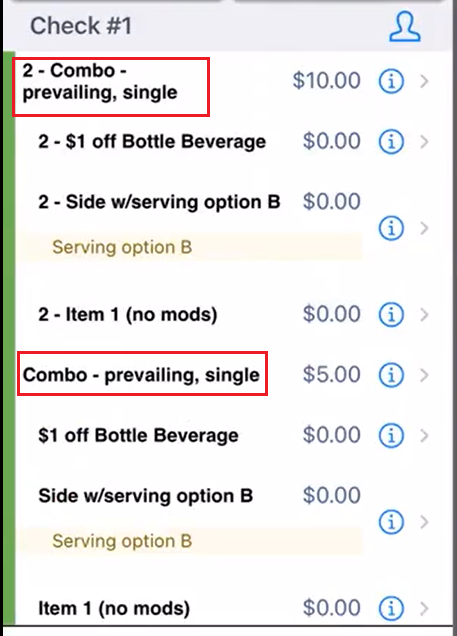
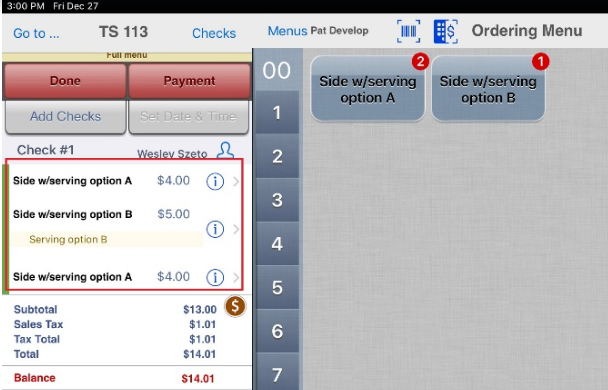
| OE-12553 | Concepts: Add options to print components and serving options on checks, with/without prices A new concept setting allows concepts to specify how components and serving options will print on checks. Variables allowed for printing components and serving options:
| Account feature toggle required* 4.8 Print priced components and serving options Path: Concept > Settings >Check Settings
| Checks will print in accordance with the settings configured for the concept. Examples:
|
Reports | |||
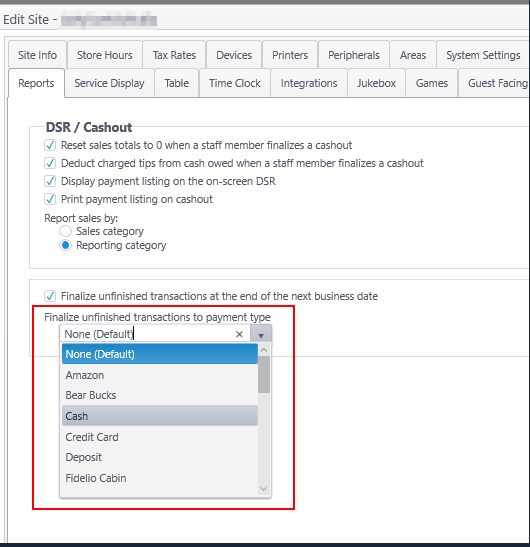
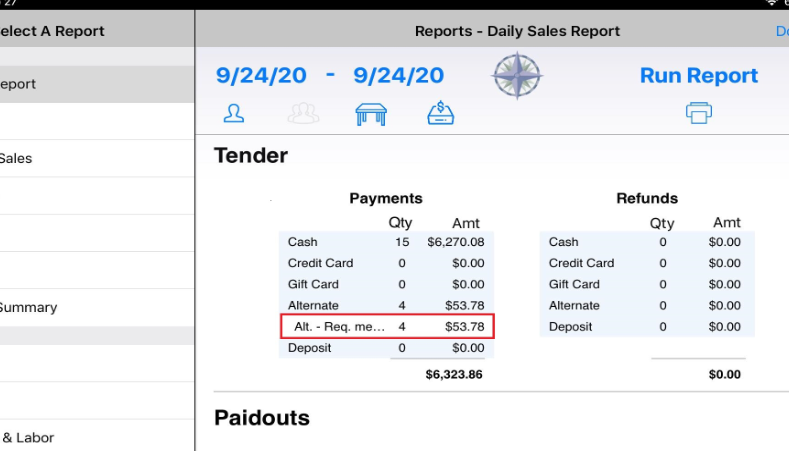
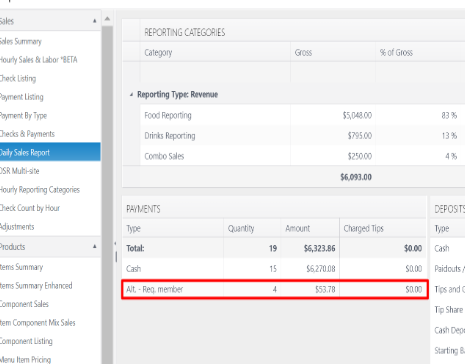
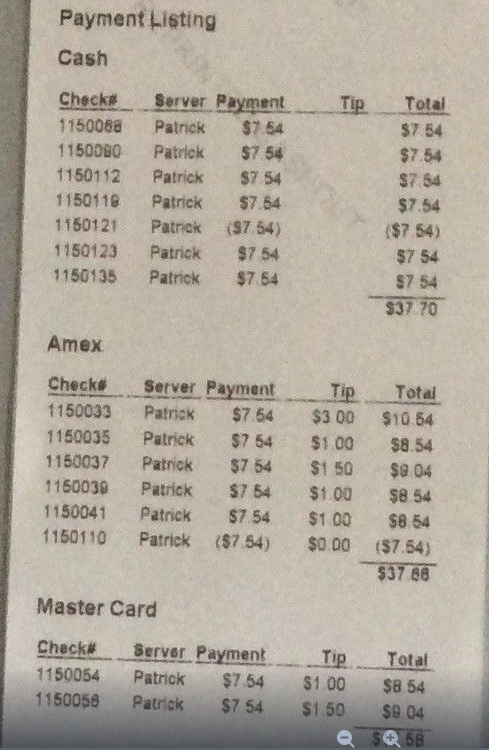
| OE-12772 | Currently, at end of day, checks that are not fully paid are closed as "unfinished transactions." | Account feature toggle required* Finalize unfinished transactions to payment type Path: Edit a site > Reports
| At the close of the business date, unfinished transactions will be closed to the specified payment type and reported on the relevant reports. App reports: Daily Sales Report, Cashout Report
ECM Reports: Payment Listing Report, Daily Sales Report
|
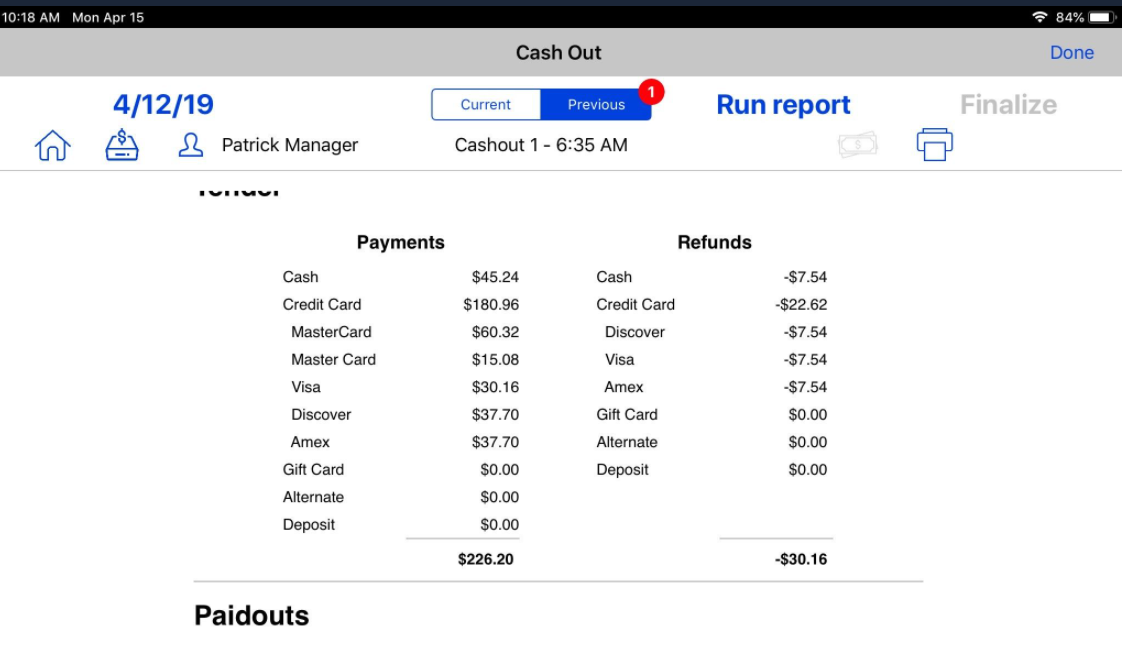
| OE-11984 | Add the following to the app and print versions of the Cashout report:
| N/A |
|
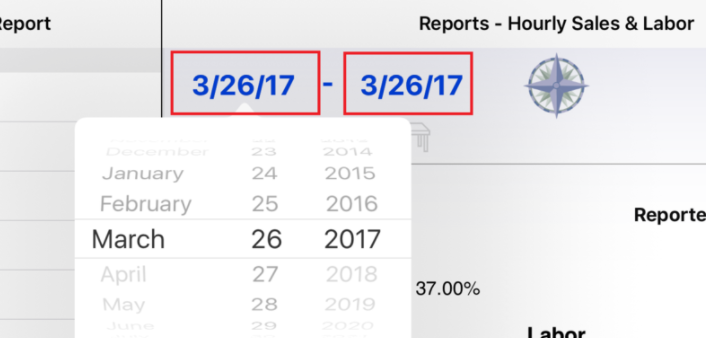
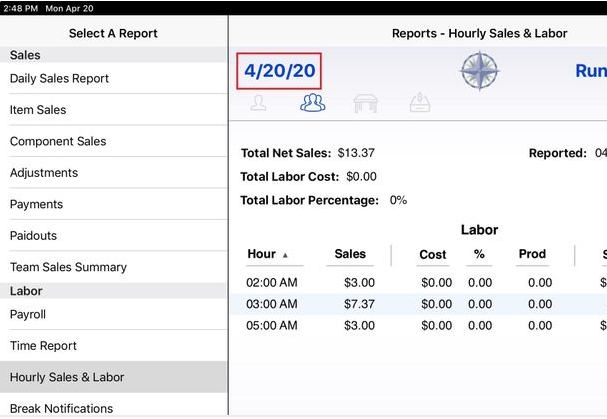
Hourly Sales and Labor Report (app) - Revise date control to single date instead of date range Improved date control to specify single date instead of date range. Hourly Sales & Labor Report: Default to current date Report default to current date. | N/A | Previous date control: Improved to single date selection: | |
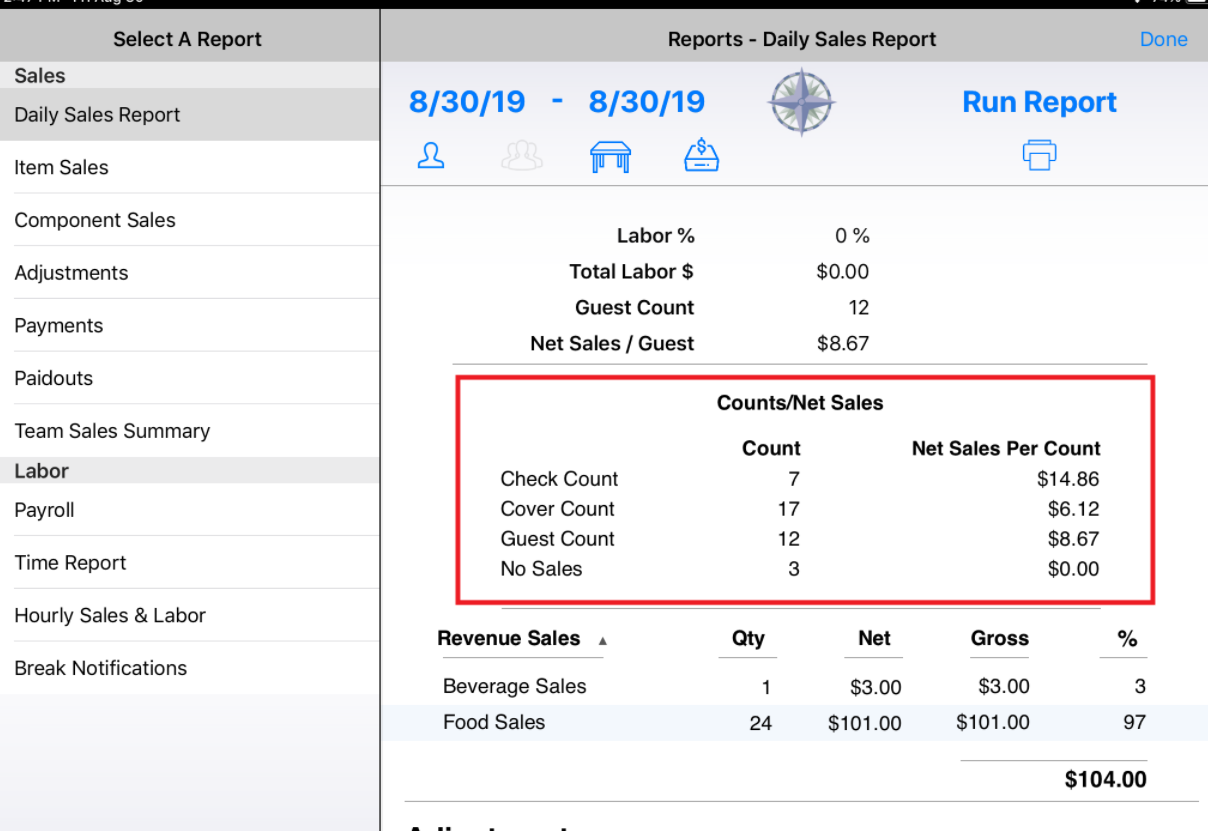
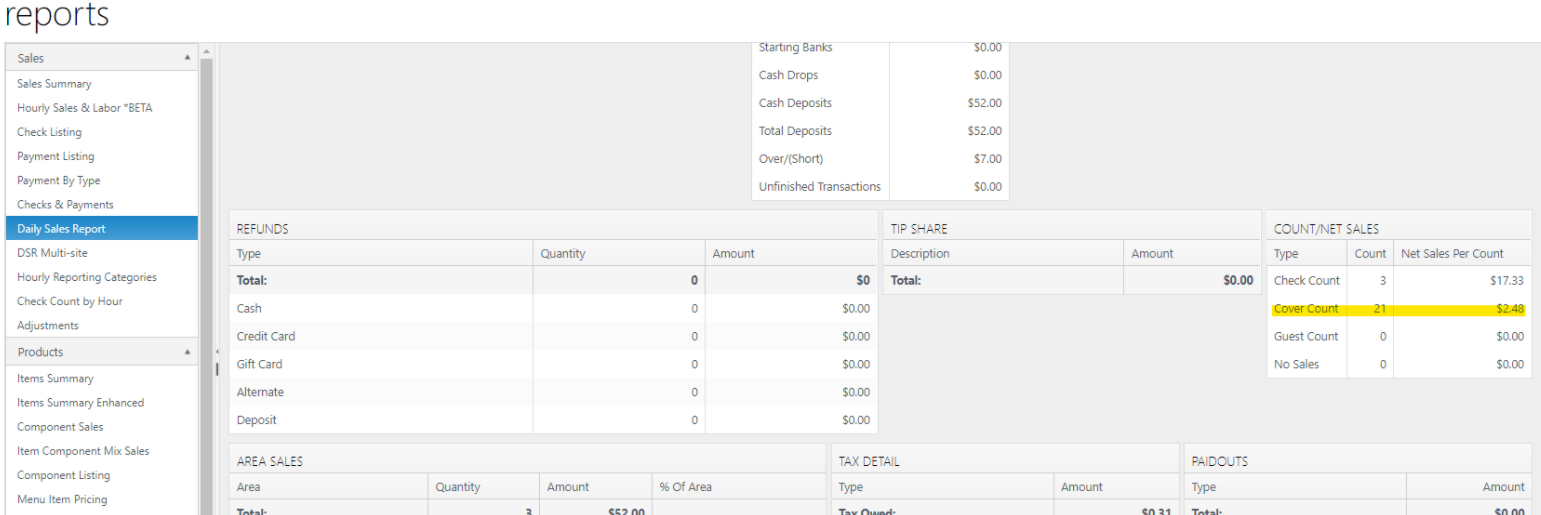
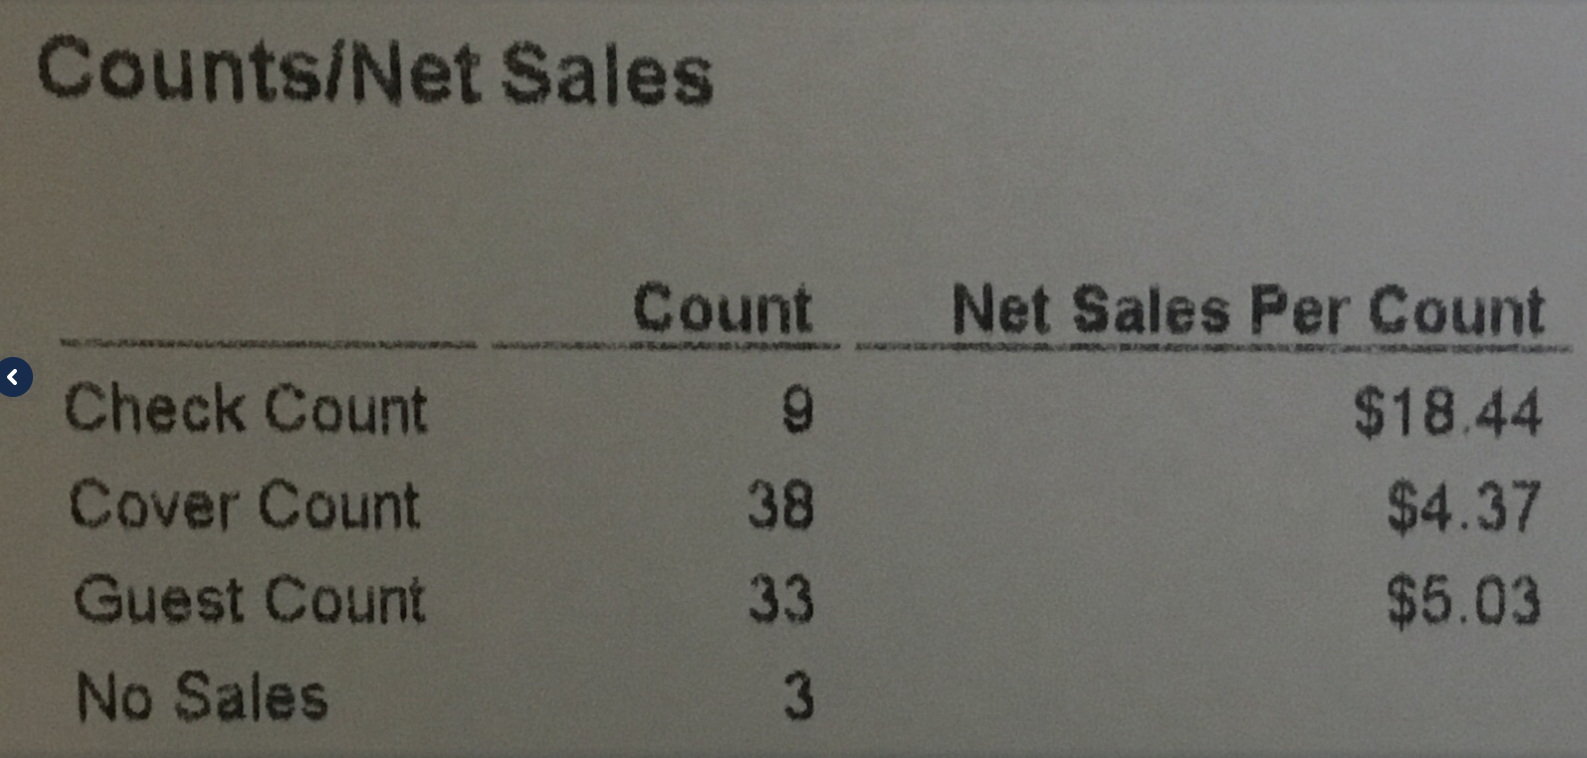
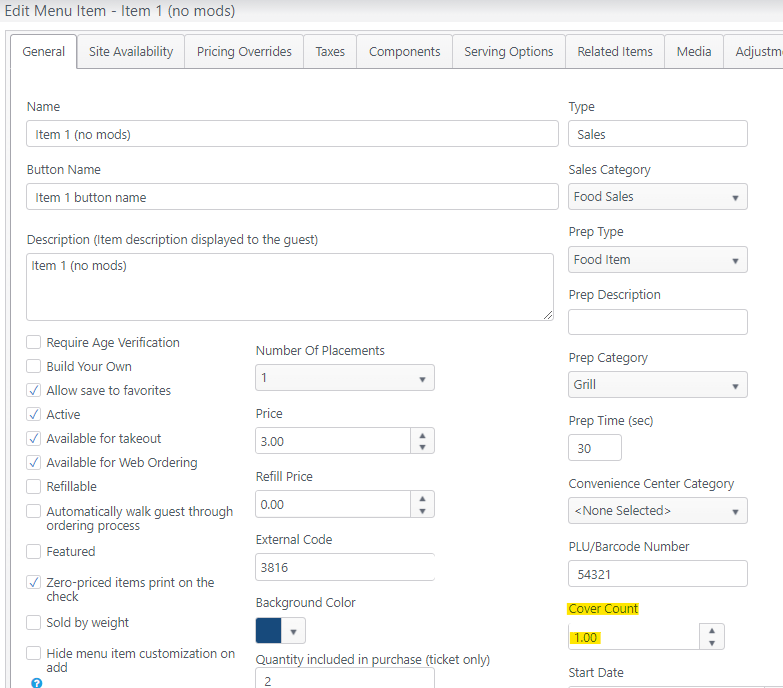
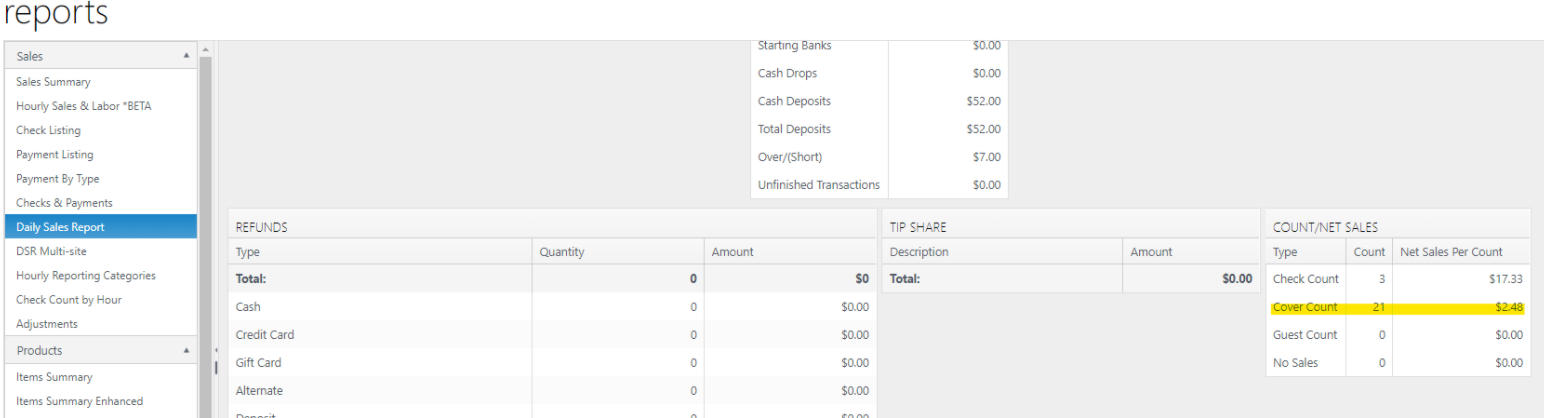
Daily Sales, Cashout reports: Include cover count and net sales per count Enhancement to Daily Sales and Cashout reports: cover counts and net sales per count are now included on the reports on the app, in ECM and on the printed report. Daily Sales Report (app): Add Counts/Net Sales information to report Cashout report: Add Counts/Net Sales information to printed cashout report | N/A | Daily Sales report on app and in ECM show cover counts and net sales per count.
| |
Staff UI Improvements | |||
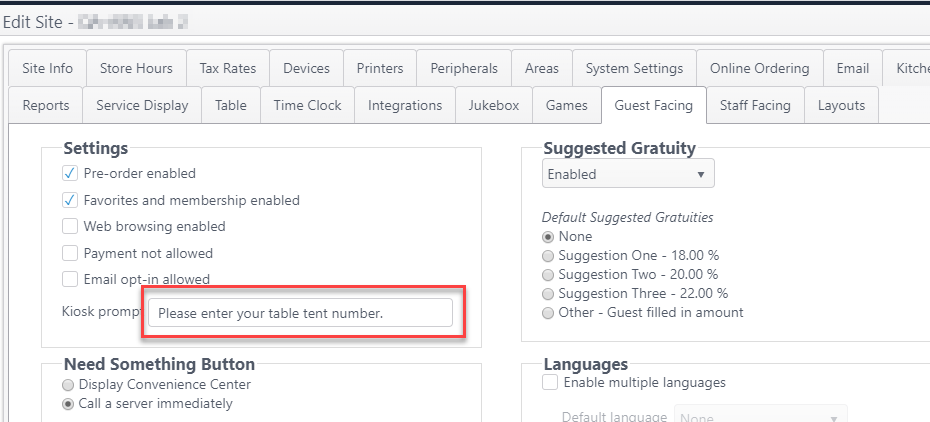
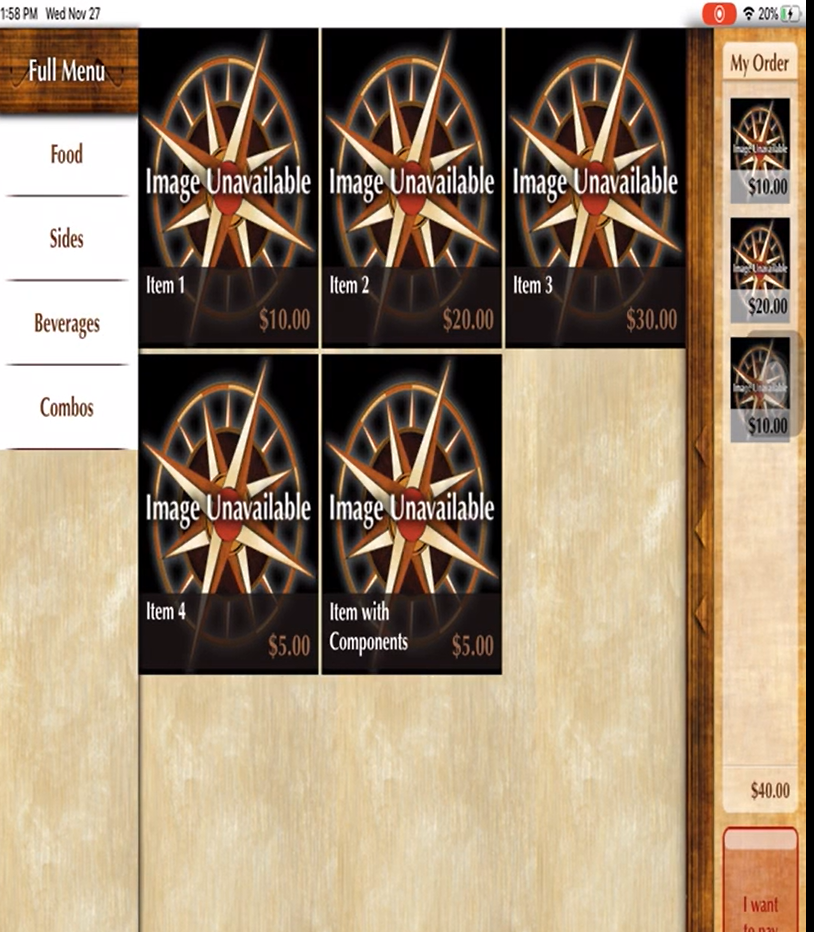
| OE-14325 | Guest Facing: Add setting to create guest identifier prompt and display in kiosk mode In guest facing mode, the kiosk prompt asks the guest to enter a guest identifier, such as a table tent number or name. | Path: Edit a site > Guest Facing
| The prompt will display on the guest facing app when the guest taps "I want to pay." The guest enters the requested information and taps Confirm.
|
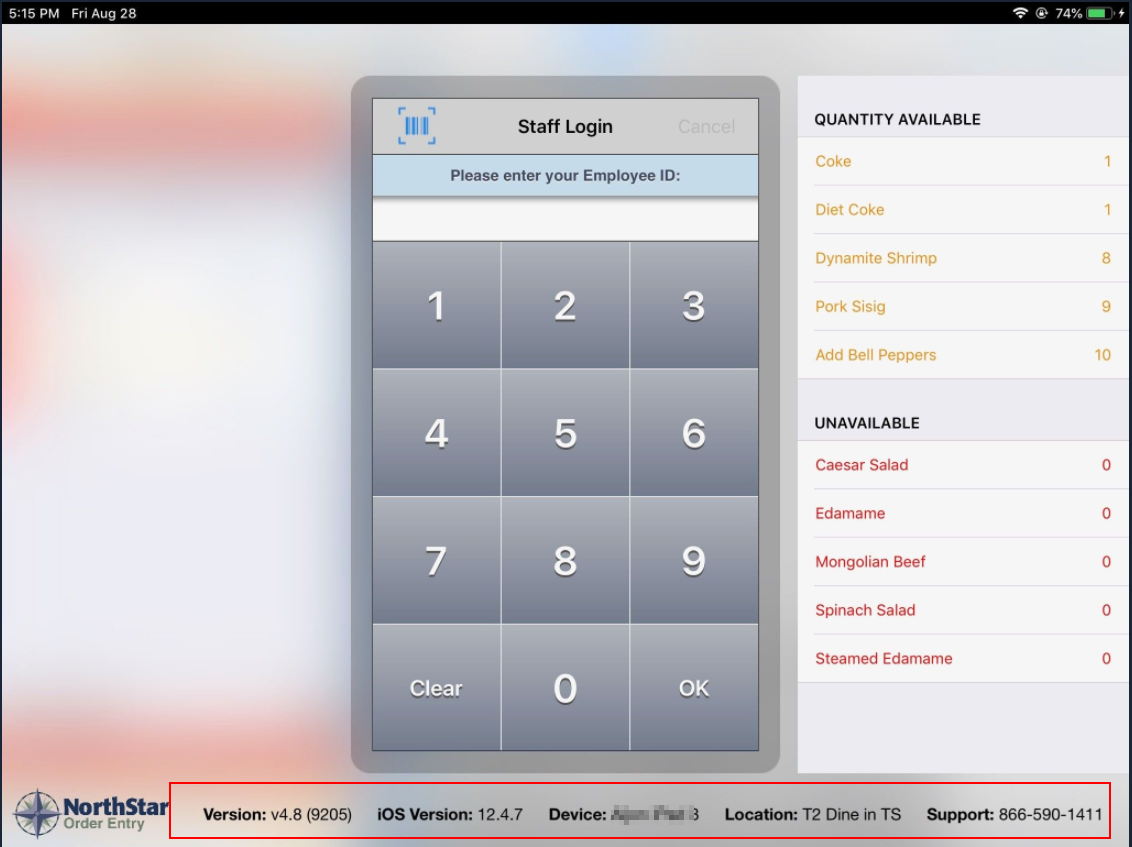
| OE-14195 | Staff Login screen: Show stock count of limited and unavailable items The staff login screen has been improved to make it more informative and useful by showing menu items with limited availability and those unavailable to be ordered. | N/A | Staff login screen shows menu items availability:
|
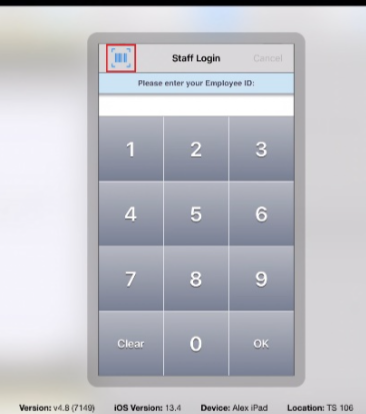
| OE-13865 | Staff Login screen: Show version, terminal and support info The staff login screen has been improved to show key information, making it more informative and making this information easy to find and use. | N/A | Information added to Staff Login screen:
|
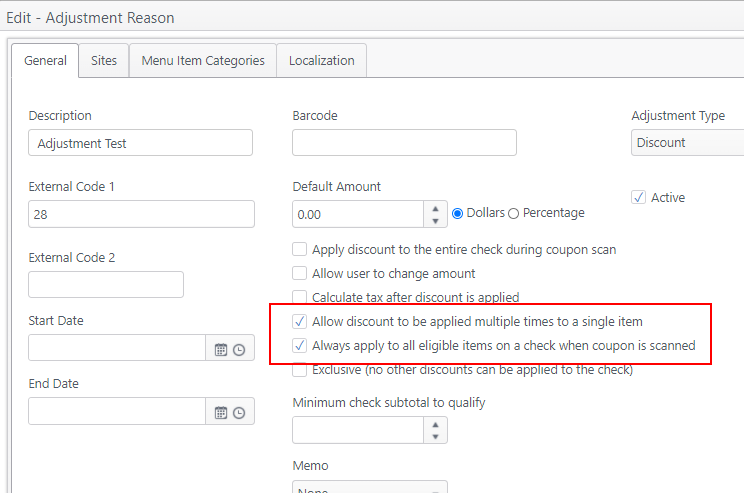
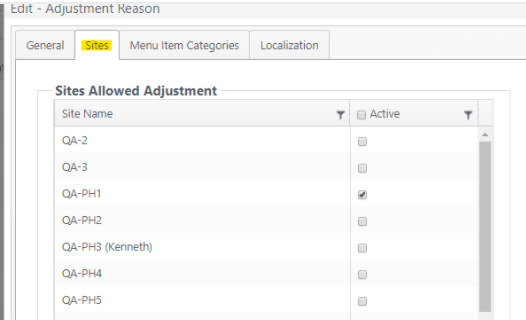
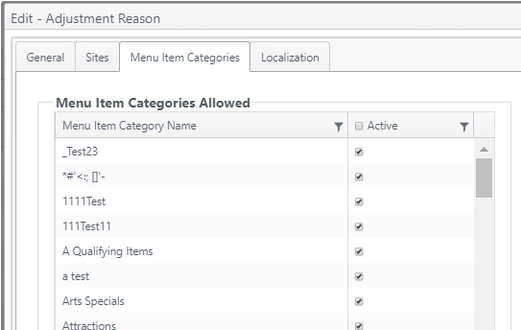
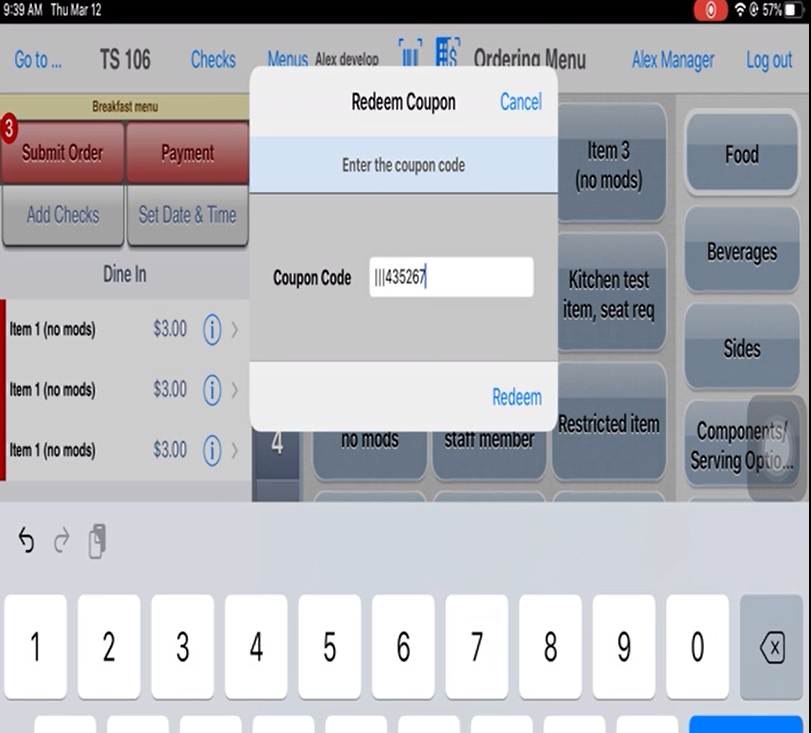
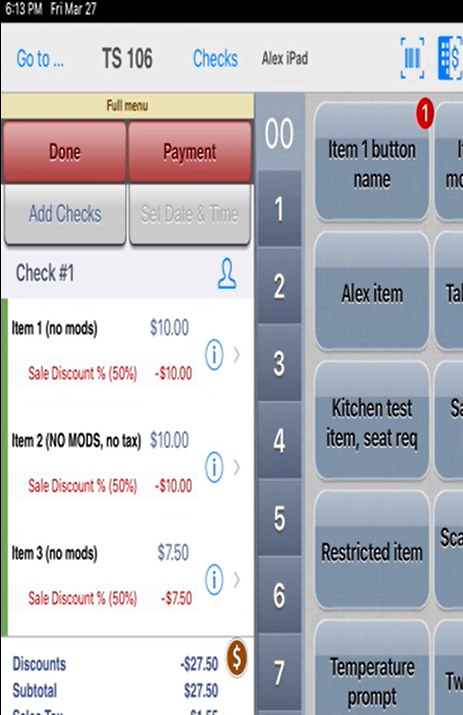
| OE-13975 | Offers: Add option to apply coupon offer to all eligible items when scanned To prevent the need to scan a coupon multiple times or to scan all eligible items individually, new Adjustments settings allow an item-based discount to be applied multiple times to a single item and to apply adjustment to all eligible items on a check when coupon is scanned . | Account feature toggle required* 4.8 Enhanced adjustment, combo, coupon parsing Path: Financial > Adjustment Reasons > Add/Edit Adjustment Reason
|
|
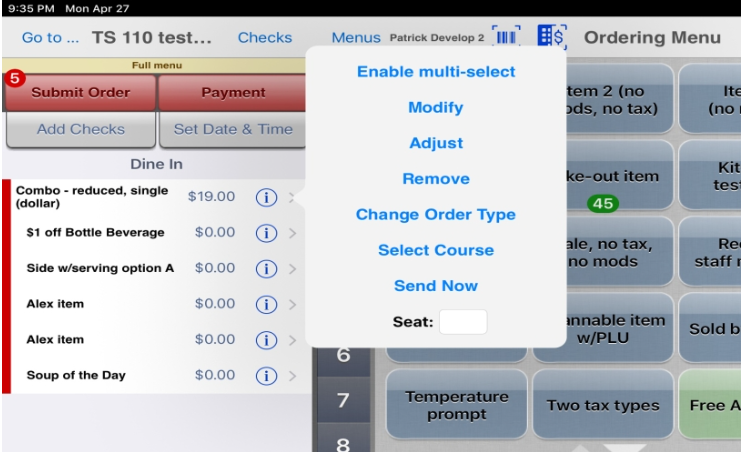
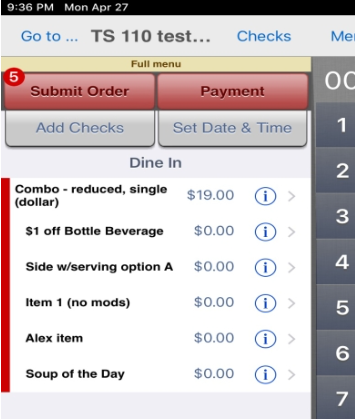
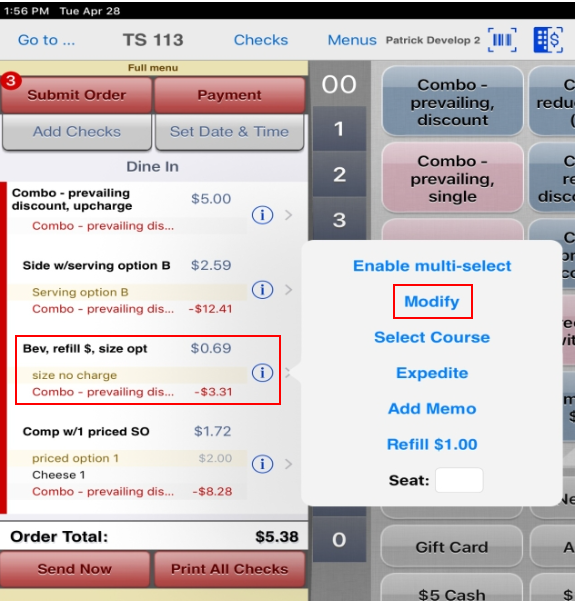
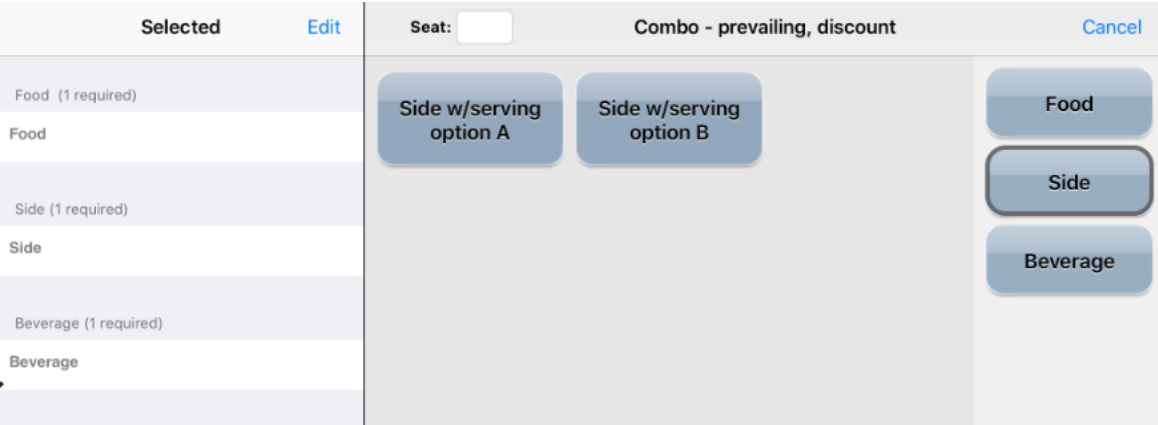
| OE-13864 | Combos: Allow combos and qualifiers to be modified before sending to kitchen Improves ordering flexibility by allowing combos and qualifiers to be modified before they are sent to the kitchen. | There are two parts to this improvement:
| |
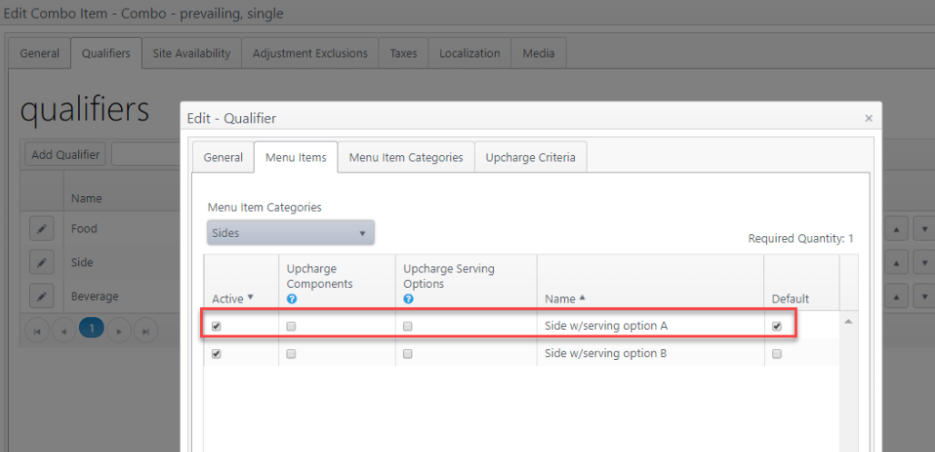
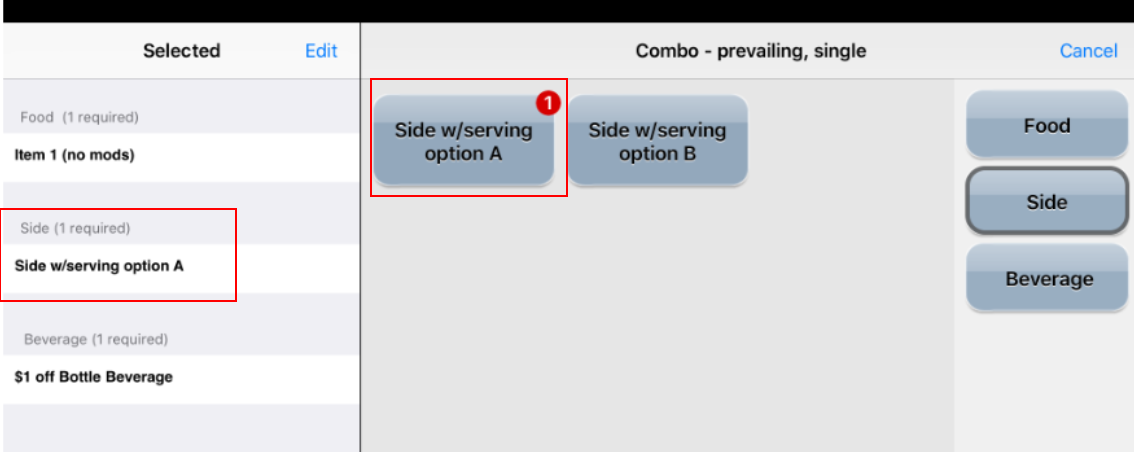
| OE-13862 | Combos: Allow default items to be set for qualifiers for quick ordering For efficient and speedy ordering, default items can be specified to apply when ordering a combo. | Path: Products > Menu items . edit a combo menu item
|
If no default has been selected for a qualifier, the qualifier must be selected from the customization screen.
|
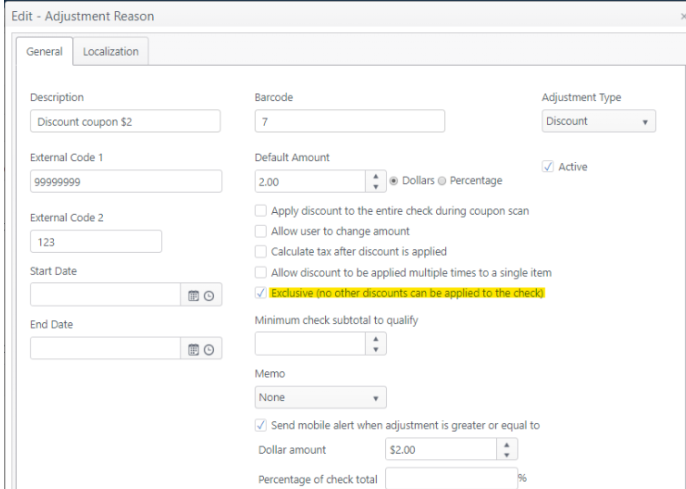
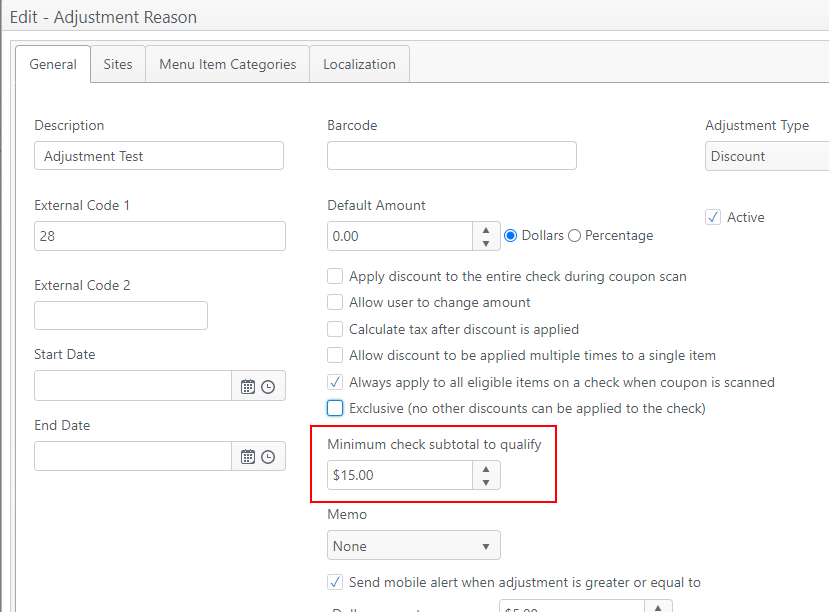
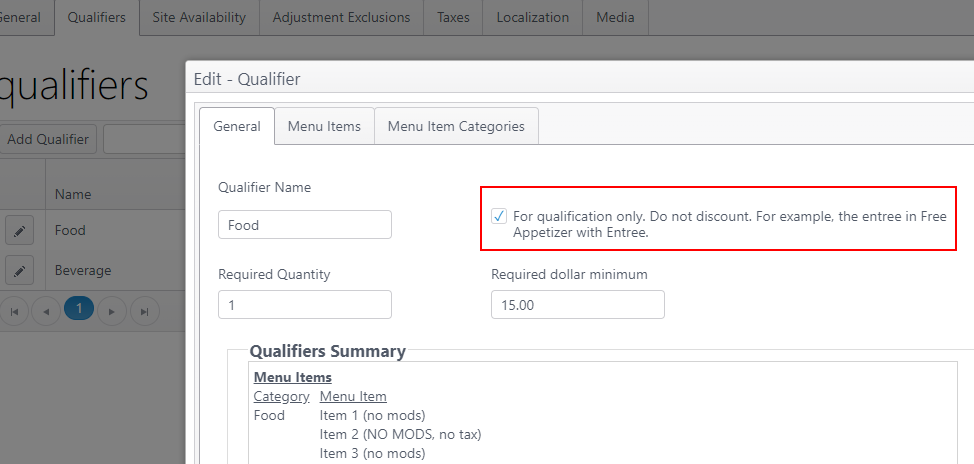
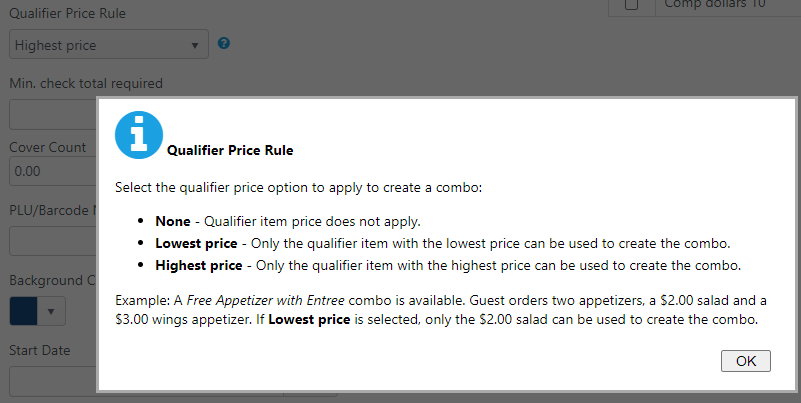
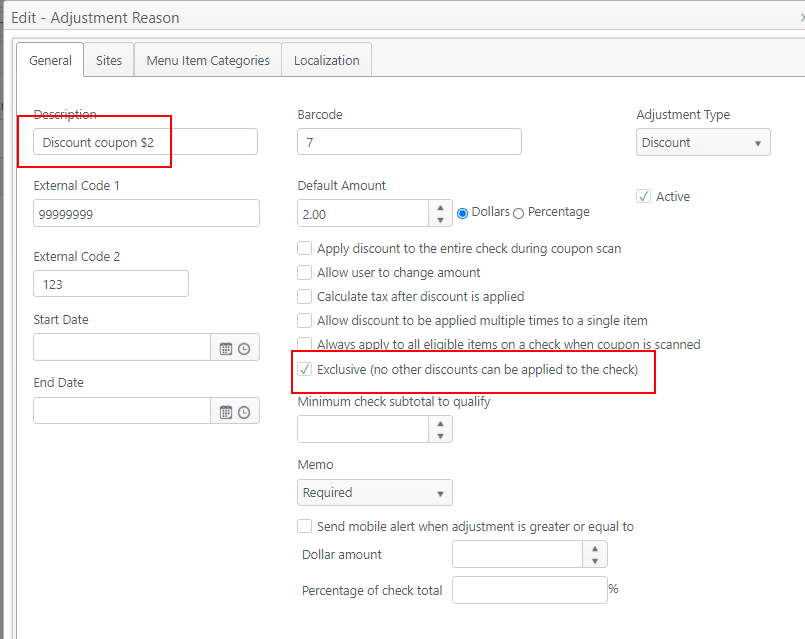
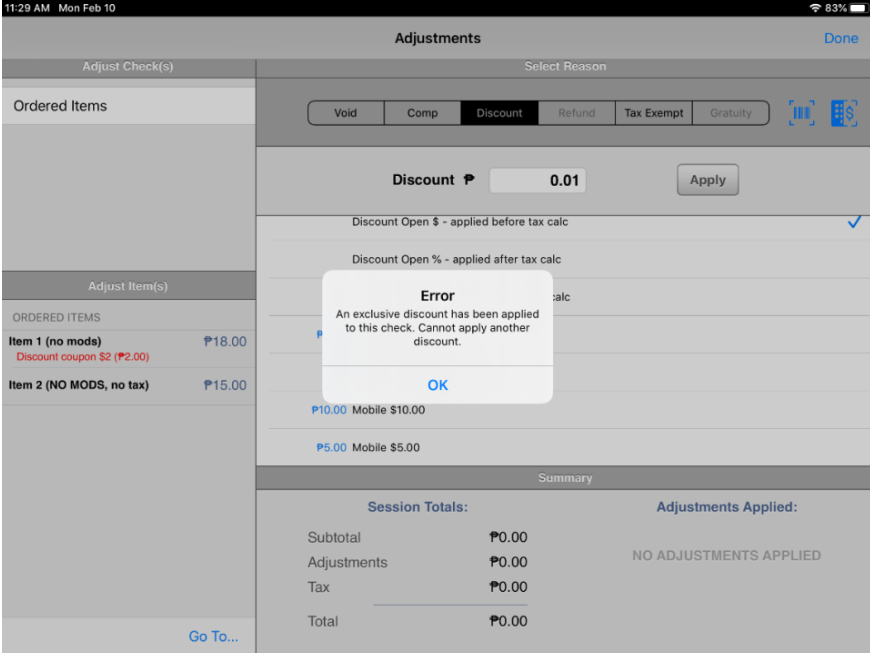
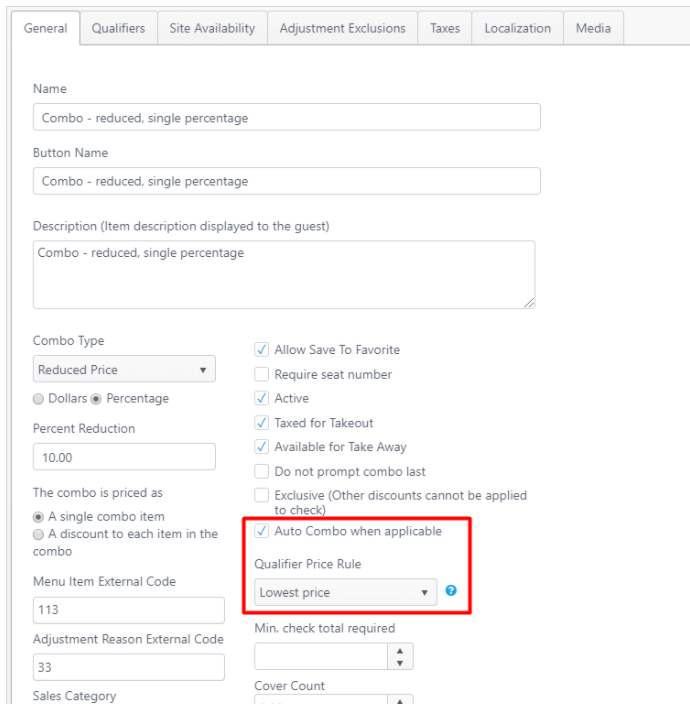
| OE-13447 | Offers: Add feature toggle and settings to support adjustment and combo discount enhancements Enhancements for discount adjustments:
| Account feature toggle required* 4.8 Enhanced adjustment, combo, coupon parsing Exclusive discount
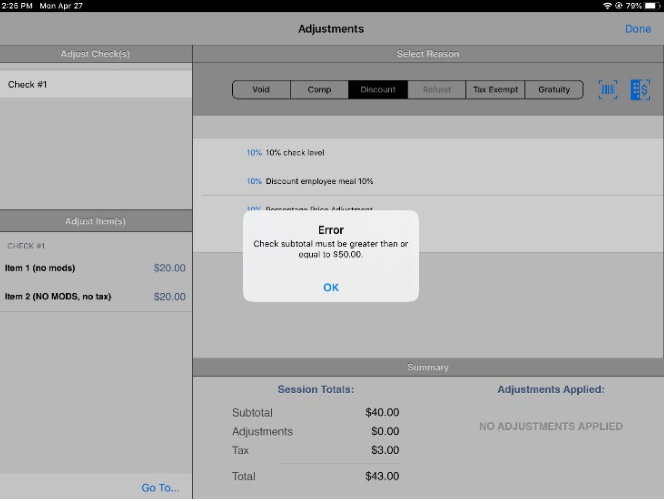
Minimum check subtotal
For qualification only Qualifier Price Rule
Help text |
|
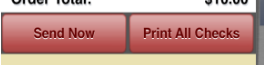
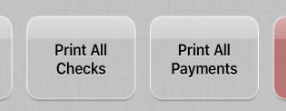
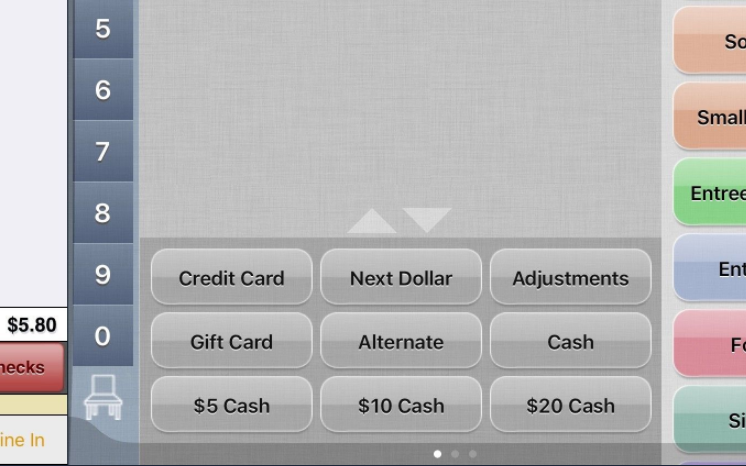
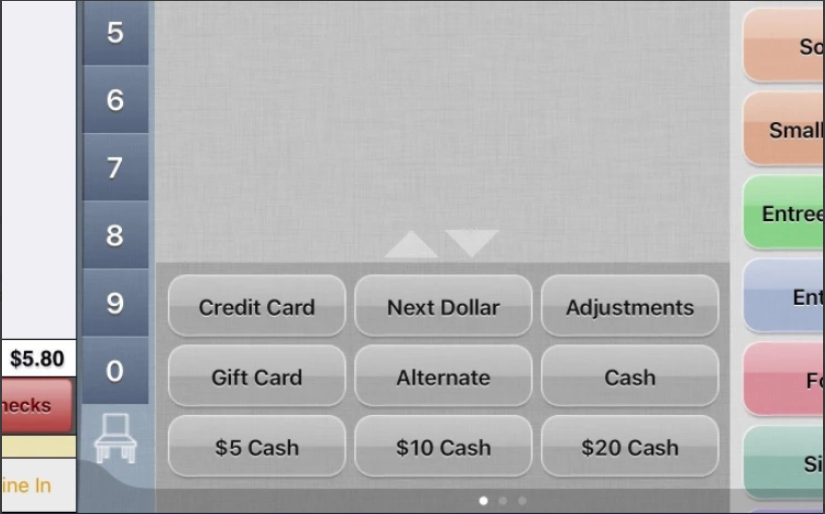
| OE-13206 | Quick pay payment: Rearrange button placements Per client feedback, the quick-pay buttons were rearranged to better optimize their use. | N/A | Quick-pay buttons rearrangement
|
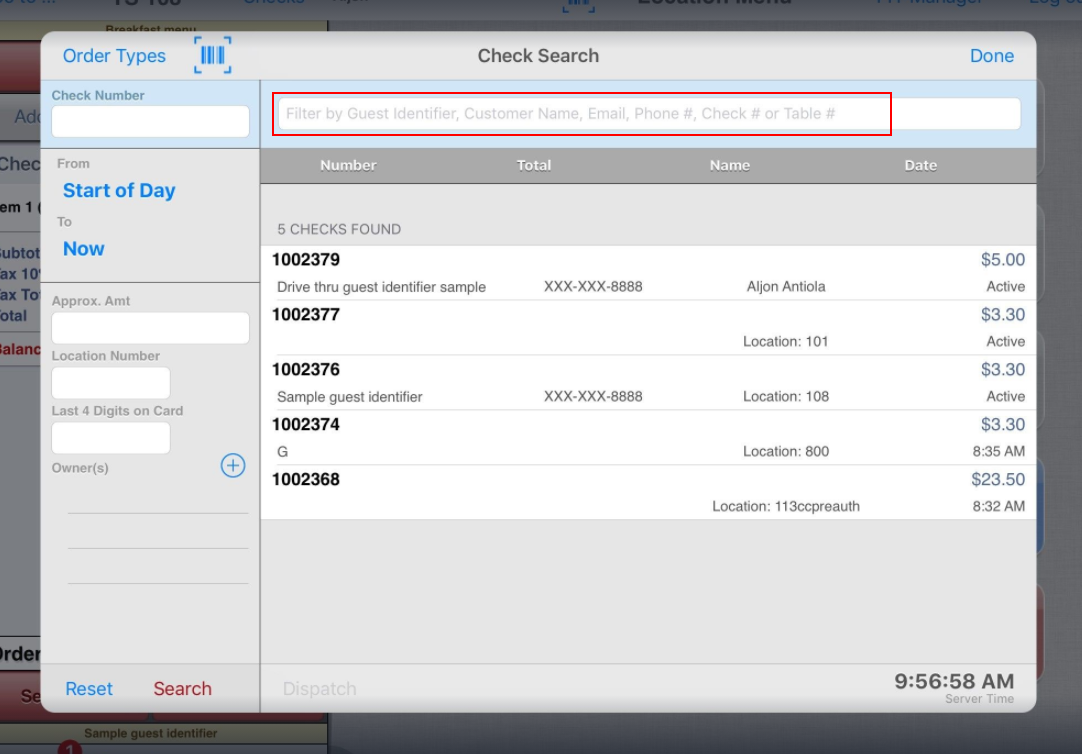
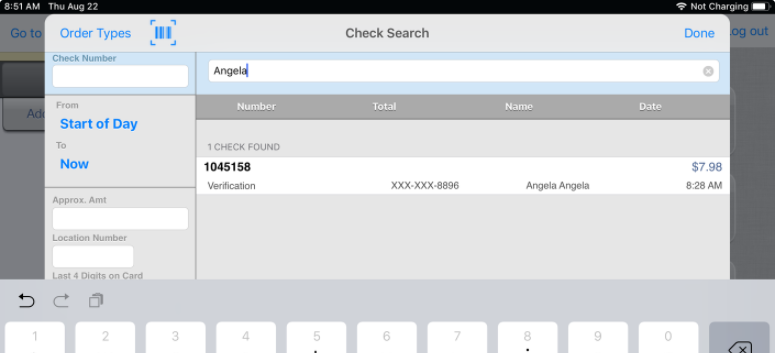
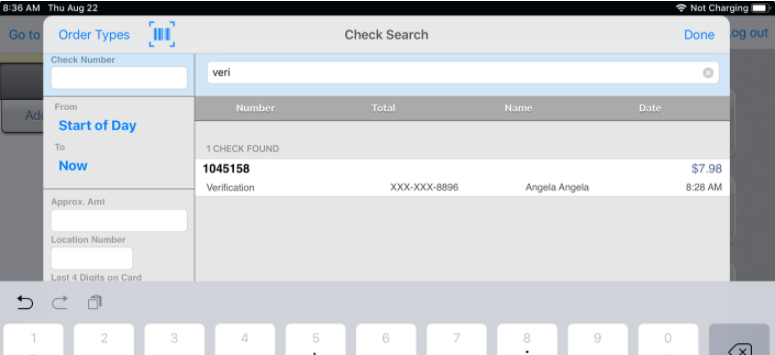
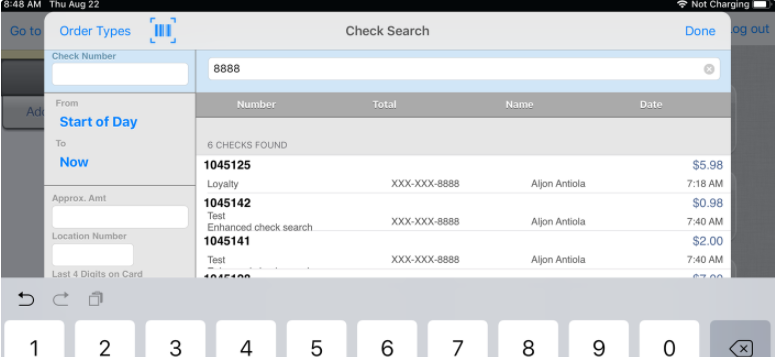
| OE-13181 | Check Search: Allow search by customer name, guest identifier and phone number This enhancement allows check search results to be filtered by customer name, guest identifier or phone number in addition to other existing parameters | N/A |
|
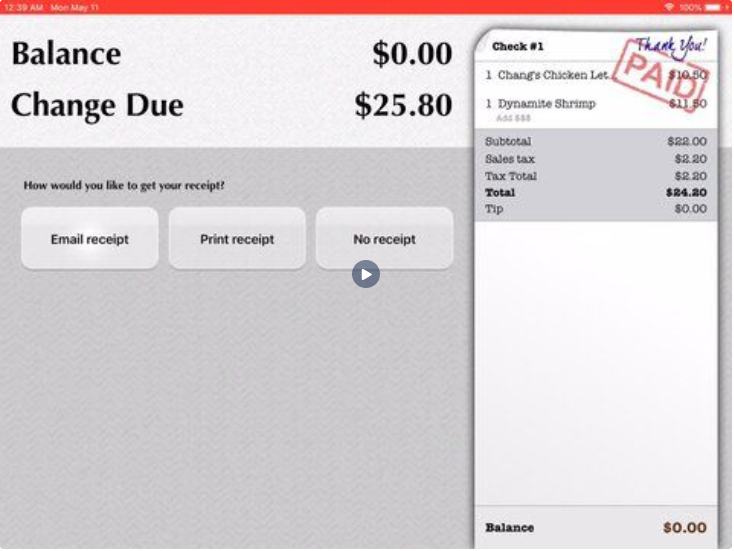
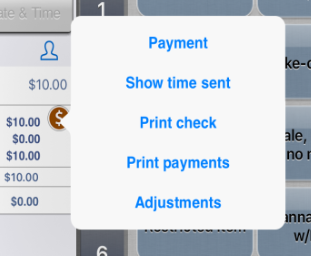
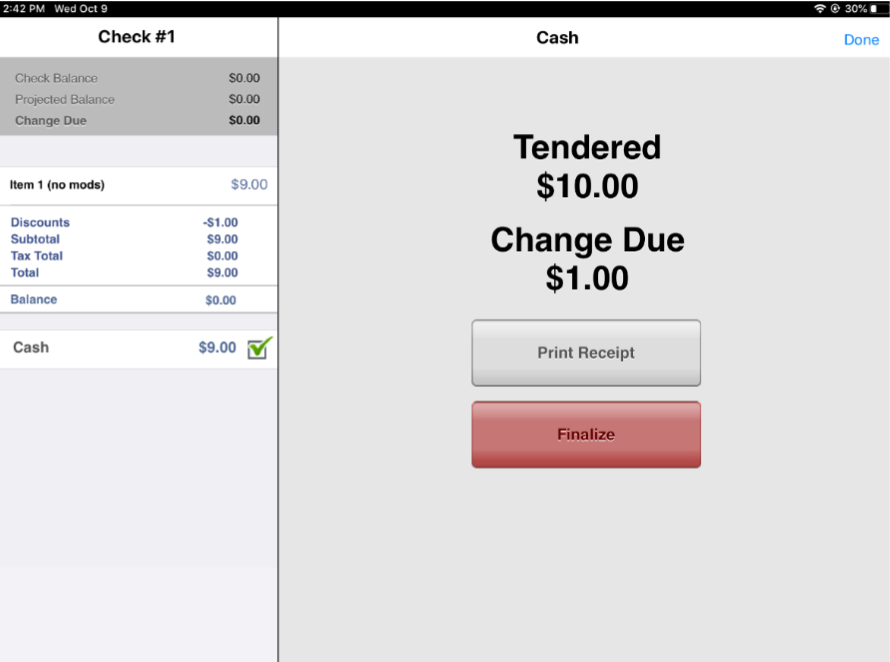
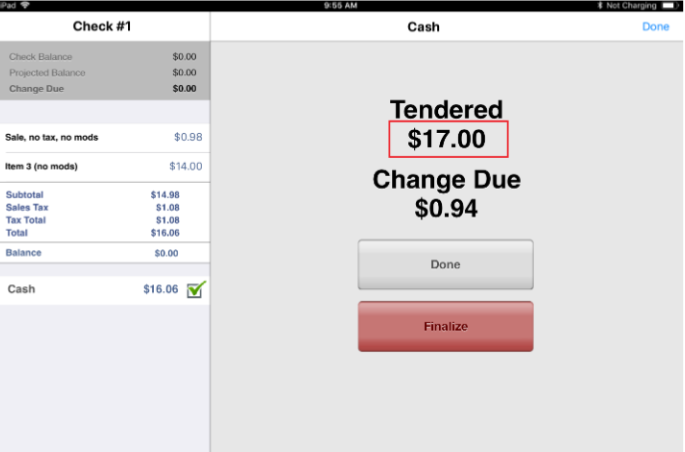
| OE-13165 | Receipts: Add ability to print receipt when using quick-pay buttons for payment When using the quick-pay buttons for payment, the finalize screen now includes a Print Receipt button to print receipt easily. | N/A |
|
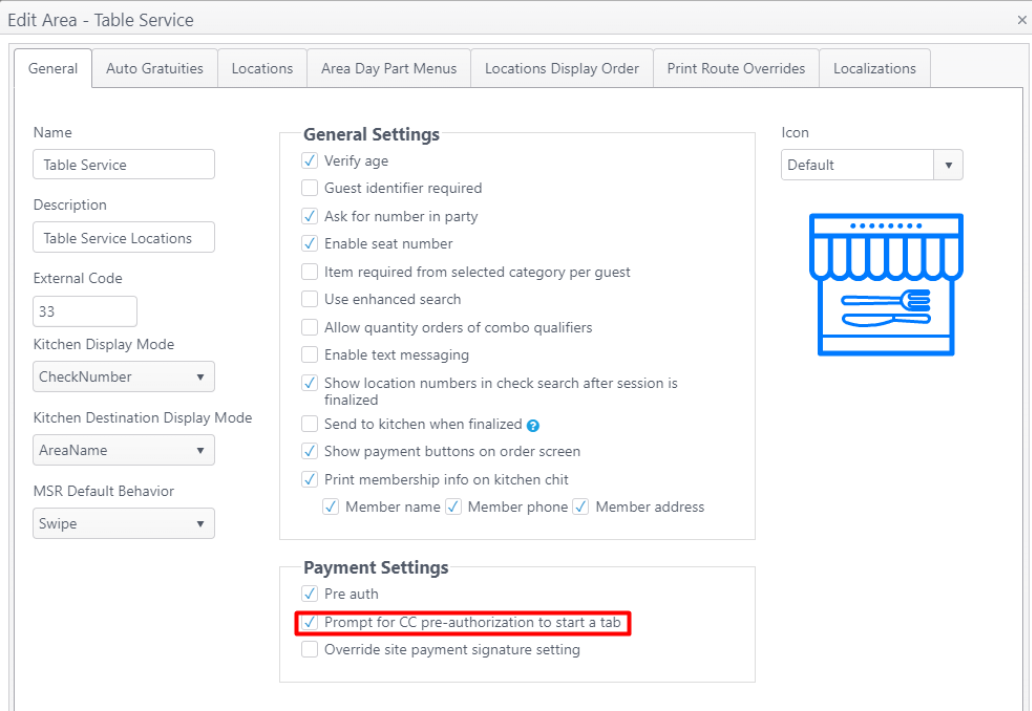
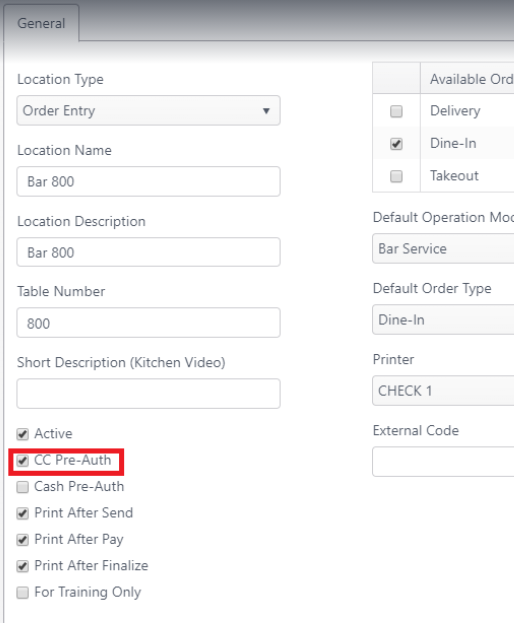
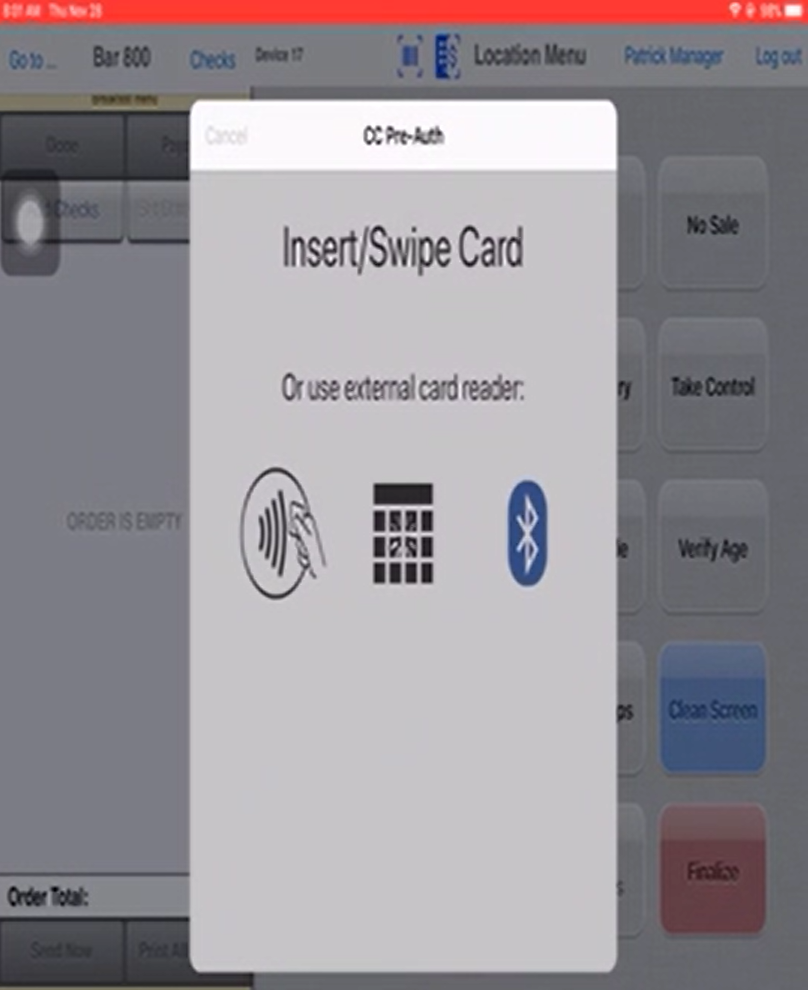
| OE-13038 | CC Pre-auth: Use Start Tab to initiate payment on PAX and/or eDynamo devices Tap Start Tab to automatically initiate transaction with payment device (PAX or eDynamo) and prompt the pre-auth popup view. | Use existing settings to:
Path: Edit a site > edit an Area
Path: Area > edit a location
|
|
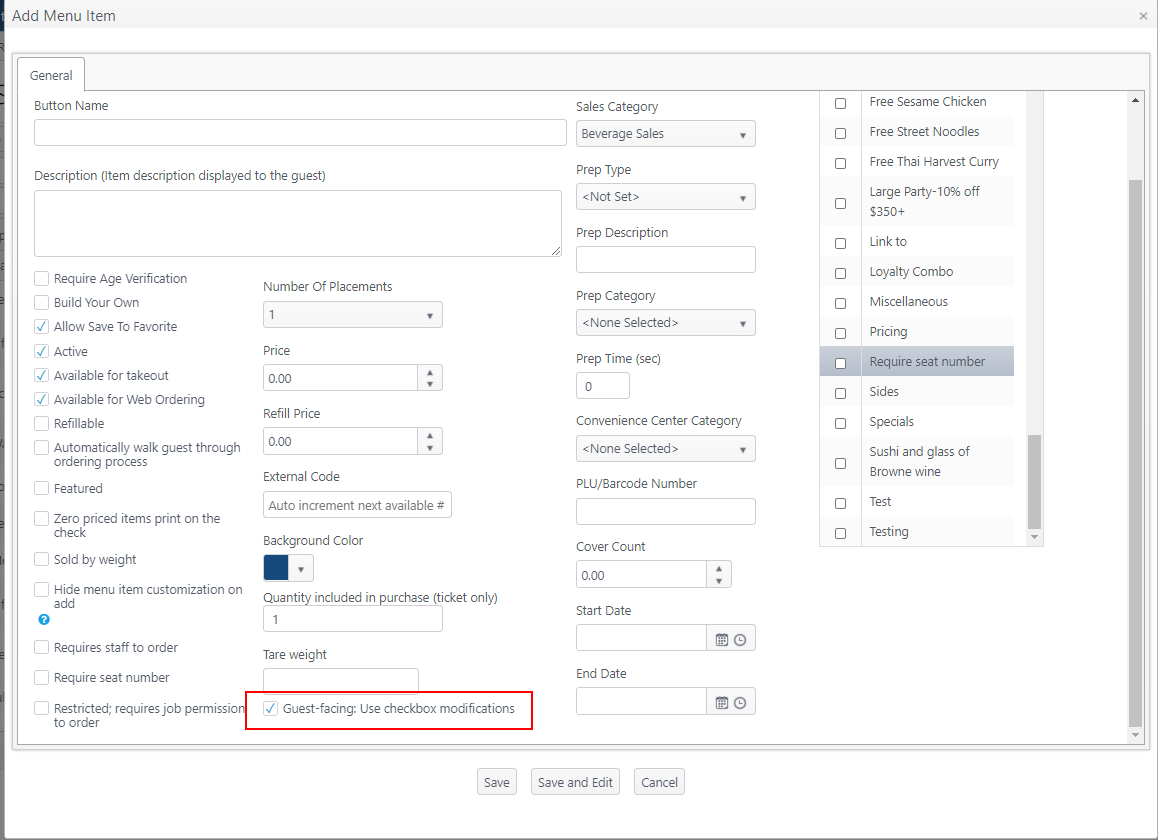
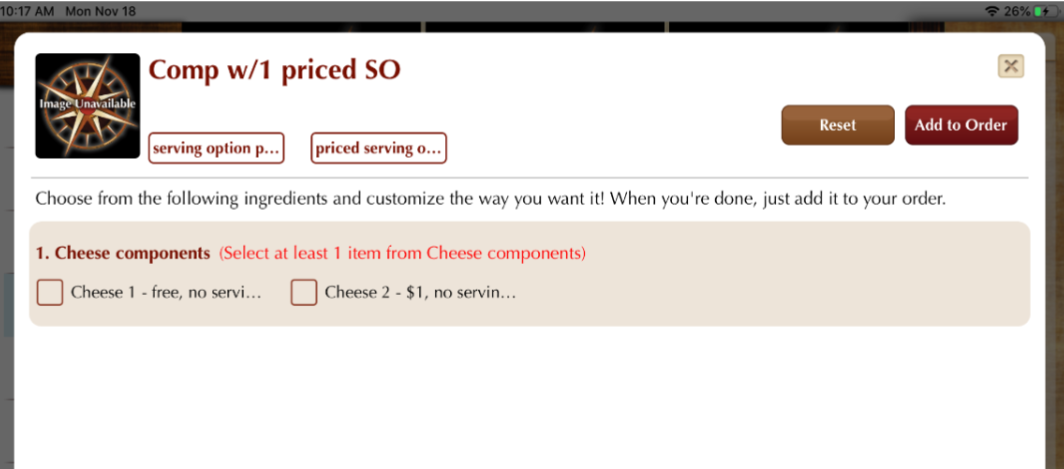
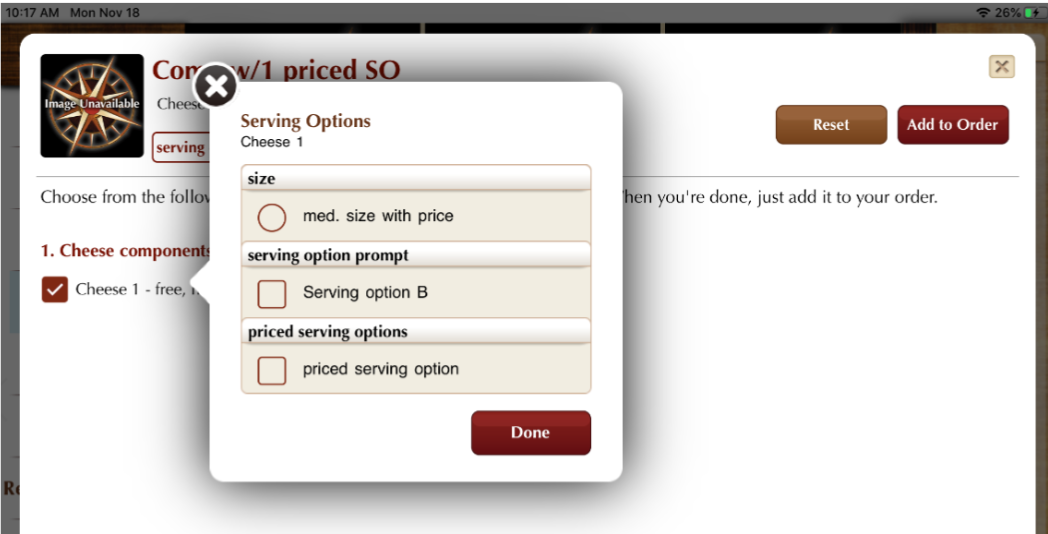
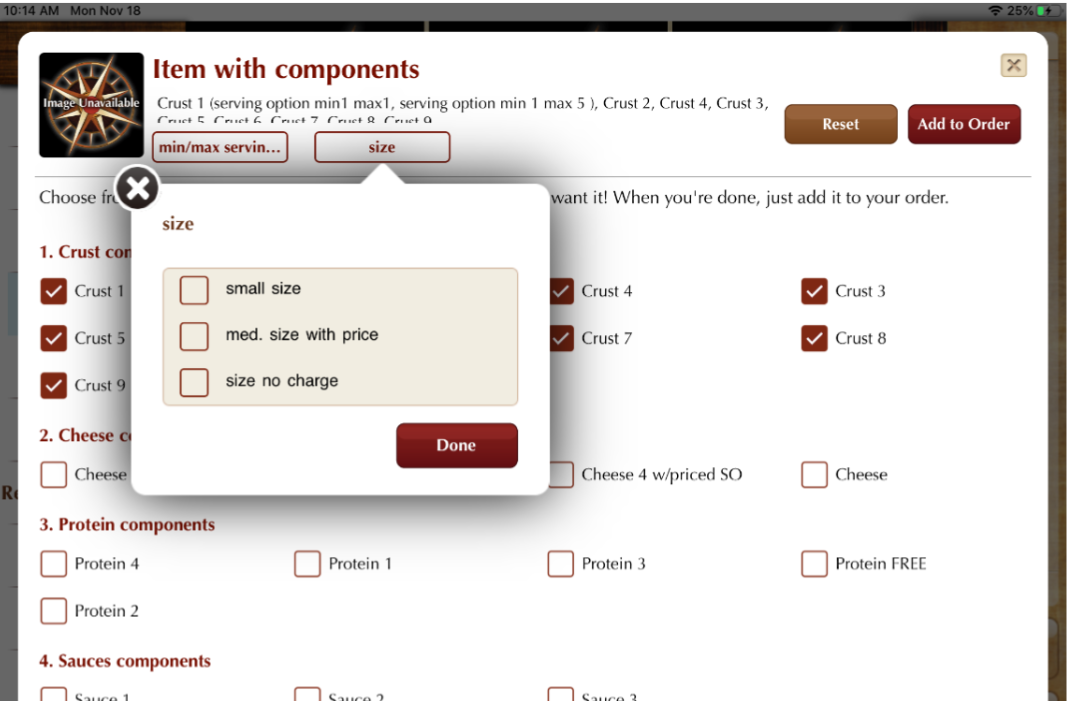
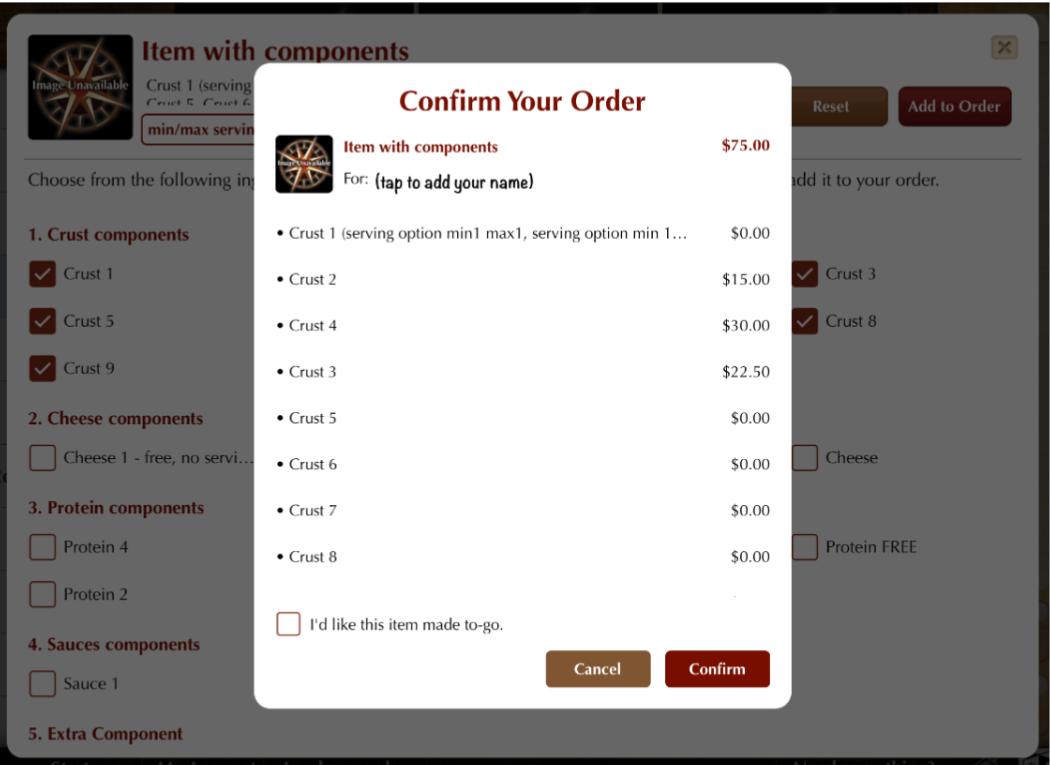
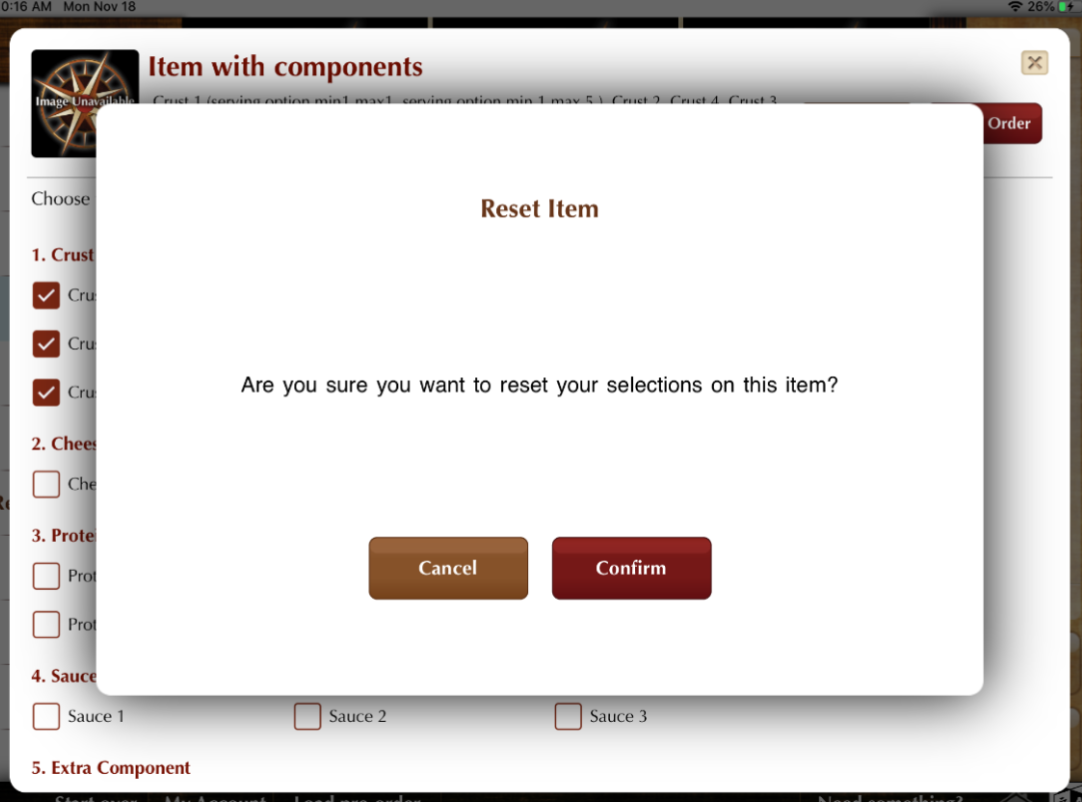
| OE-13030 | Guest-facing: Provide checkbox view for menu item customization This feature addresses the usability of the menu item customization screen when guests are customizing their order. Instead of choosing items from a list and moving them to the order, guests can simply check off the components and serving options they want using checkboxes. | Account feature toggle required* 4.8 Menu item: Checkbox modifications setting Path: Menu item > add or edit screen
| Sample screens
Clear selections and start again
|
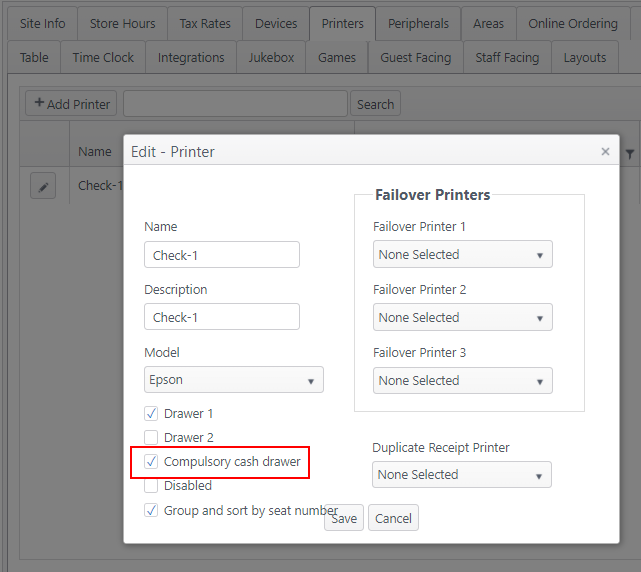
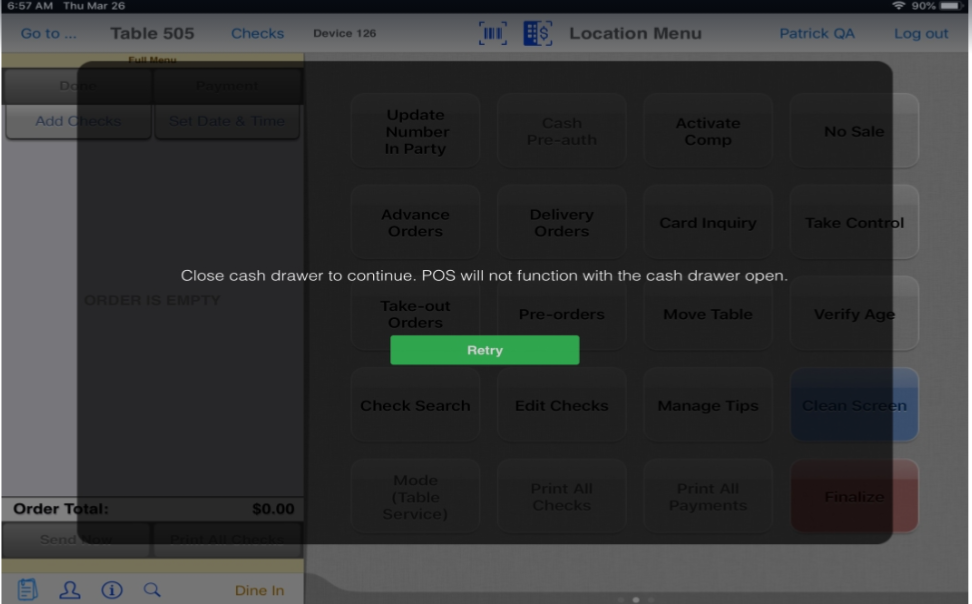
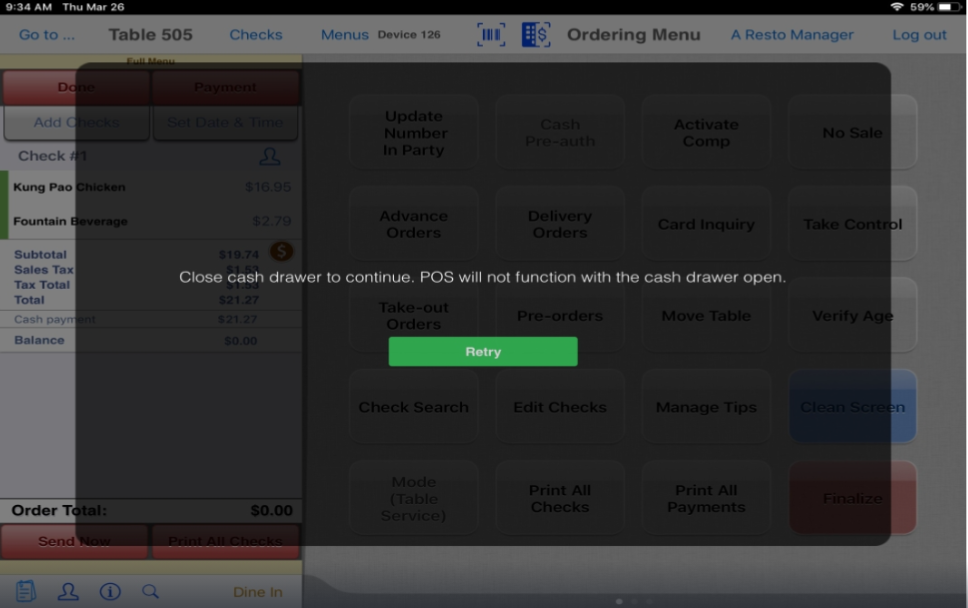
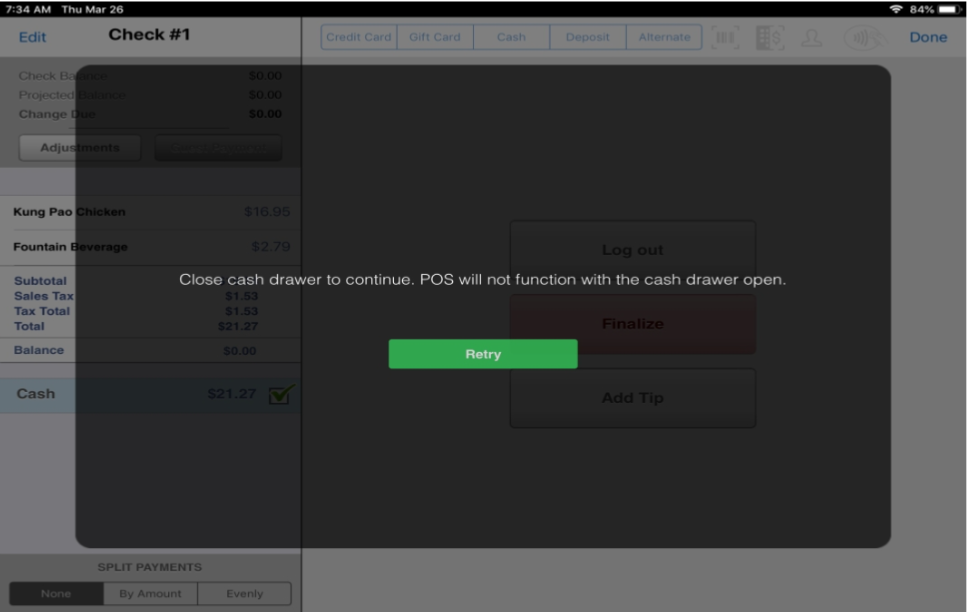
| OE-12999 | Cash drawer: Prevent certain POS terminal functions when cash drawer is open This improvement requires that the cash drawer be closed before the user can use the POS terminal. A screen blocker will appear to advise the user. | Account feature toggle required* 4.8 Compulsory cash drawer Path: Edit a site > Printers
| Sample screens
|
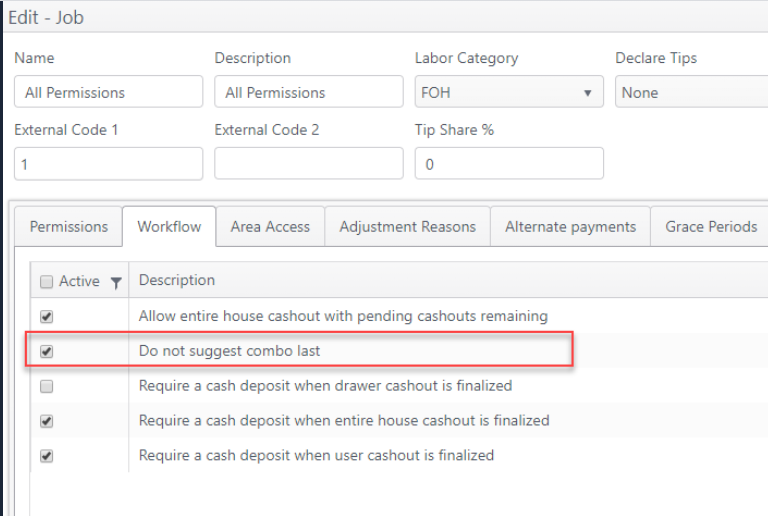
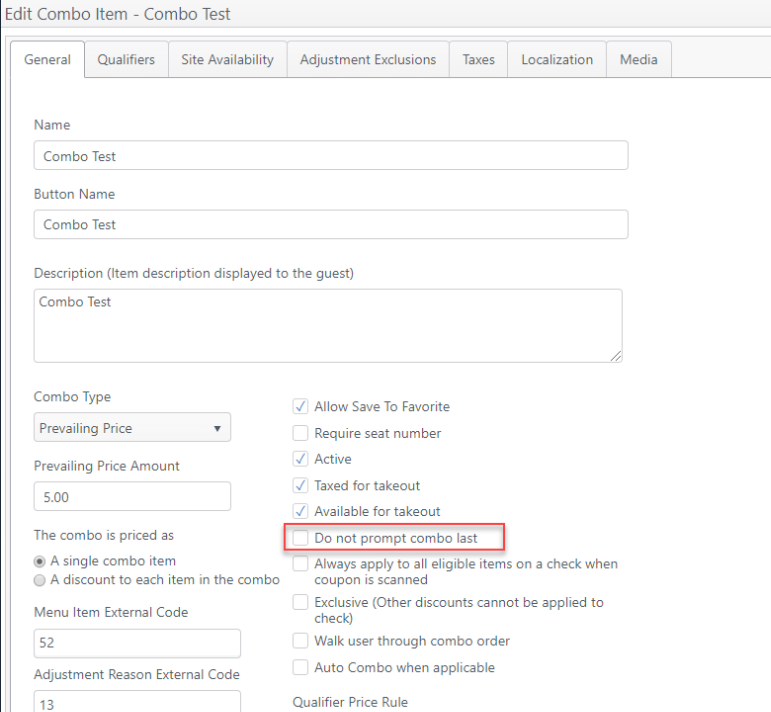
| OE-12938 | Combos: Add job and menu item settings to bypass Combo Last prompt when items qualify for combo New settings give concepts the option to only offer combo first menu items and to not create combos at the end of ordering (combo last). Staff facing feature improvement only. | Job setting Path: Users > Jobs > Workflow
Menu item setting Path: Product > Menu Items > edit combo menu item
|
|
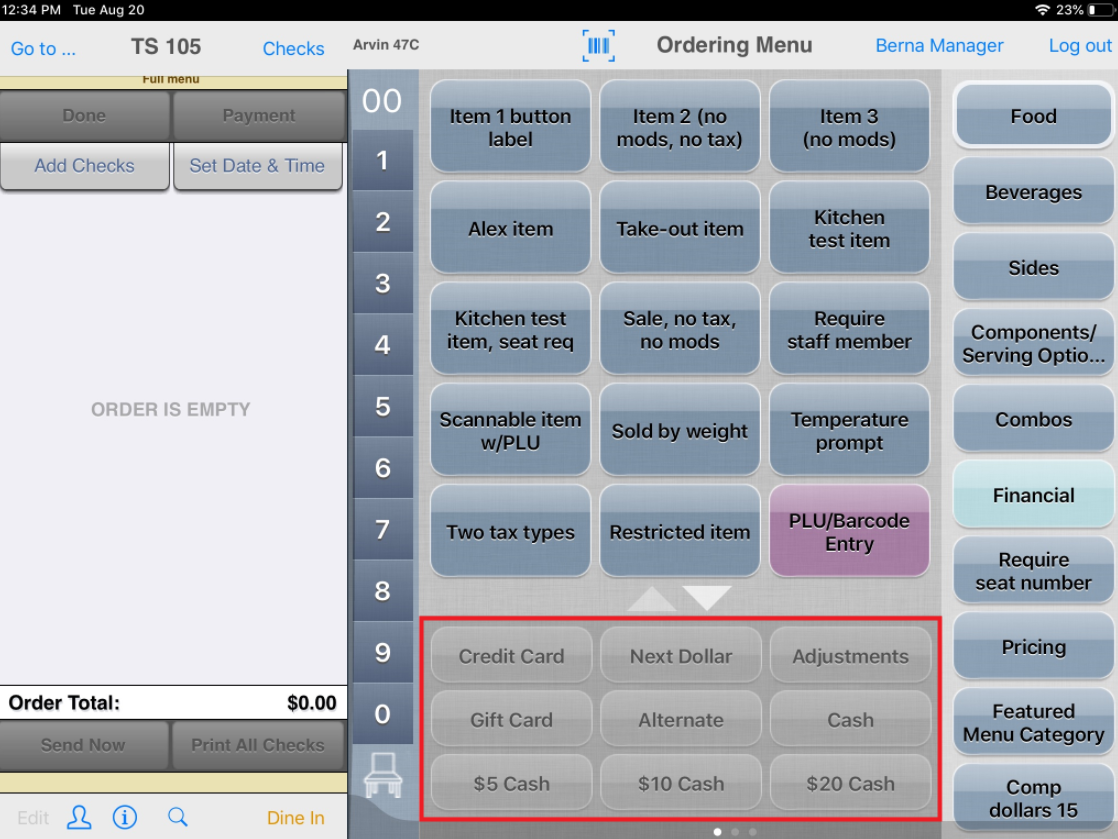
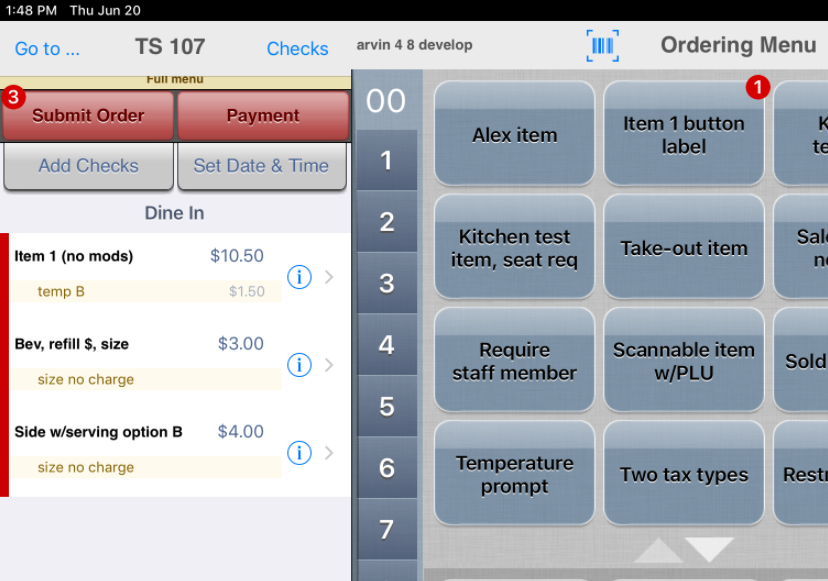
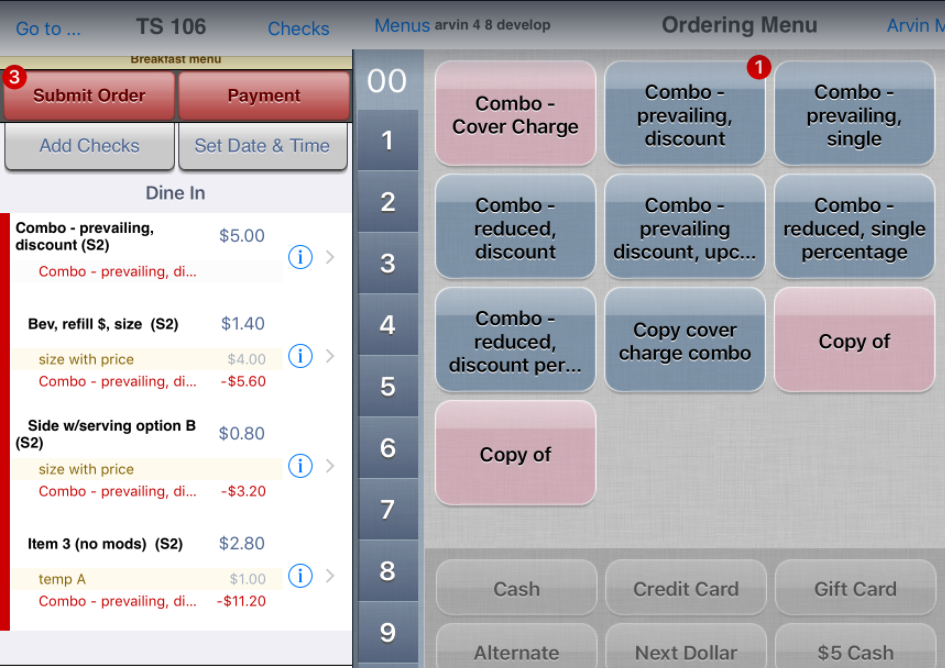
| OE-12640 | Payment: Quick pay - Add pre-set payment buttons on Ordering Menu Quick-pay buttons can be presented on the Ordering Menu screen to allow for quick and easy payment, eliminating the need to go to the Payment screen first to select the payment method. | Account feature toggle required* 4.8 Enable quick-pay buttons by area Quick-pay buttons are enabled by area Path: Edit a site > Area > General
| Quick-pay buttons allow user to select payment method and go immediately to Payment screen. The selected payment method determines the payment workflow.
|
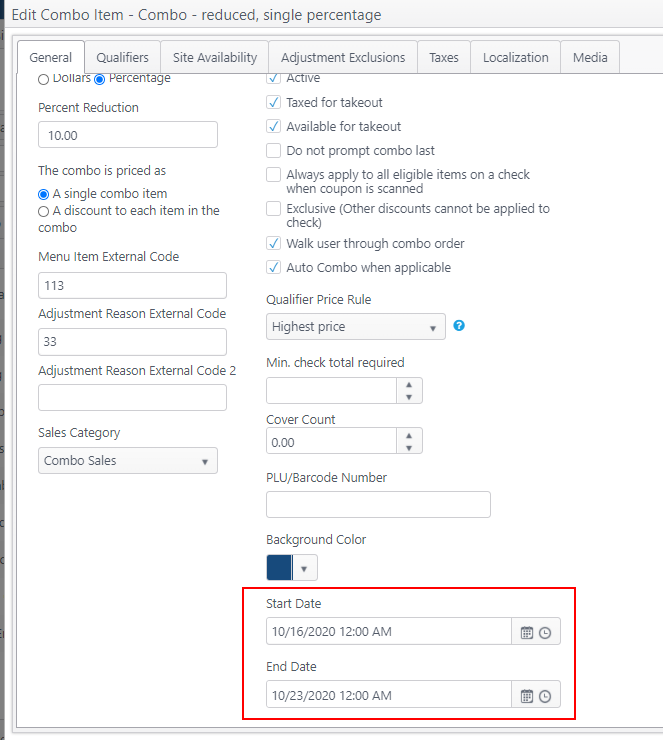
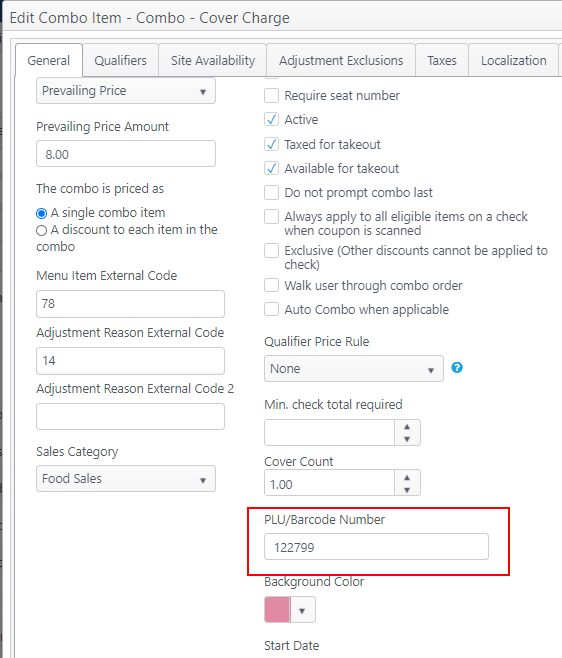
| OE-12619 | Combo: Add Start Date and End Date to combo menu items Add Start Date, Start Time, End Date and End Time fields on combo menu items. This allows certain combo offers to expire as scheduled. | Path: Products > Menu Items > add/edit a combo menu item
| If current date is within the start date and end date range, the combo will be available to order.
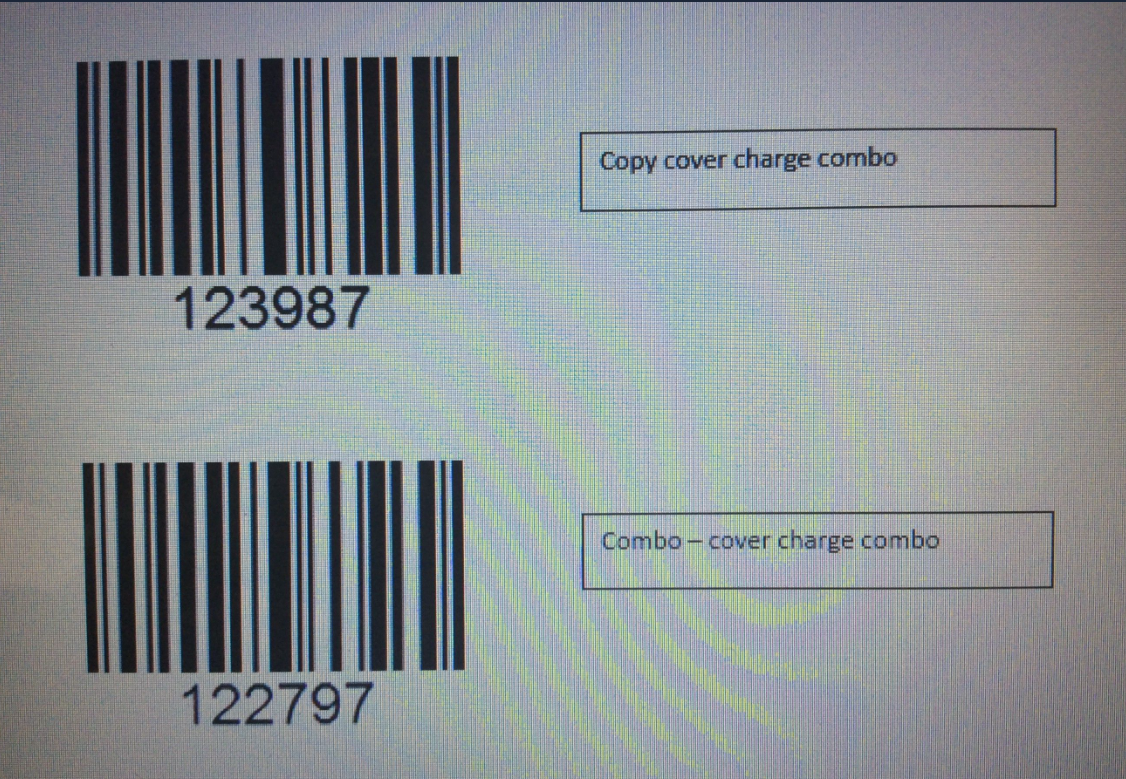
|
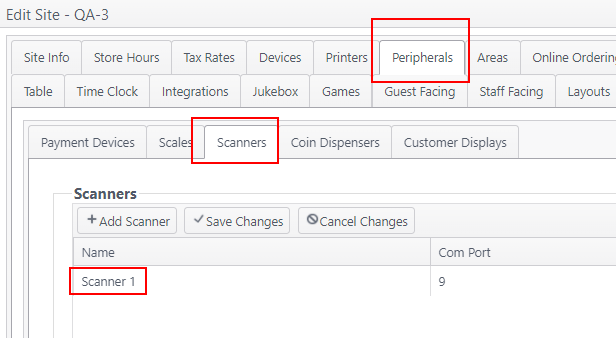
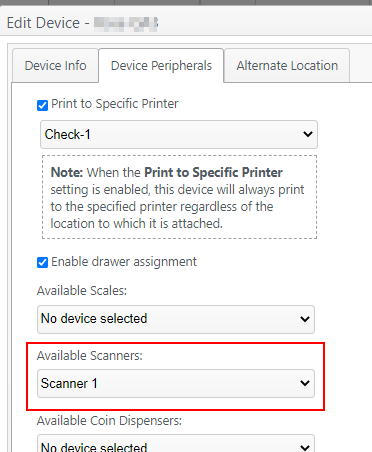
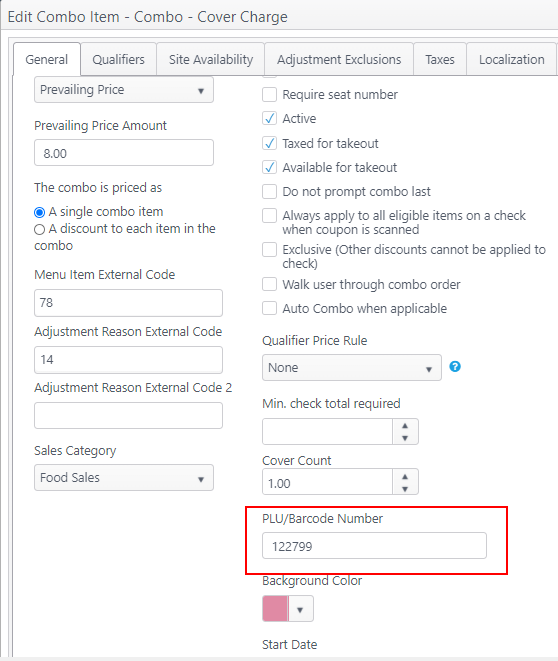
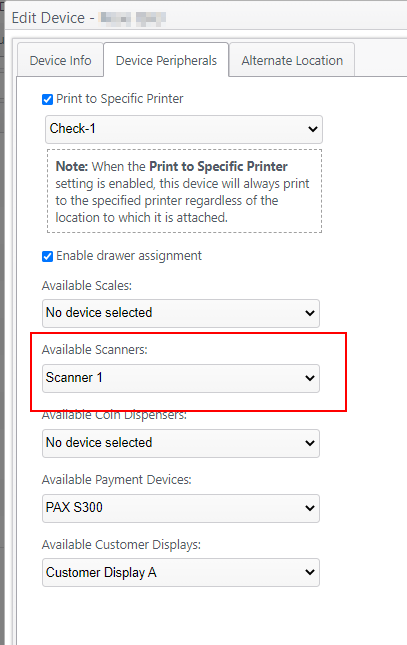
| OE-12618 | Scan code: Create combo automatically when barcode for combo is scanned Barcode can be scanned from coupon or other media provided by guest. | Precondition: Scanner must be configured (settings already exist) Path: Edit a site > Peripherals > Scanners
Path: Edit a site > Devices > Device Peripherals > Available Scanners
Menu items applicable to offer must be configured with barcode for ordering
|
|
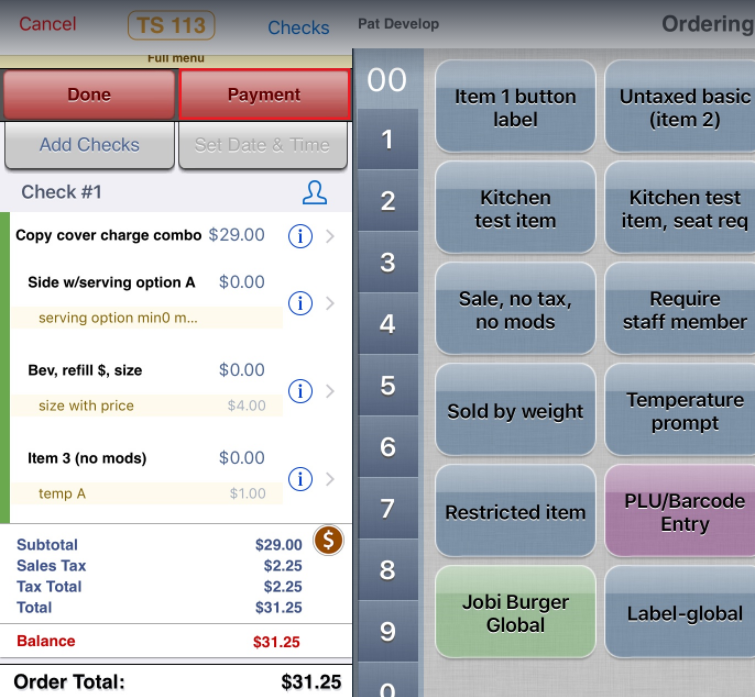
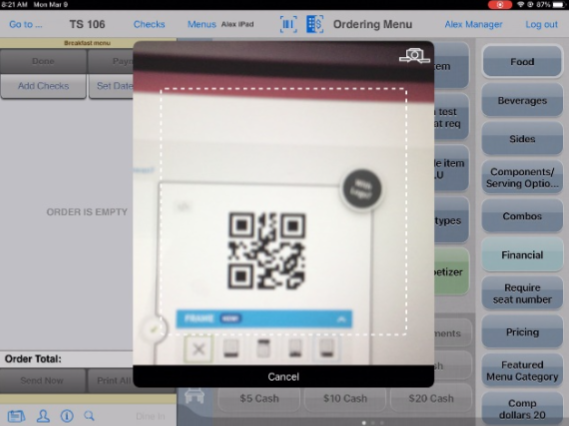
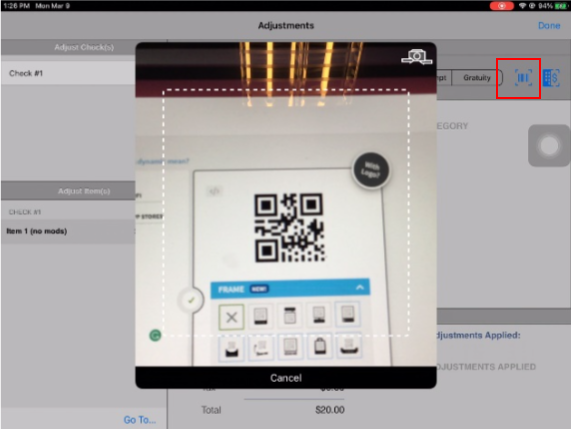
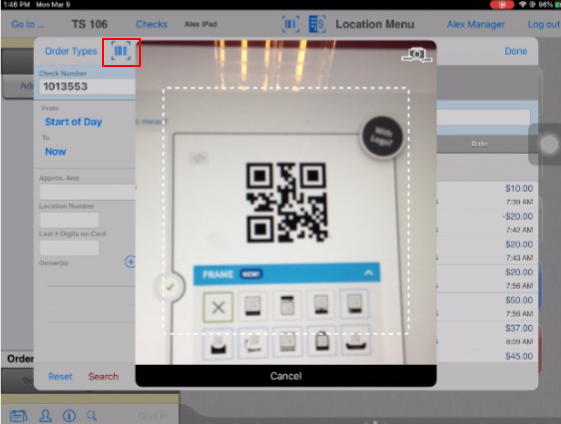
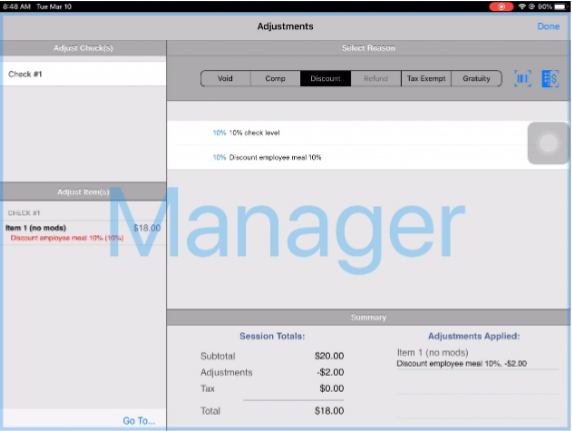
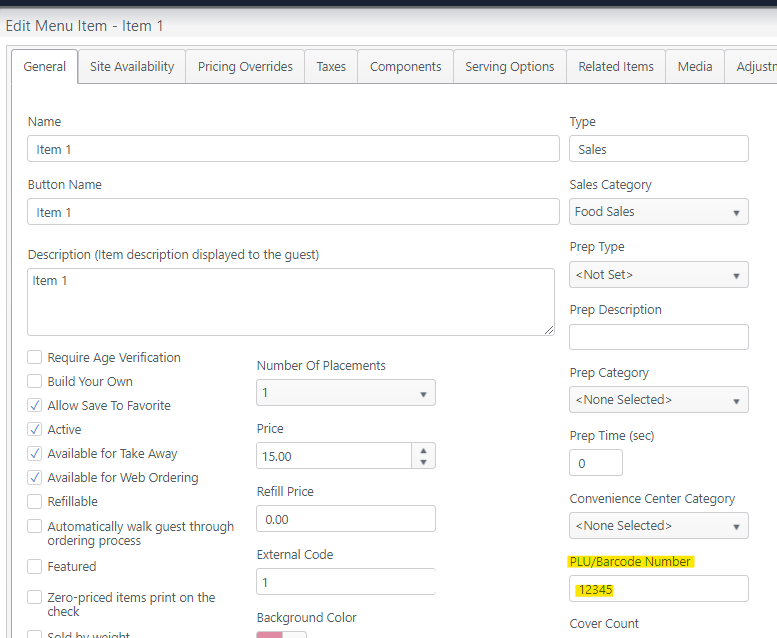
| OE-12250 | Scan code: Use the iPad camera to scan QR or barcode (ordering, adjustments, loyalty, other) A scanner icon on the app allows the user to access the iPad camera to scan QR codes and barcodes to be applied to:
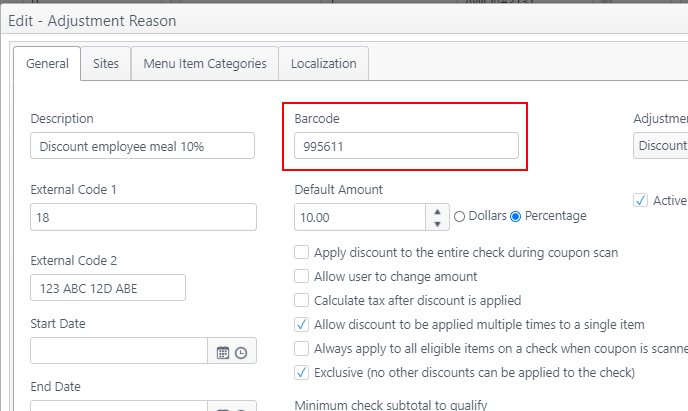
| Menu items and adjustments should have barcodes configured to allow them to be scanned. Path: Products > Menu items >add/edit menu item
Path: Financial > Adjustment reasons > Add/edit adjustment reason
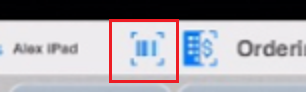
| The scanner icon appears at the top of the screen.
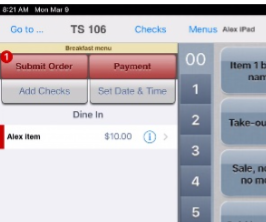
General workflowOrder an item
Gift card sale
Gift card redemption
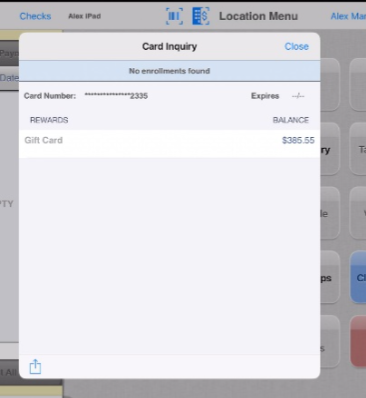
Gift card inquiry
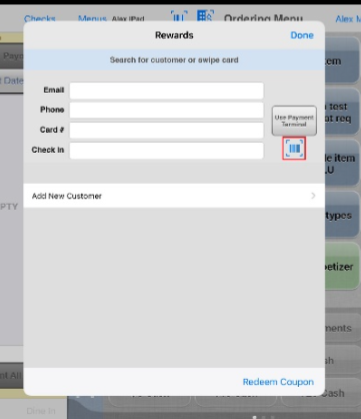
Loyalty transaction
Adjustment reason
Reopen check
Server Sign on
Manager override
|
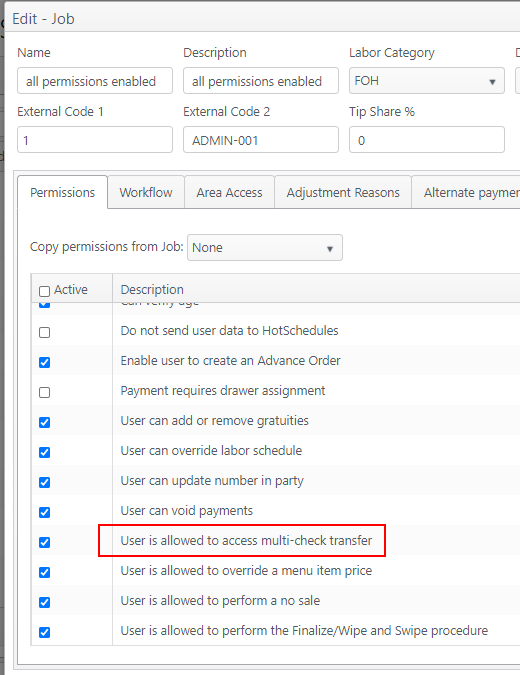
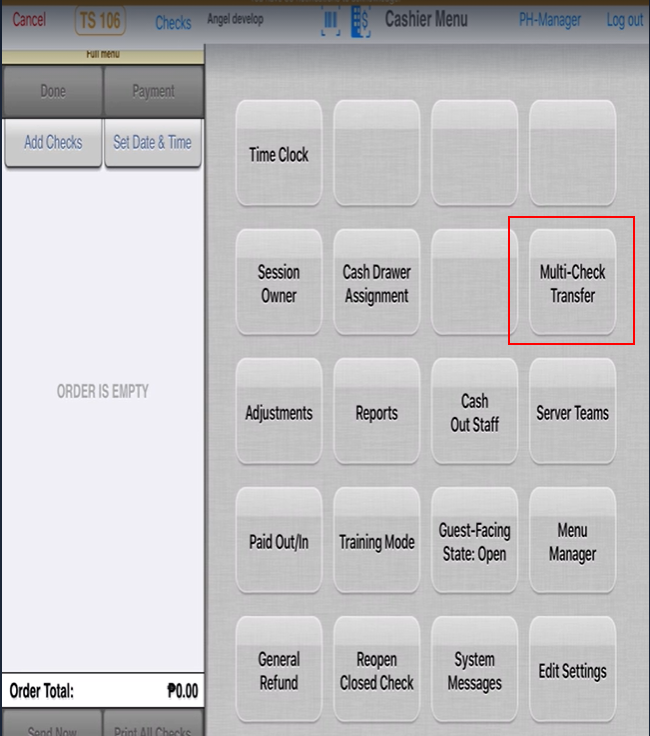
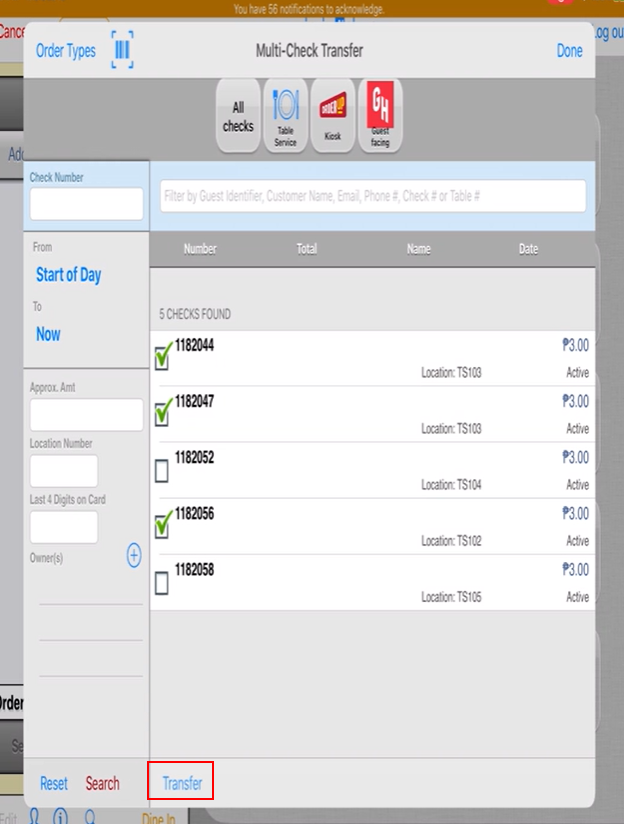
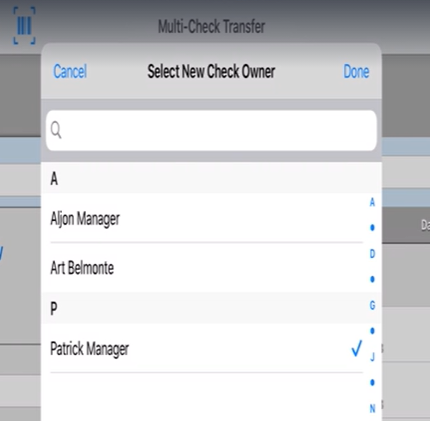
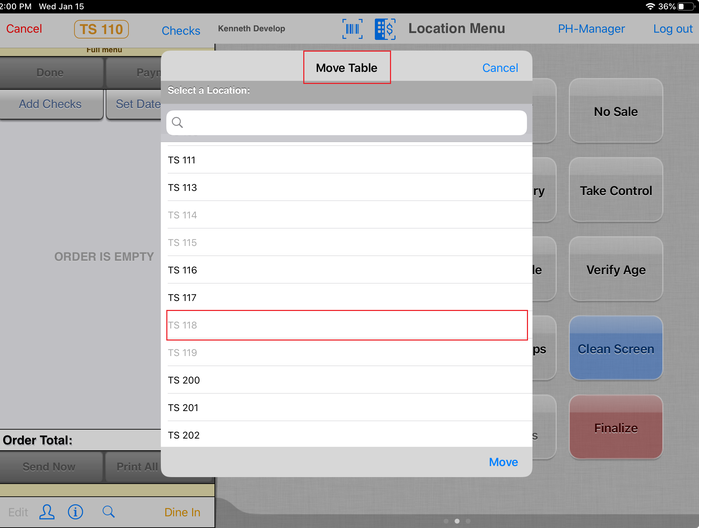
| OE-11398 | Check management: Transfer multiple checks to new owner Allows ownership of multiple checks to be transferred to another user | Requires job permission to allow job to perform multi-check transfer to another user Path: Users > Jobs
| Requirements:
Workflow:
|
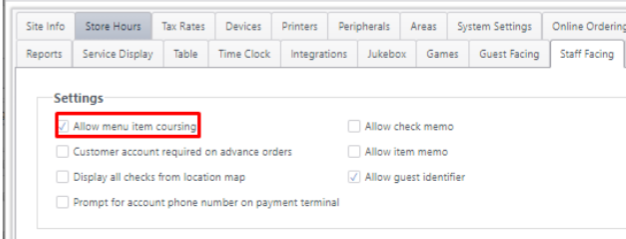
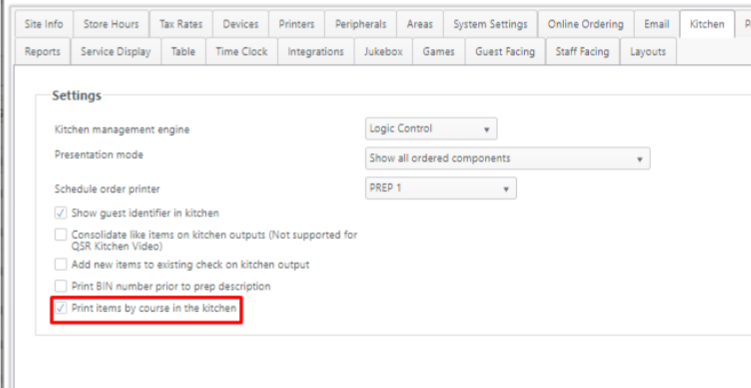
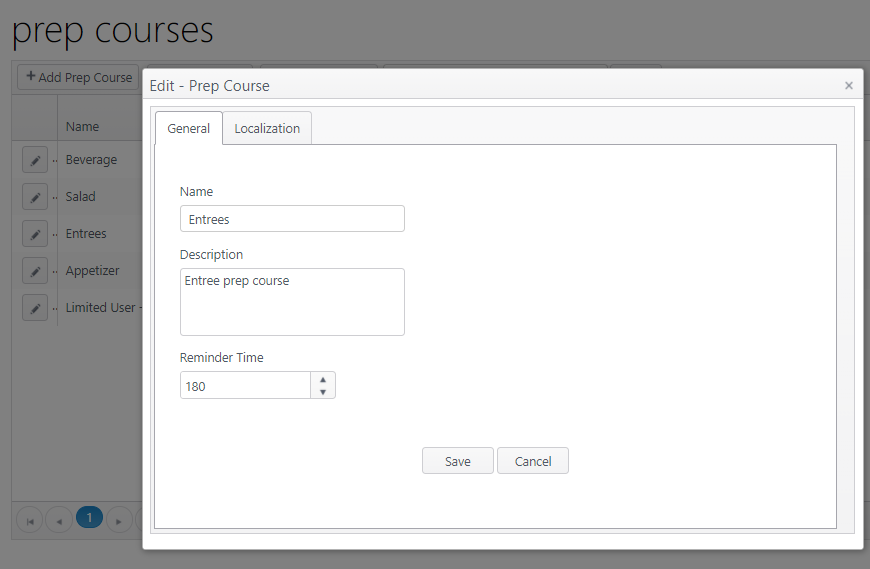
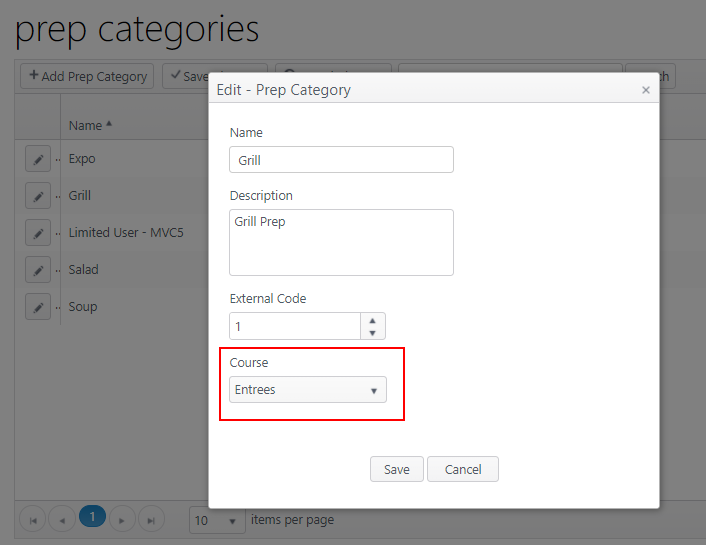
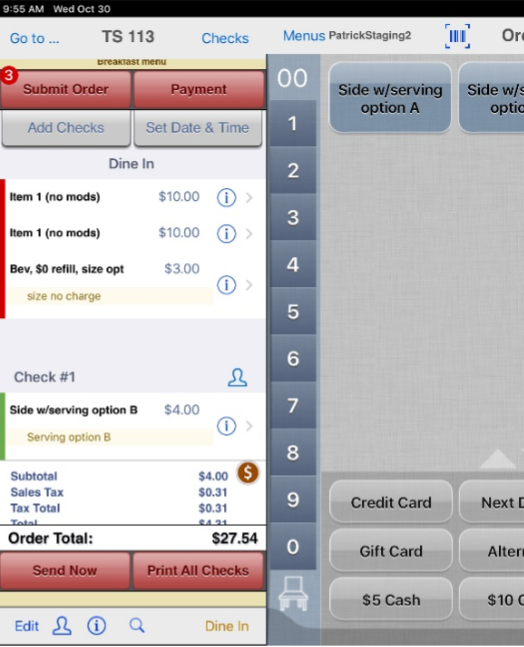
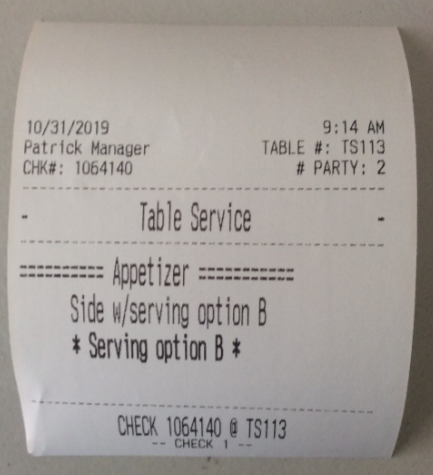
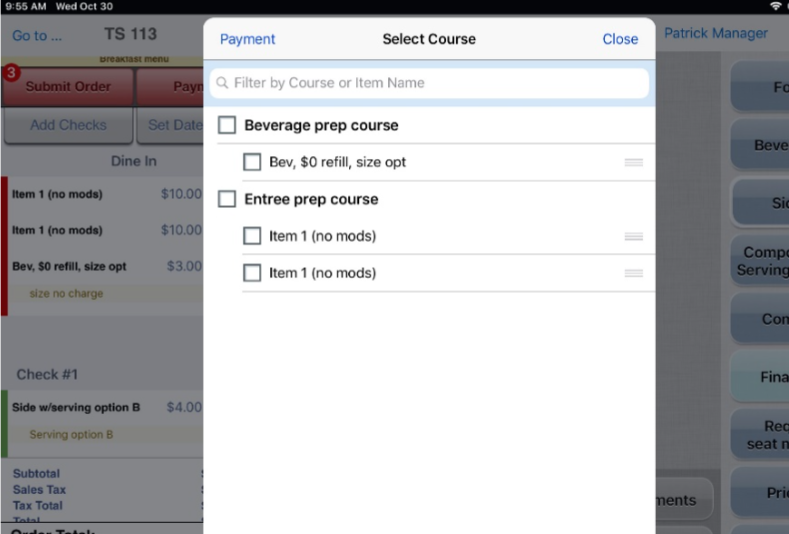
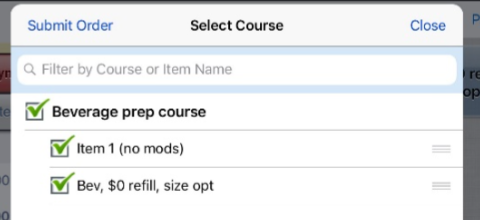
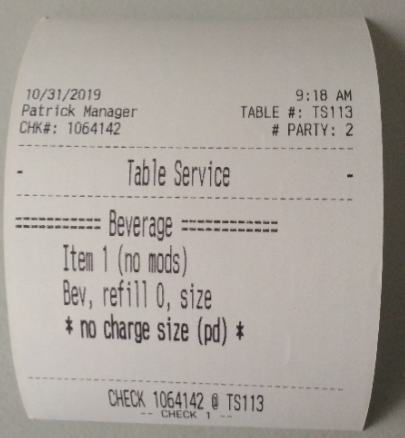
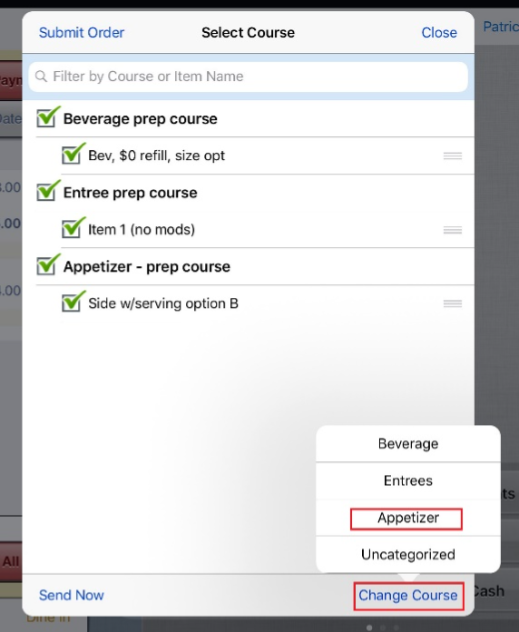
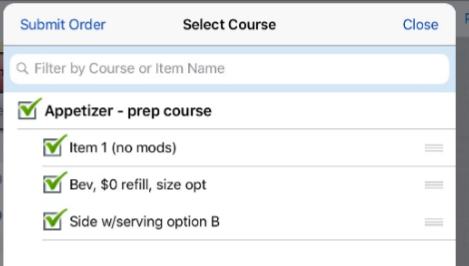
| OE-9326 | Staff-facing: Menu item coursing for kitchen printing/prep Allows server to control when items are sent to the kitchen. Items can be sent by course (appetizer, salad, entree, dessert, for example) for better control and improved guest experience. | Path: Edit a site > Staff Facing > General
Path: Edit a site > Kitchen
Path: Categories
Path: Products > Menu Items
|
|
| OE-7936 | Improved message for clarity when POS device does not have a payment device selected. | N/A | Improved message: |
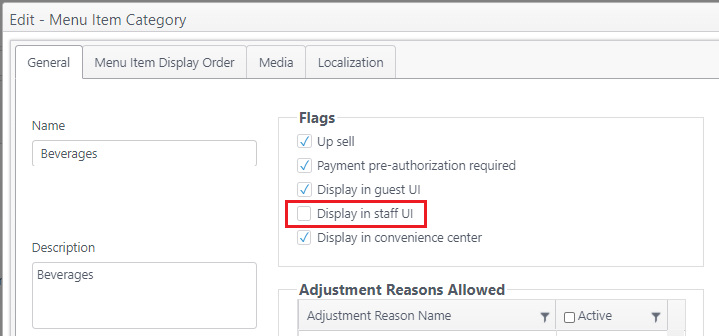
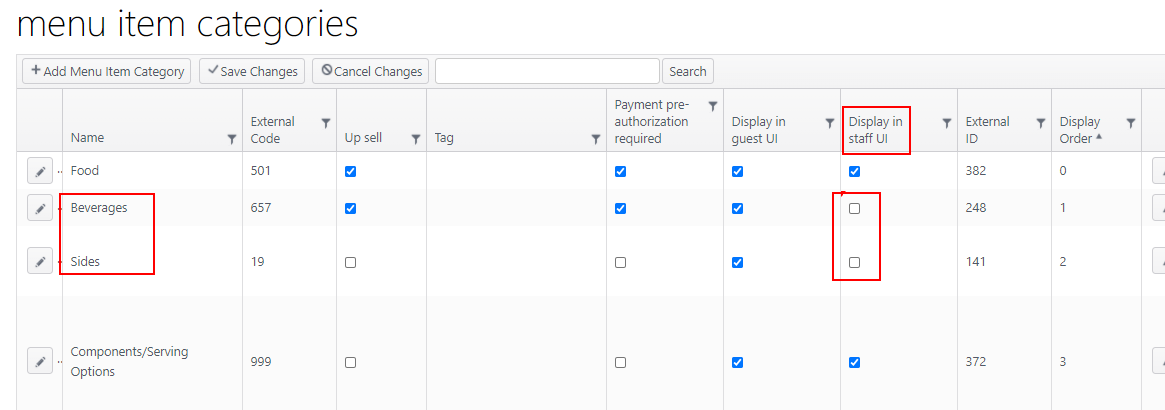
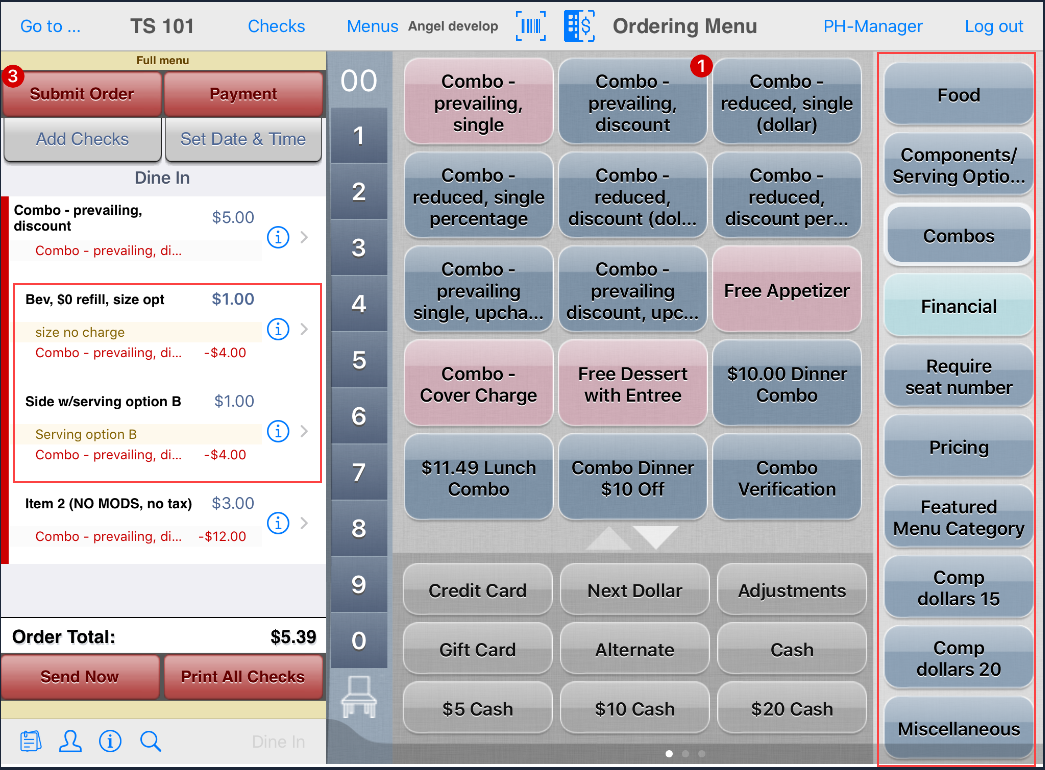
| OE-14278 | Menu item categories: Honor ECM setting to hide categories when selected Menu item categories can be configured to be hidden on the application's ordering screen. When ordering a combo that contains menu items within a hidden menu item category, the menu items can still be ordered. | Path: Categories > Menu Item Categories
|
|
Time Clock - New UI for iOS | |||
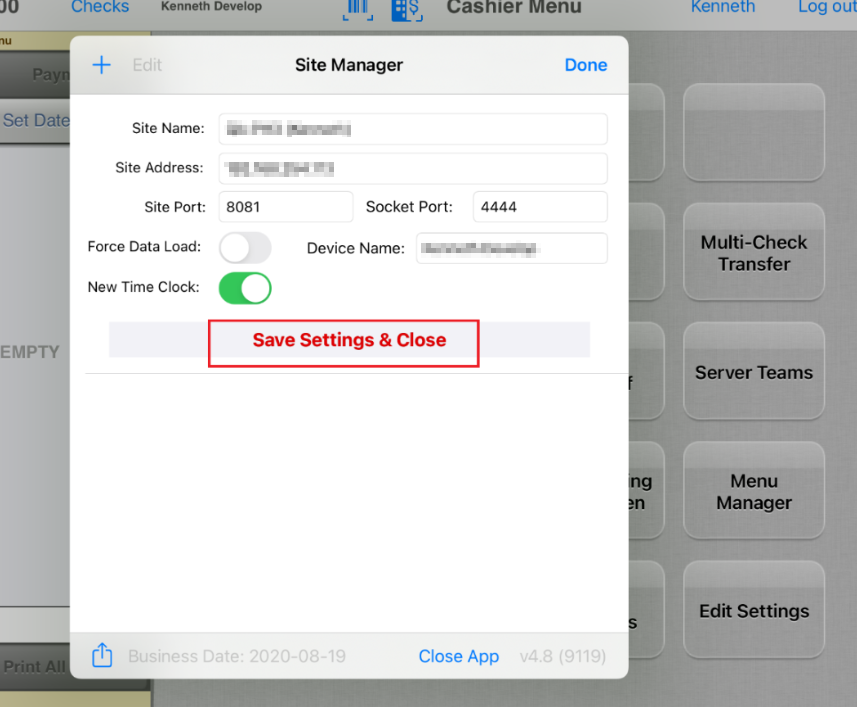
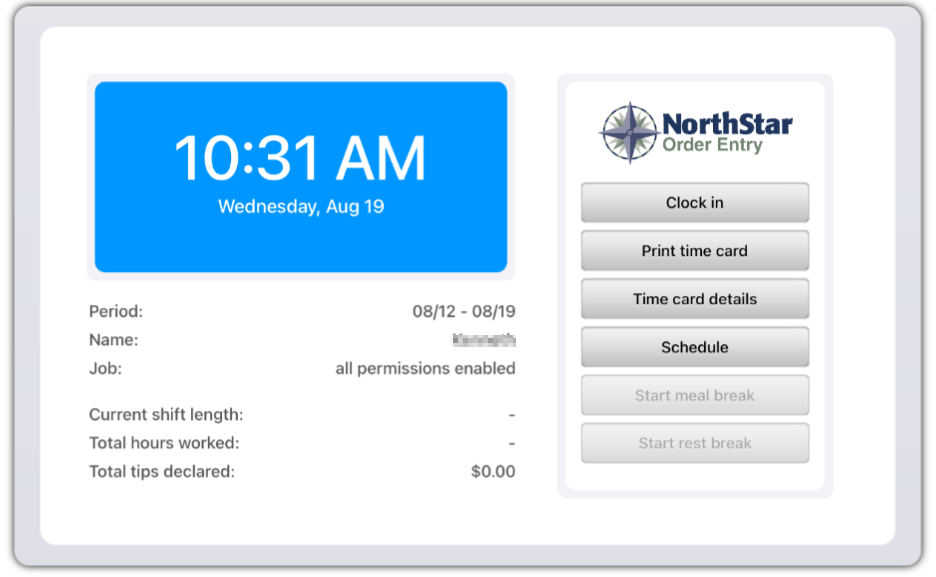
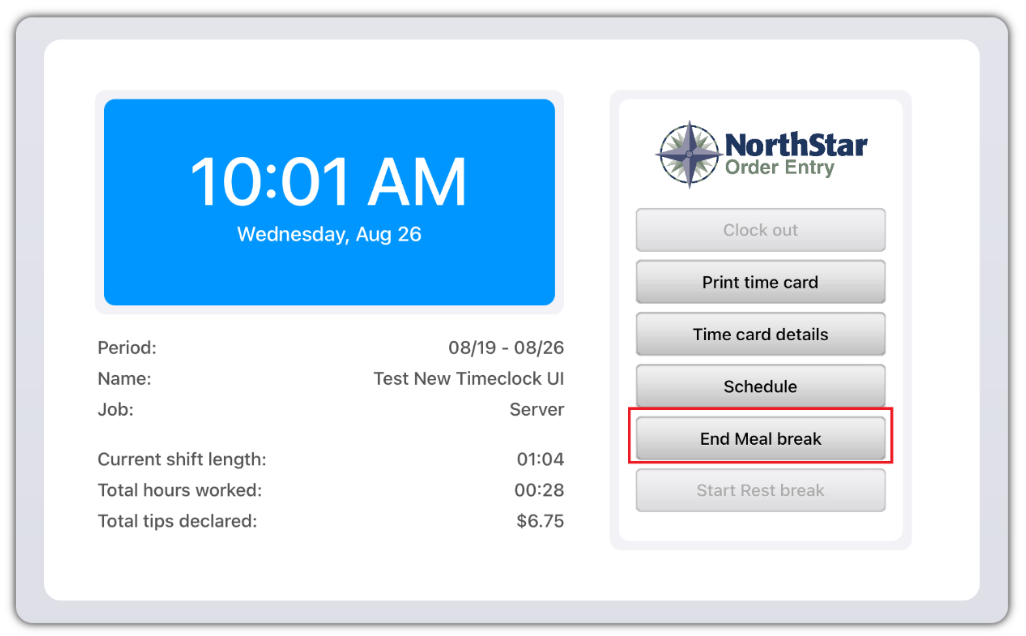
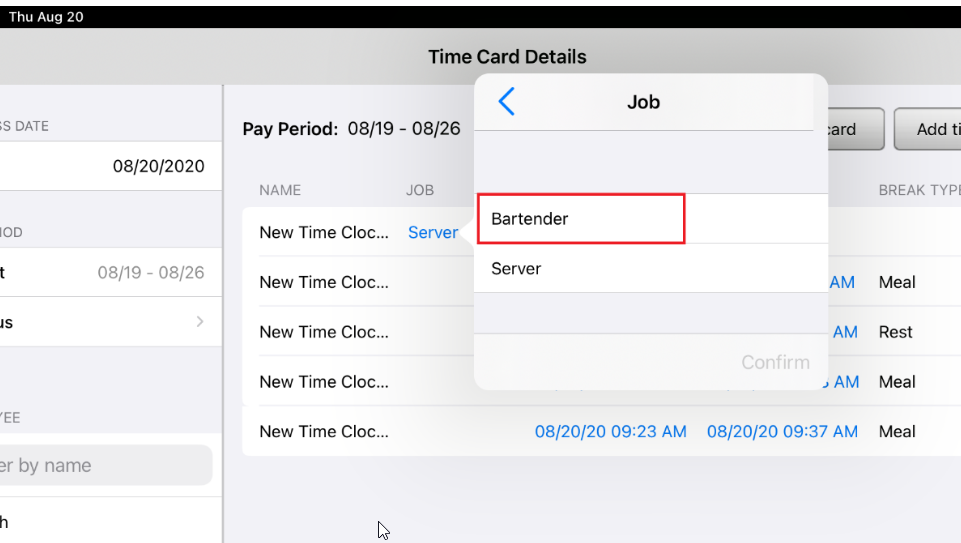
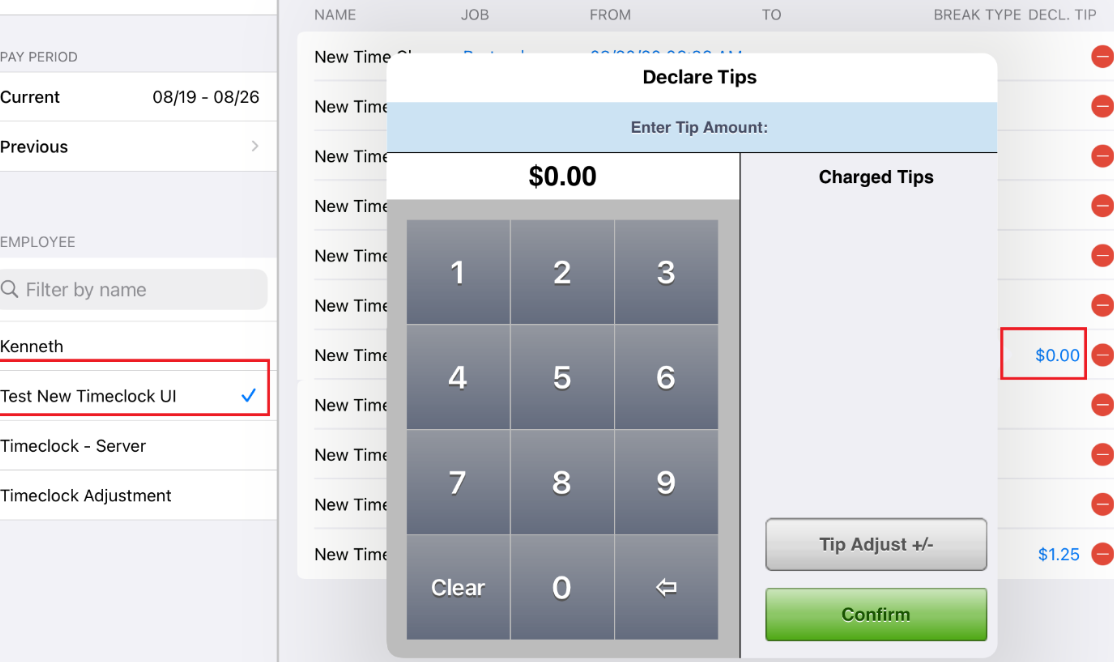
| OE-14175 | Time Clock: Use new Time Clock UI when selected from Edit Settings The Time Clock user interface has been updated to improve functionality and look-and-feel. Includes the same functions as the original UI:
| Enable new time clock interface:
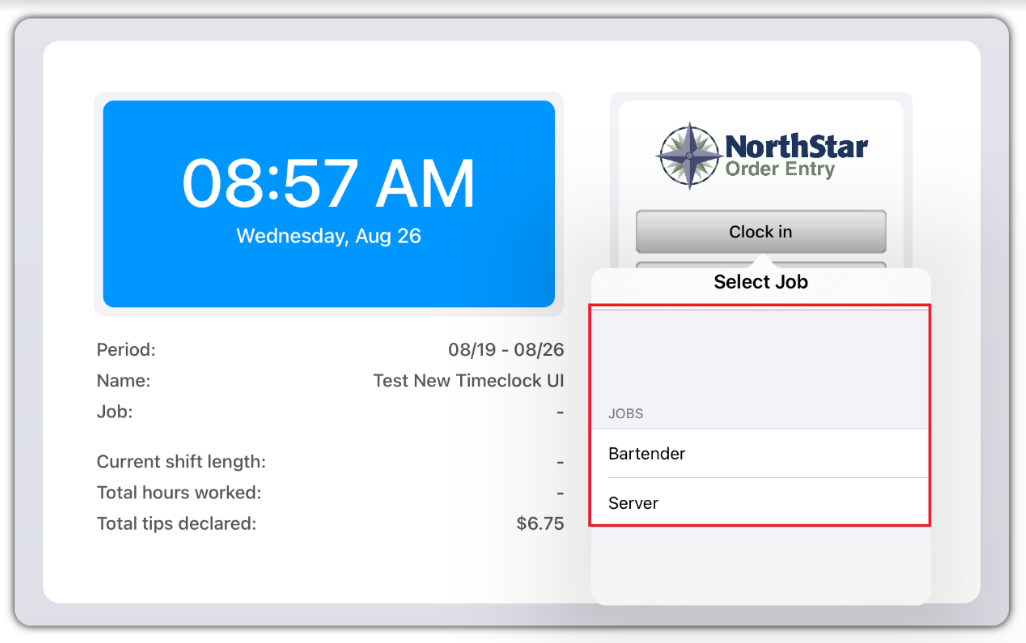
| New Time Clock UI: Clock in by job
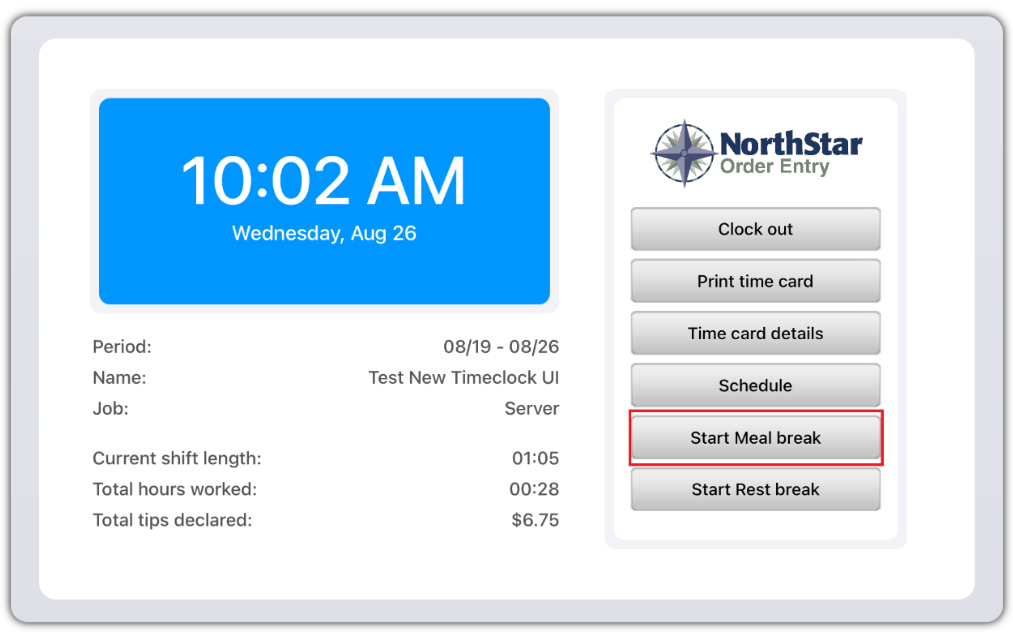
Start/end breaks
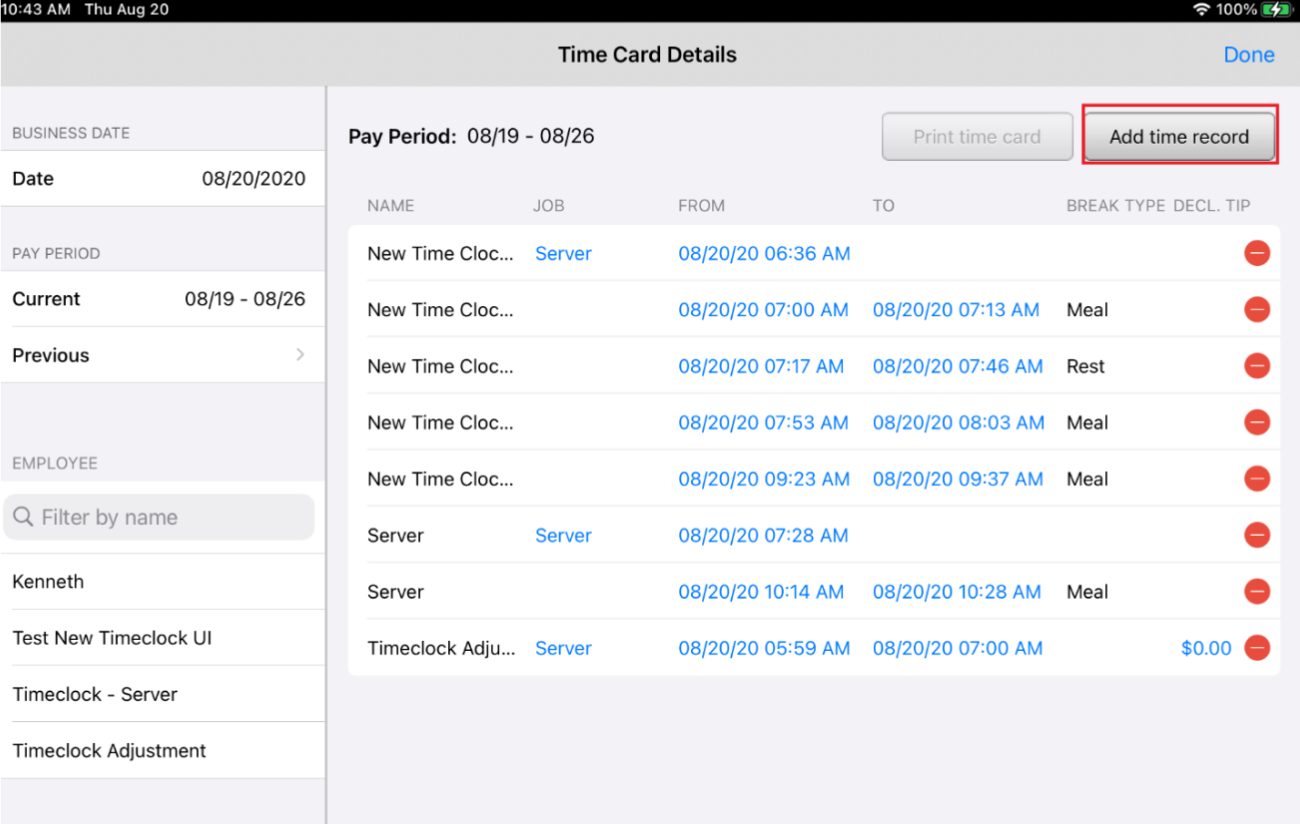
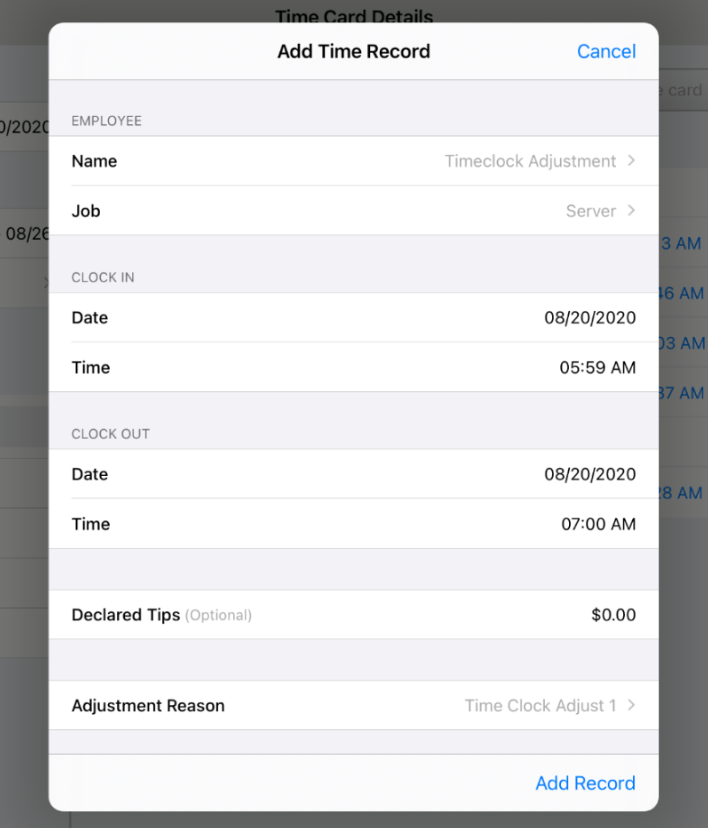
Time card details : Add time record
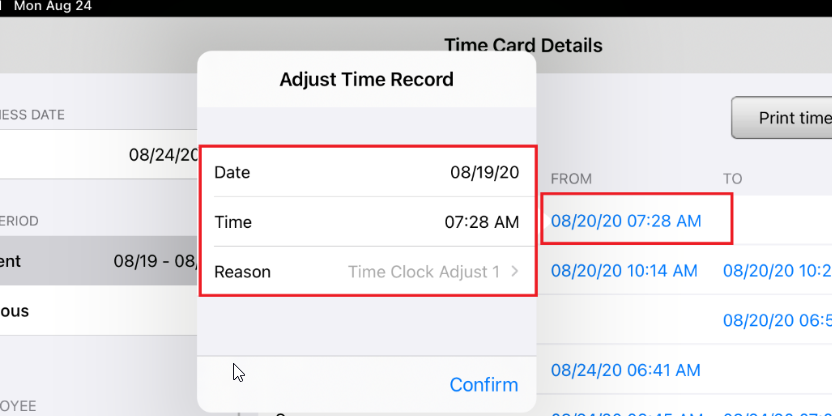
Adjust time record
Adjust job
Add/Declare tips
|
UI Text/Cosmetic Fixes | |||
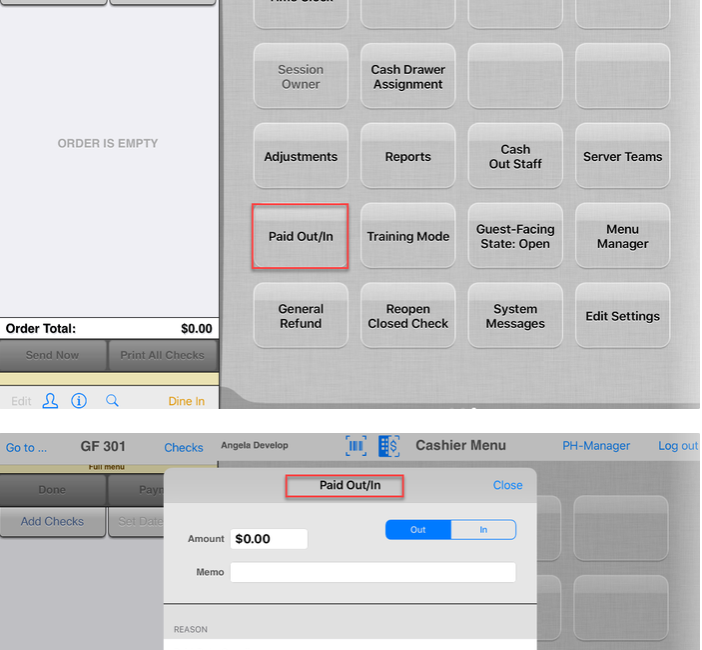
| OE-11213 | Paid Out/In: Revise labels on ECM settings and interface from Paid Out to Paid Out/In Improved naming to accurately reflect paid out/paid in functions. | N/A | Revised Paid Out name to Paid Out/In on button and pop-up header |
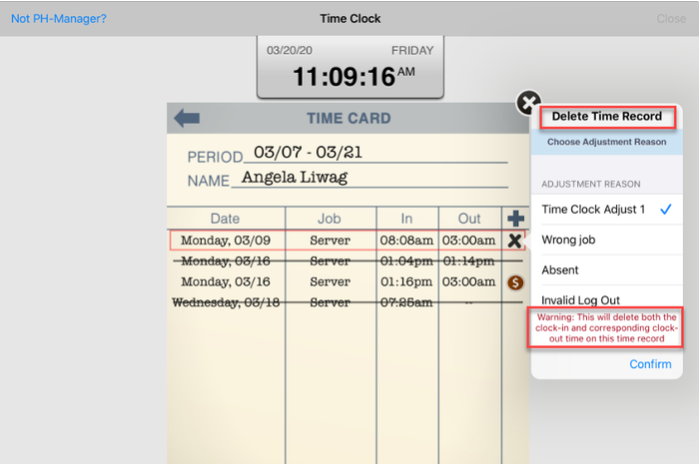
| OE-10285 | Time Card: Update "punch" terms to "clock in," "clock out" and "time record" Updated nomenclature from "punch" to "clock in," "clock out," and "time record." | N/A | Updated nomenclature
|
UX/UI Design | |||
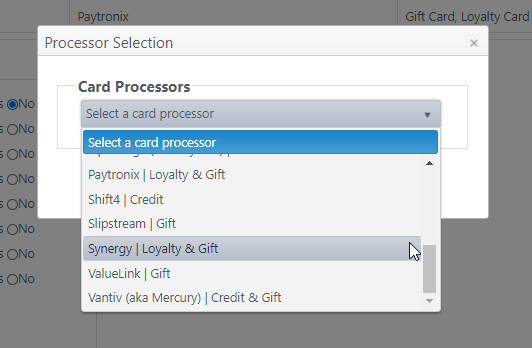
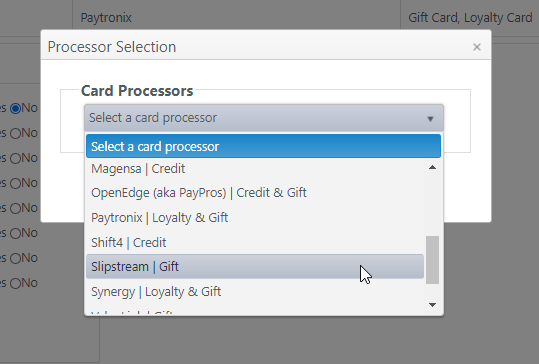
| OE-13224 | Payment processing: Add Synergy loyalty & gift card processor integration Technical and UI changes made to integrate Synergy as a gift and loyalty card processor. | Path: Edit a site > Payment > Add Processor
| Perform all loyalty and gift card payment functions as normal using Synergy as the card processor. Apply loyalty reward
Gift card payment
|
Web Ordering API | |||
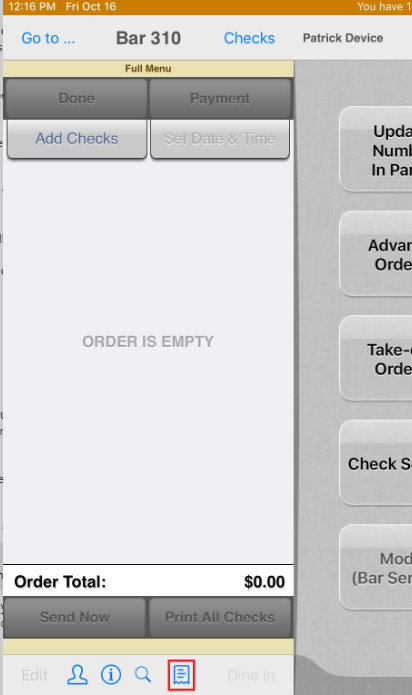
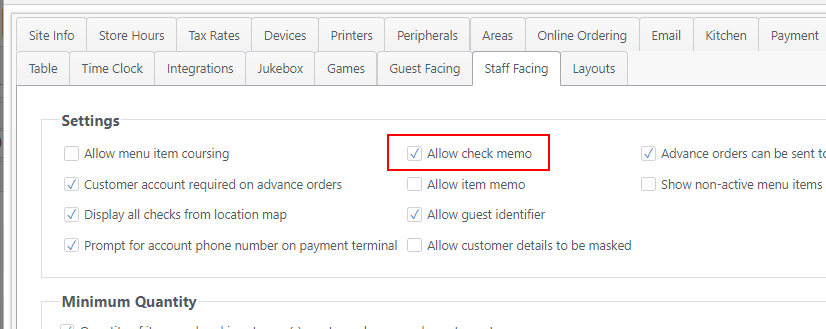
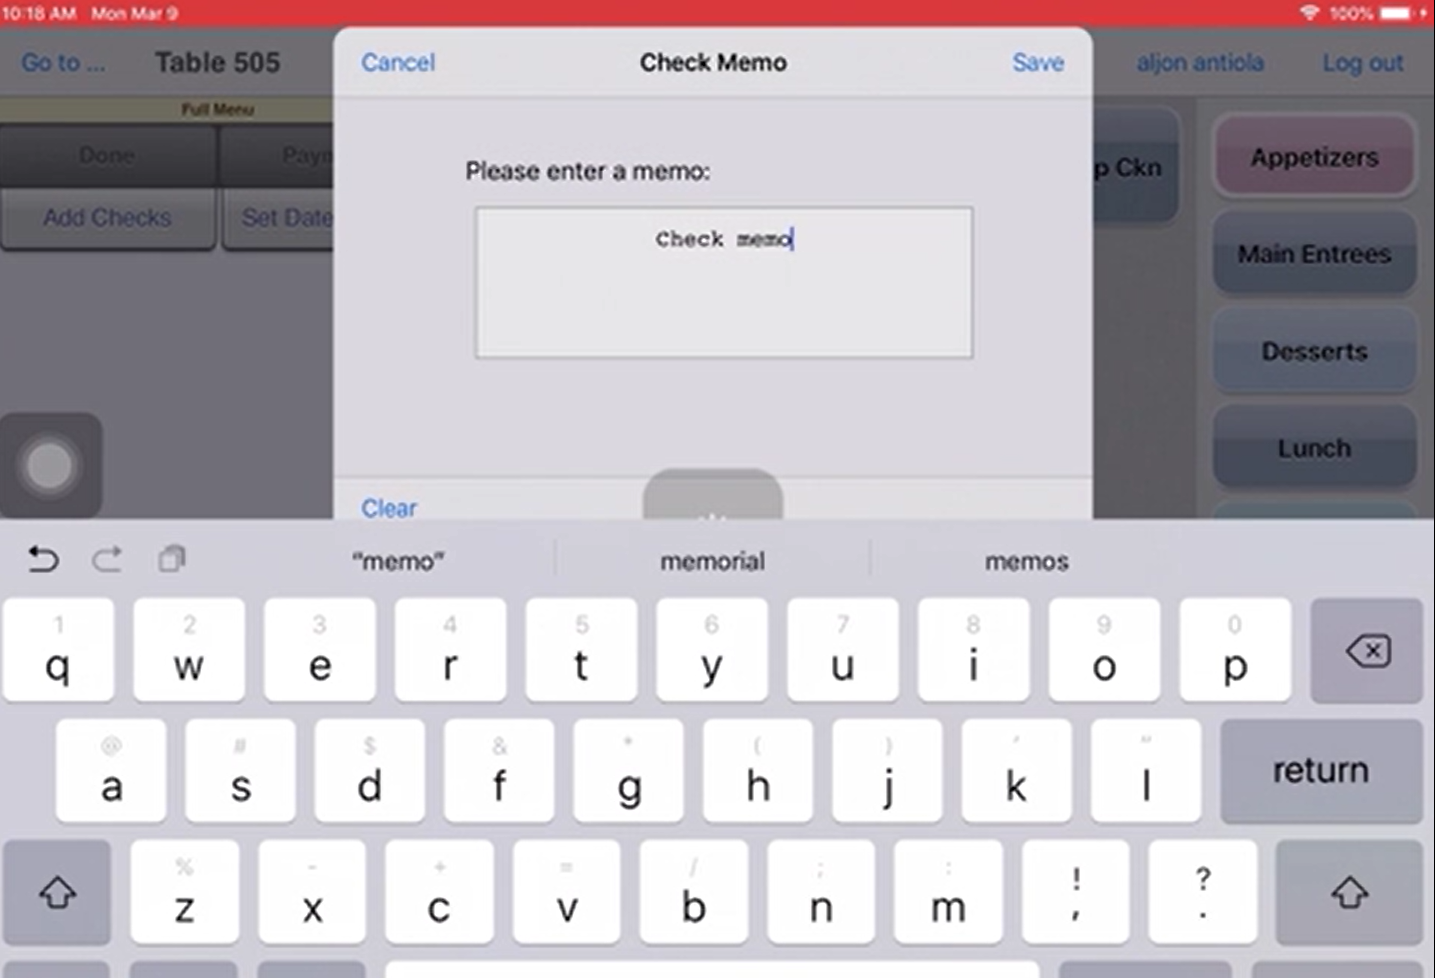
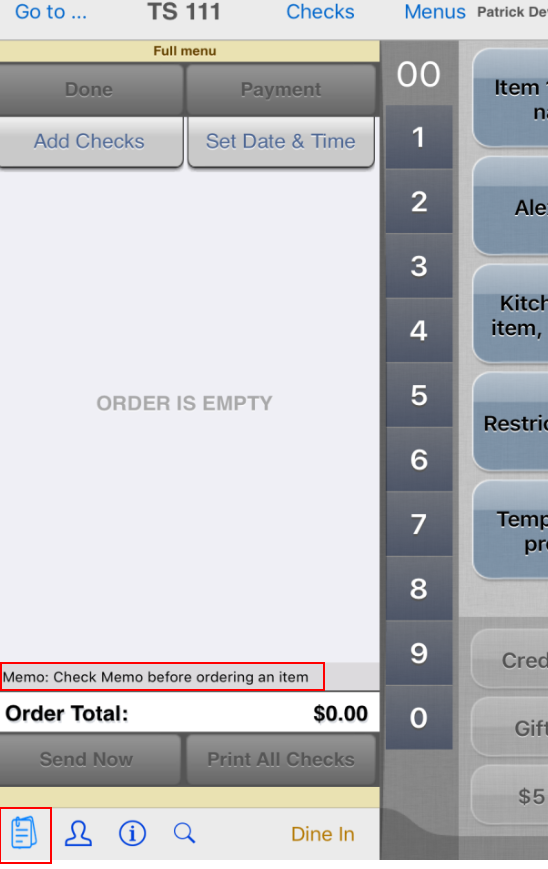
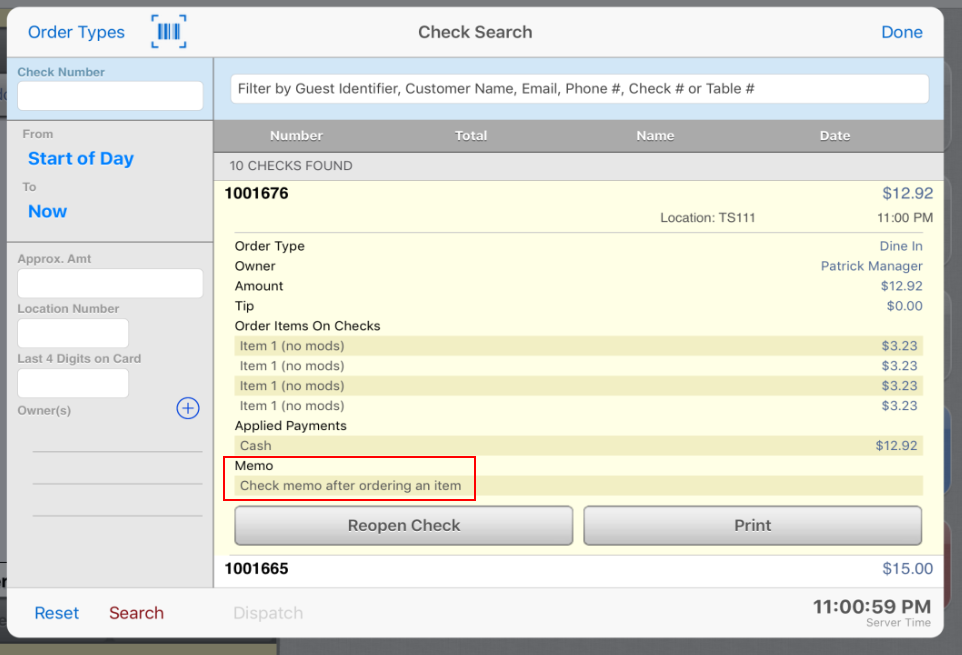
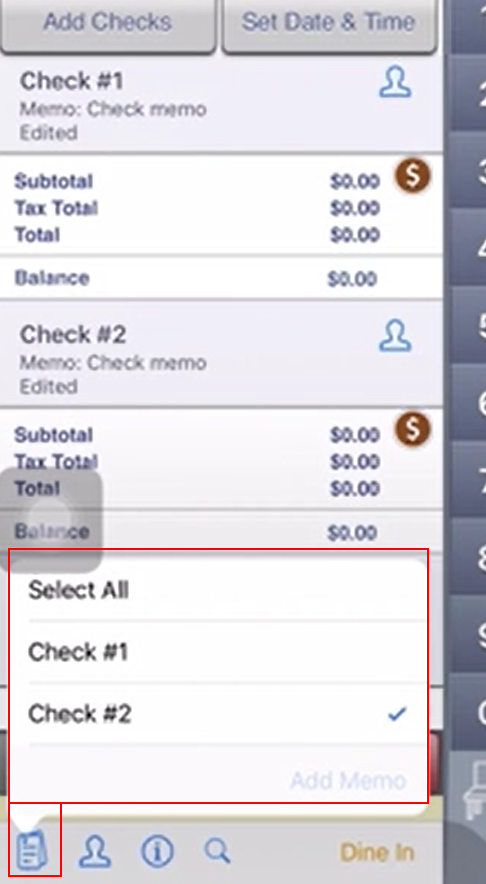
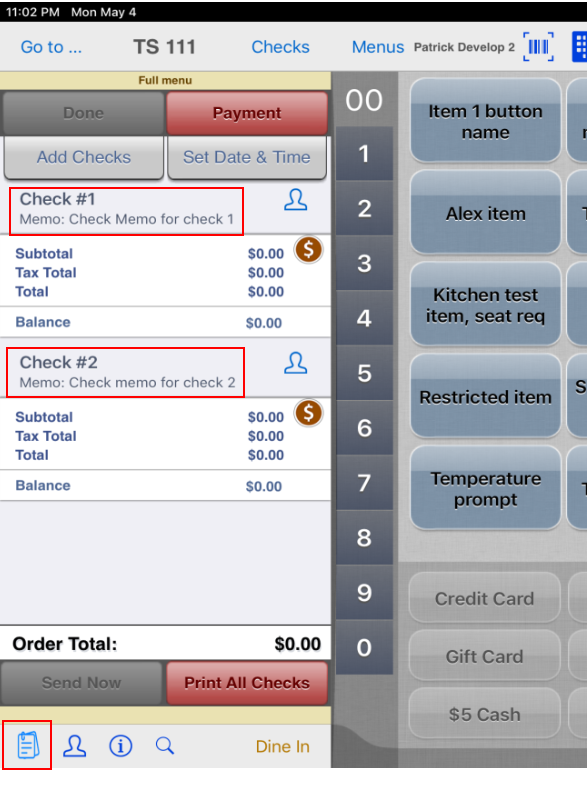
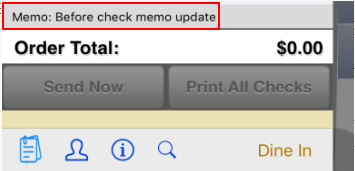
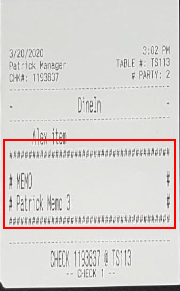
| OE-12384 | Adds the ability to add a memo to a check or checks. Memo can be added:
Maximum character length: 255 characters When there are multiple checks in a session, memo can be added to one or more selected checks. | Path: Edit a site > Staff Facing > Settings
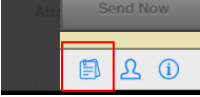
| Check memo icon:
Add check memo before ordering
Memo on check search
Add check memos to two checks before sending to kitchen
Edit memo
Kitchen chit
|
Other | |||
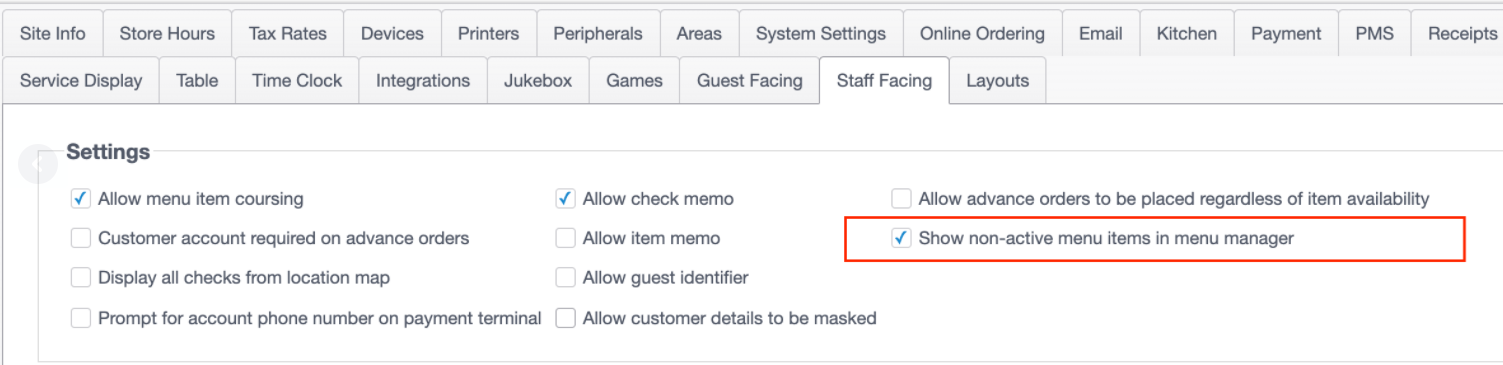
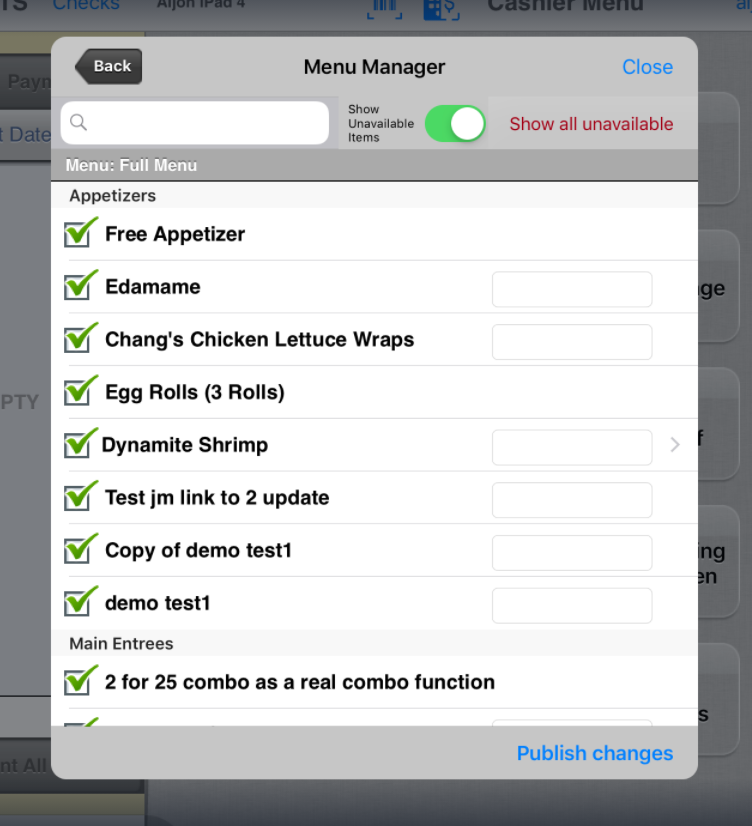
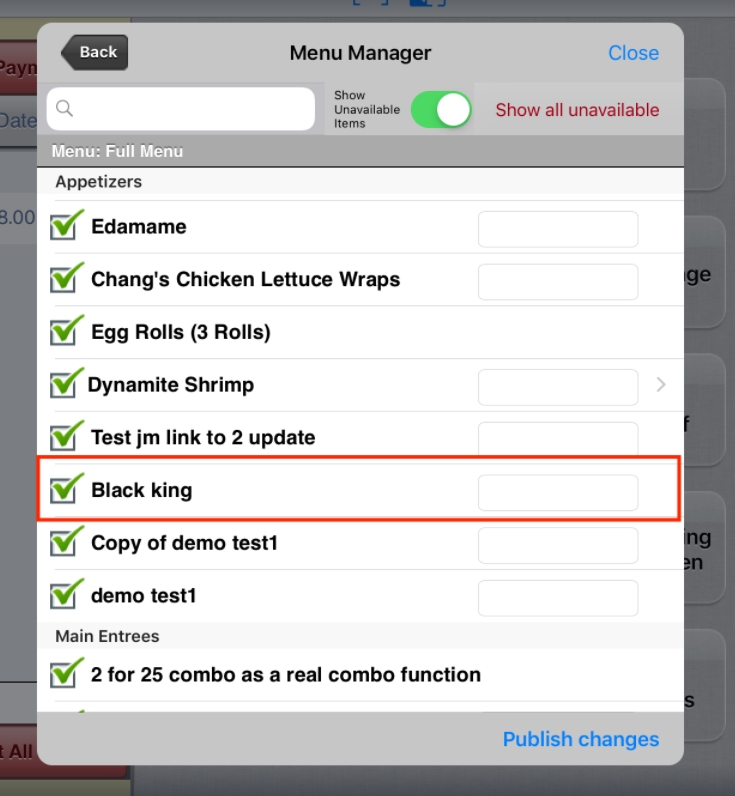
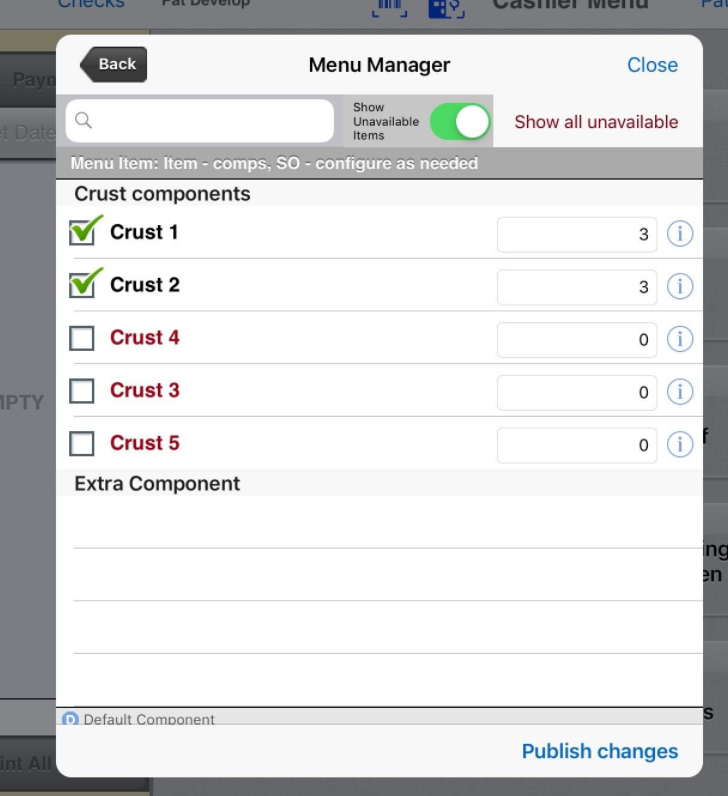
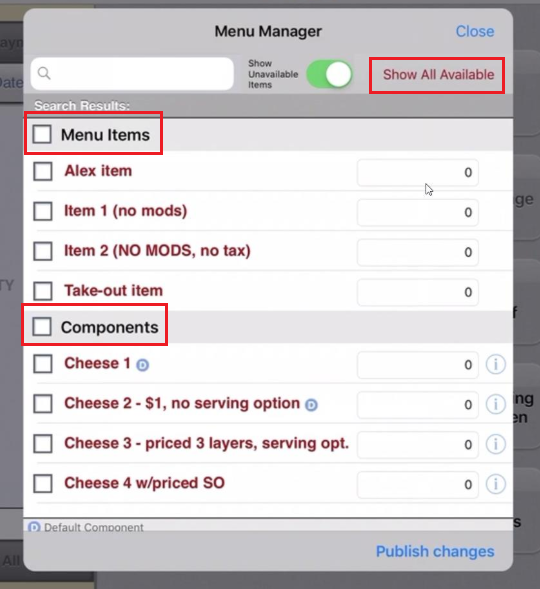
| OE-14497 | Menu Manager: Show only active menu items Sites can opt to only see active menu items on the menu manager (default). | Path: Sites > Staff Facing
|
Showing active items only
Including non-active item "Black king" |
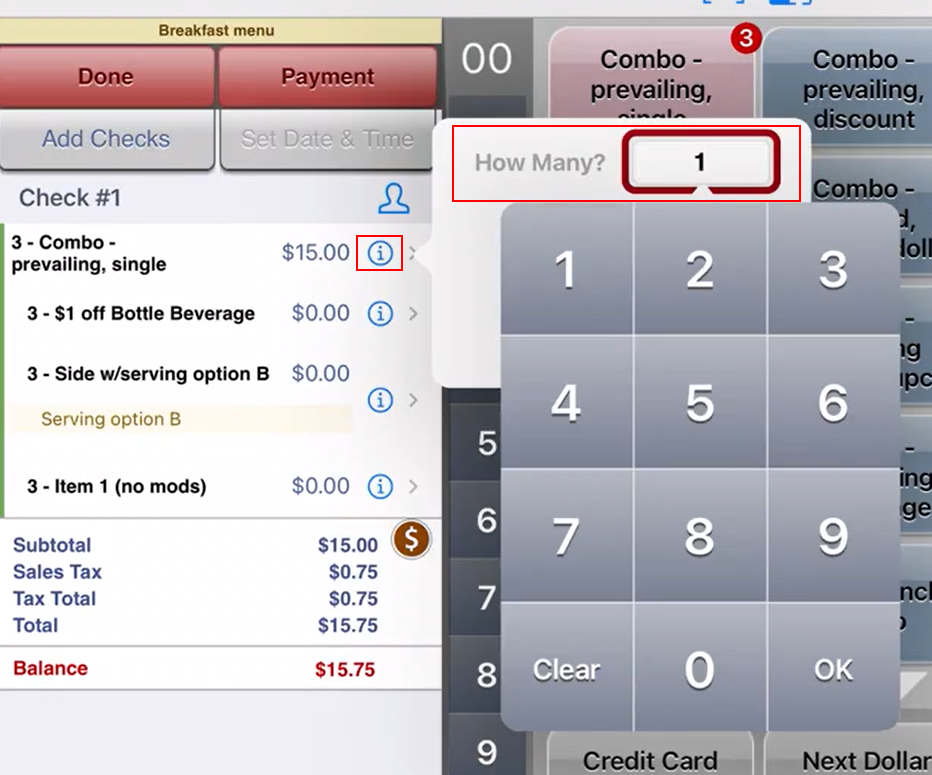
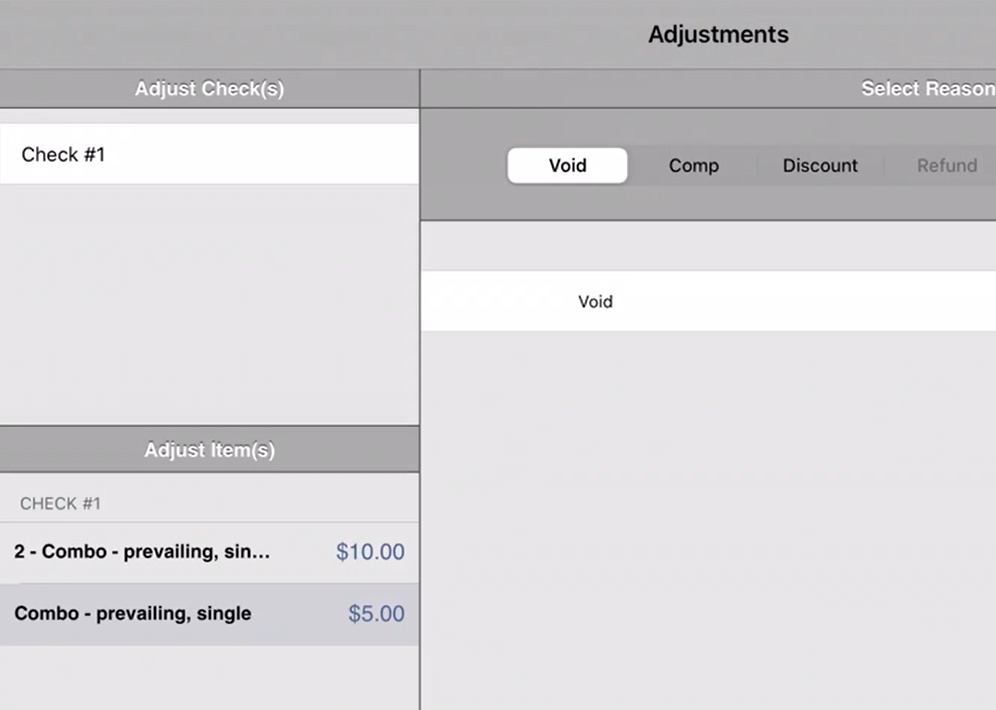
| OE-14374 | When menu items in a combo are ordered in quantity, one or more combos can be separated from the others and adjustments can be made to just that combo. | N/A |
|
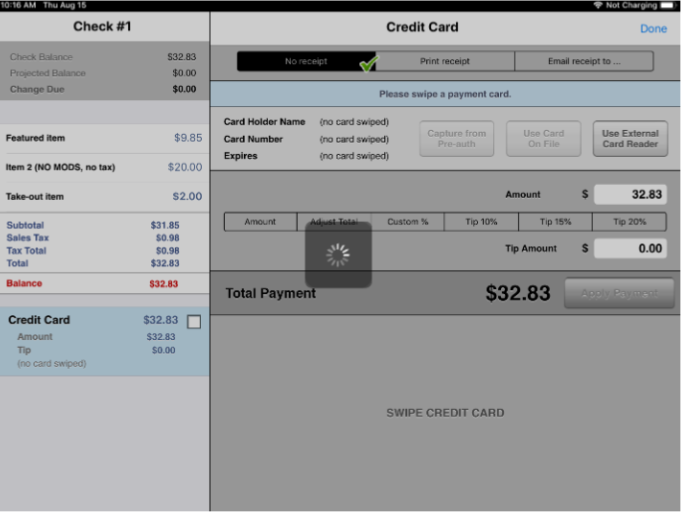
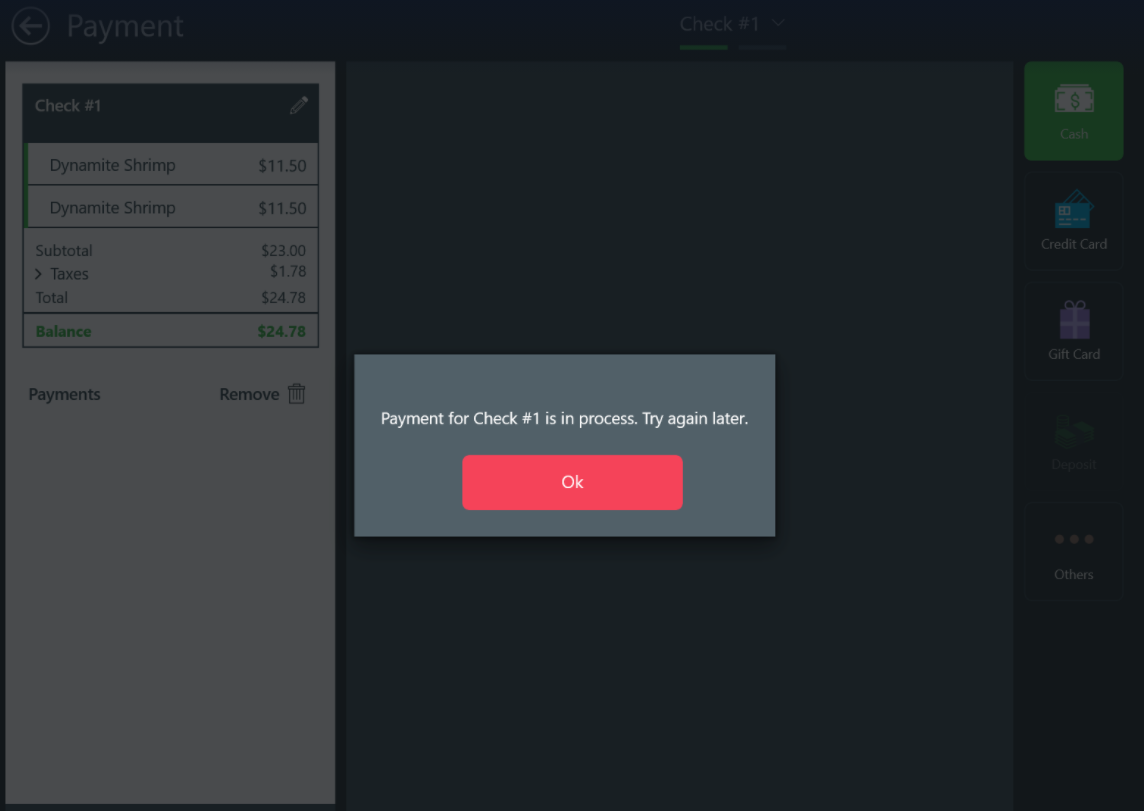
| OE-14232 | Payment: Lock check while payment is in progress to prevent access to Payment page While payment is in progress, the payment screen is locked and masked to prevent any action from being taken until payment is complete. | N/A |
|
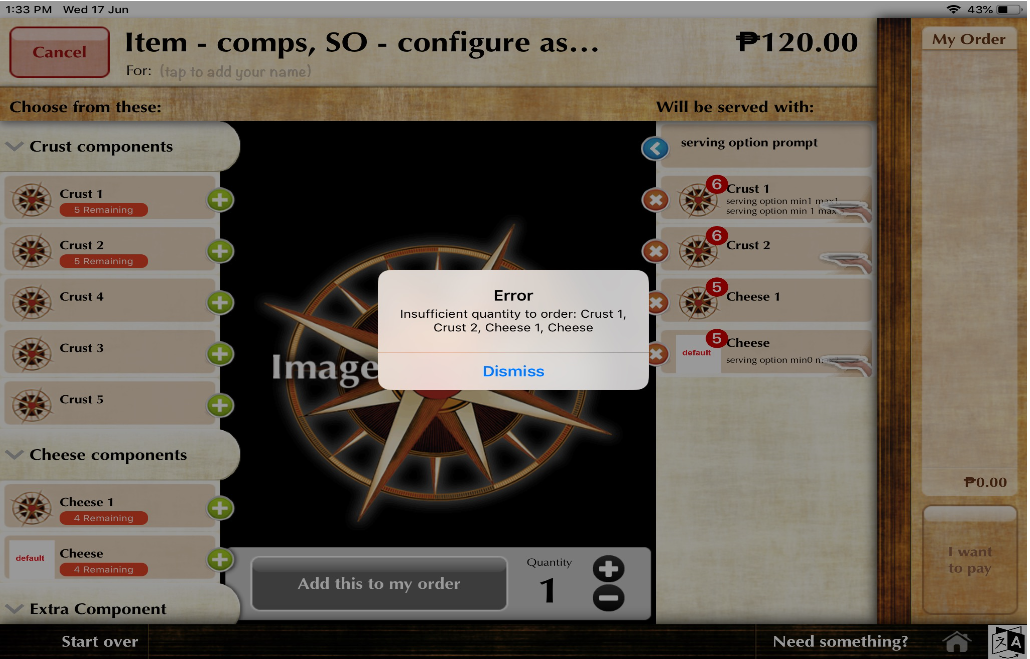
| OE-14221 | When a menu item has more than one component and any component has insufficient quantity, present an informational message specifying all components with insufficient quantity to complete the order. | N/A |
|
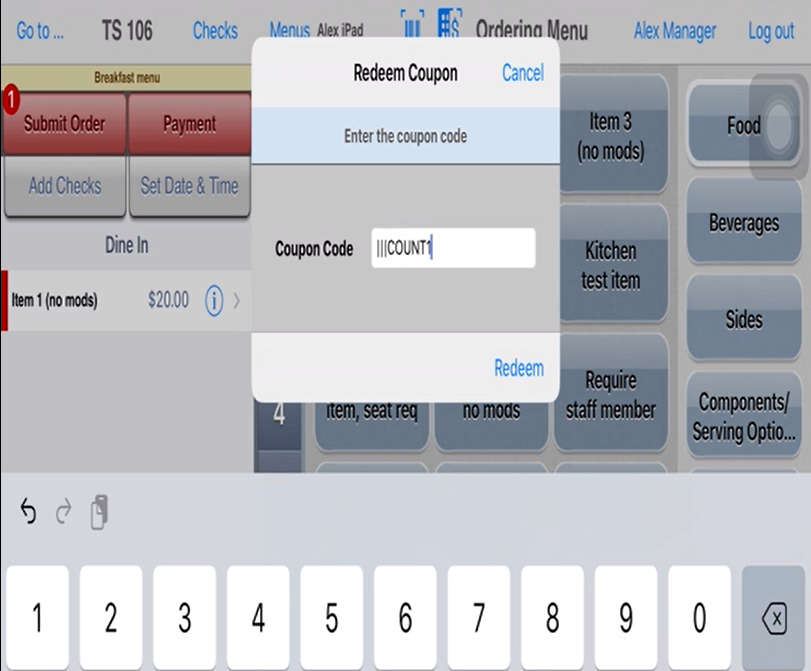
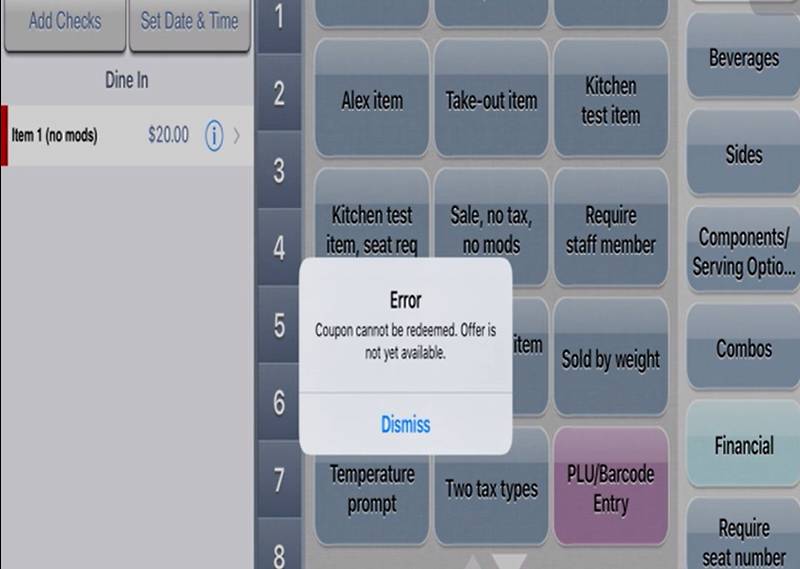
| OE-14125 | NorthStar Offers: Coupon redemption - Show message if coupon date is not yet valid Show prompt when coupon is not effective yet per effective date and offer is not date-enforced. When user confirms, apply coupon; otherwise, do nothing. | N/A |
|
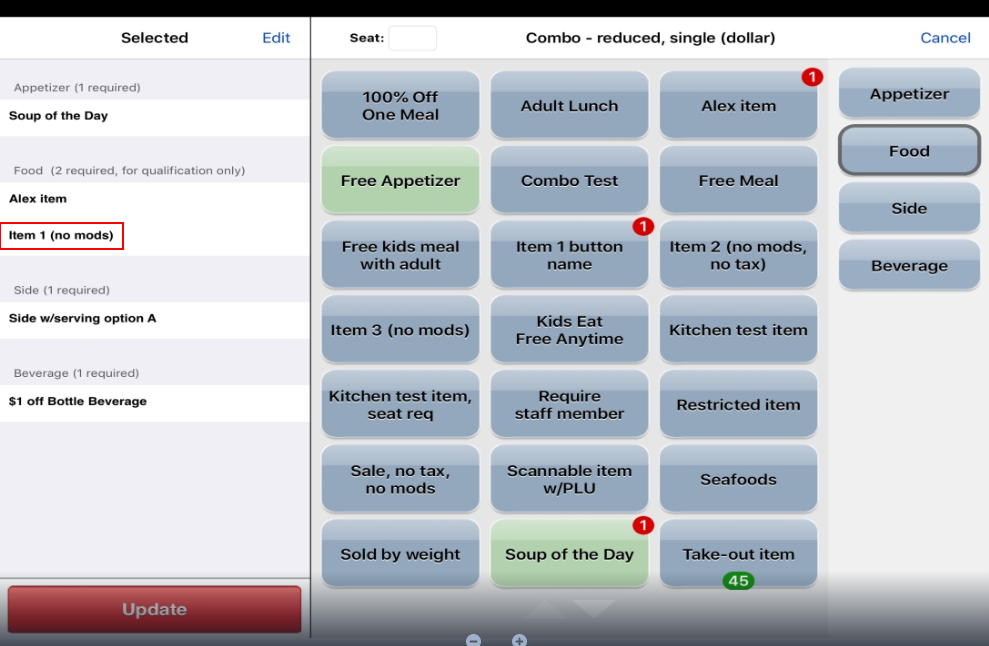
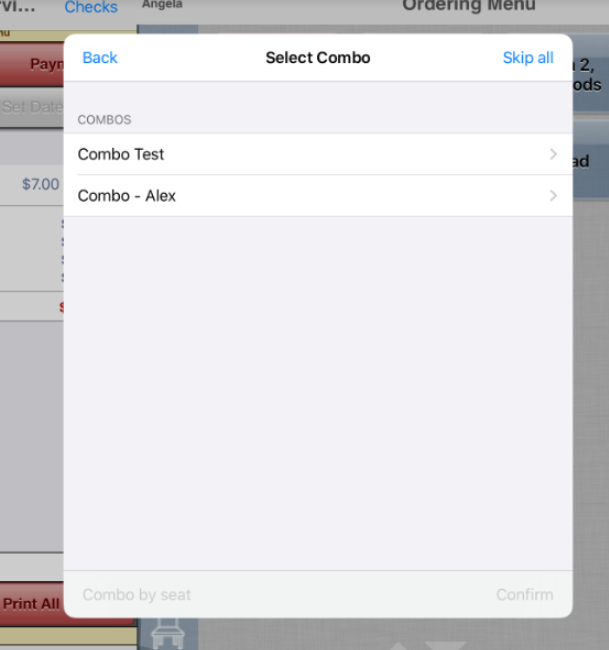
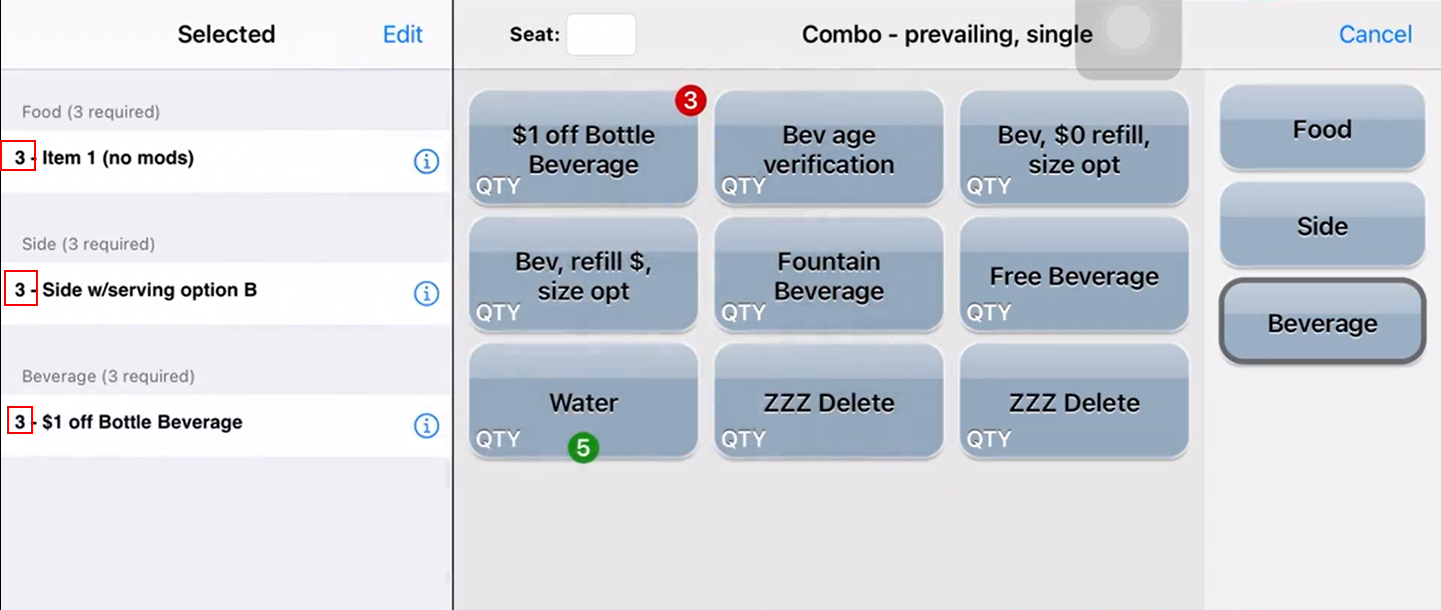
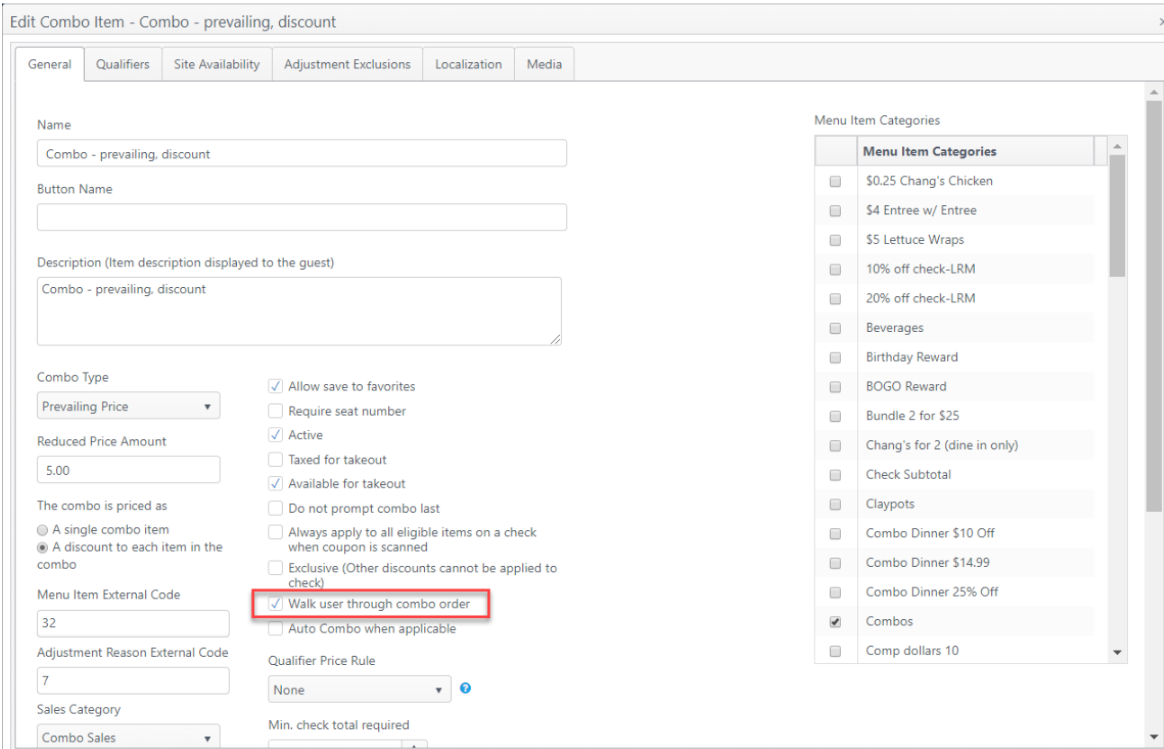
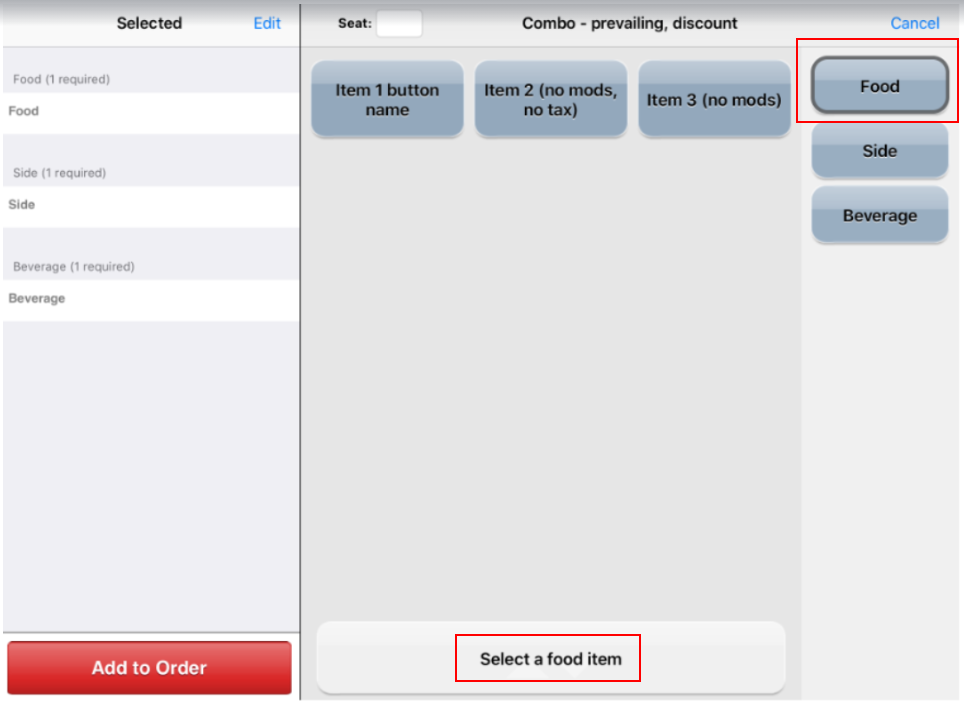
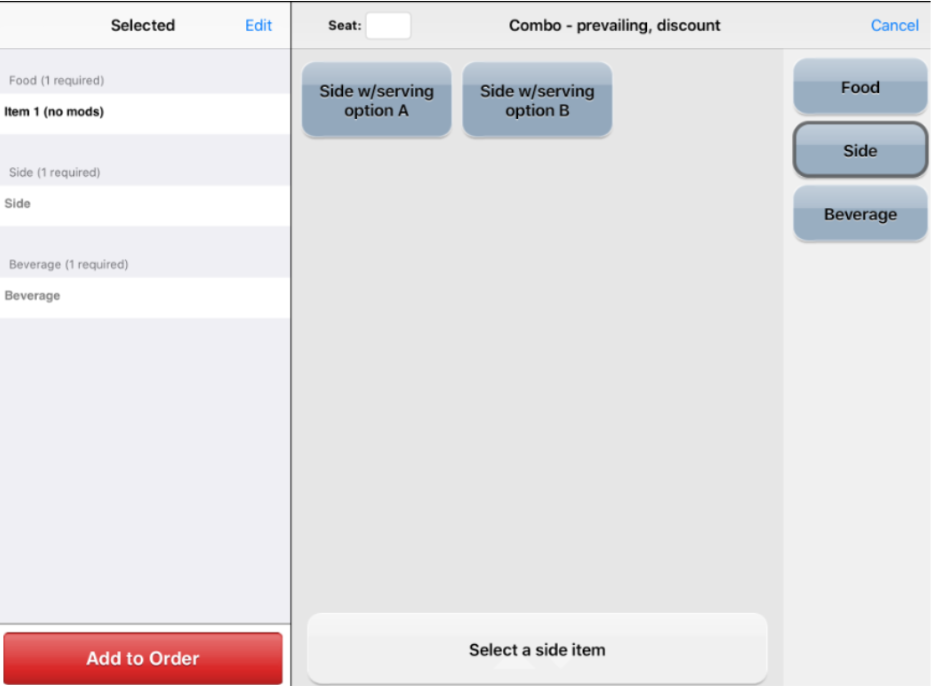
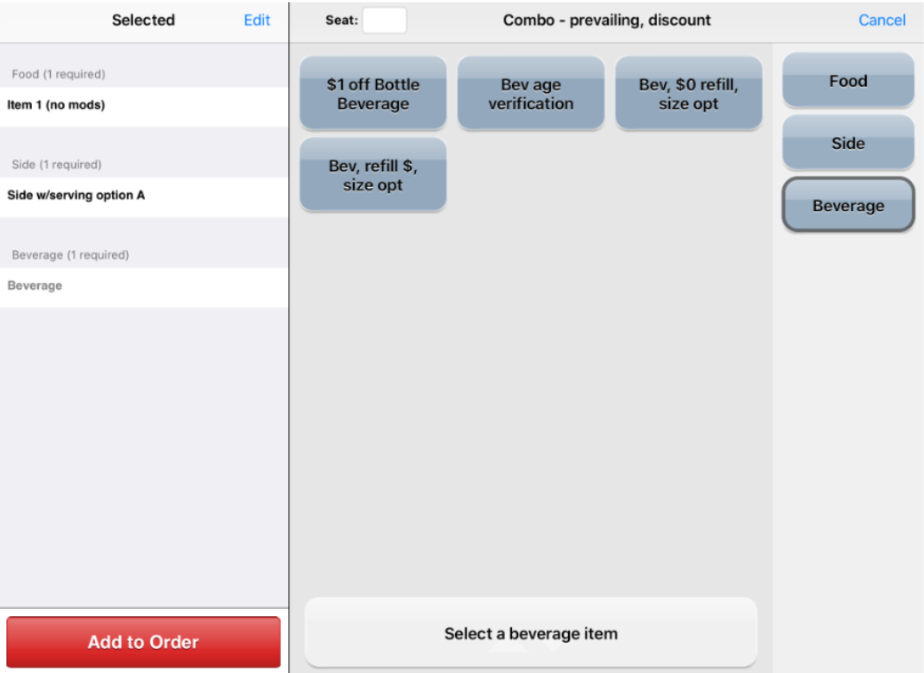
| OE-14009 | Combo ordering: Walk user through ordering required number of qualifiers in each category When ordering a combo, the server is prompted to select each qualifier in a combo, effectively "walking" them through the combo ordering process. | Path: Produce > Menu Items > Add/Edit a combo
|
|
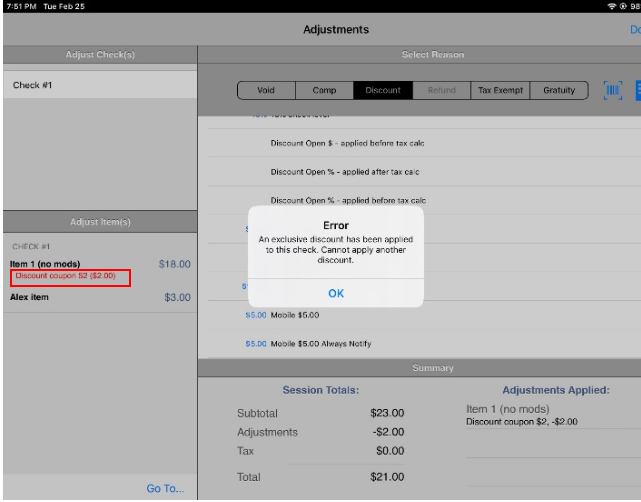
| OE-13914 | Adjustment: Apply exclusive discount to unsent and sent items (added to check) When a discount is marked as an exclusive discount and applied to an item, no other discount can be applied to that item, whether the item is unsent or sent. | Path: Financial > Adjustment Reasons > Add/edit adjustment reason
|
|
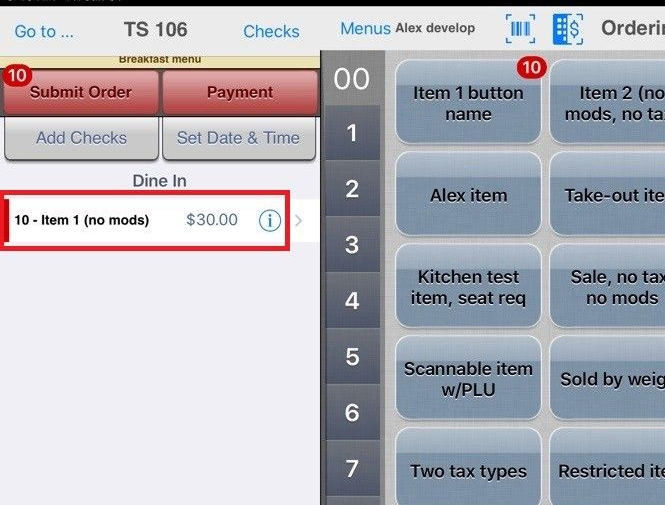
| OE-13886 | Improved to increment cover counts when the numeric keypad is used for quantity ordering. | Pre-condition: Menu item has cover count configured
|
|
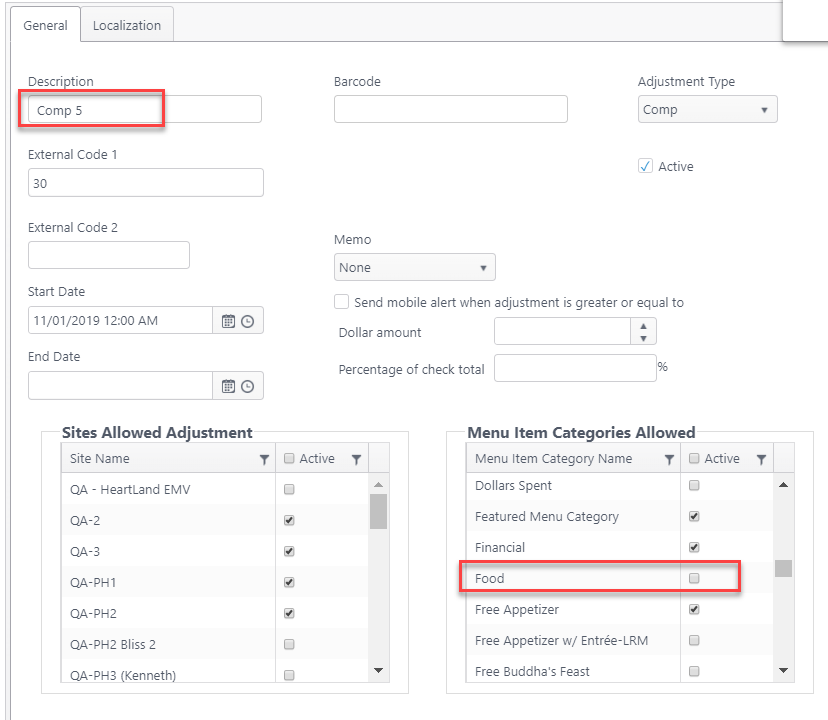
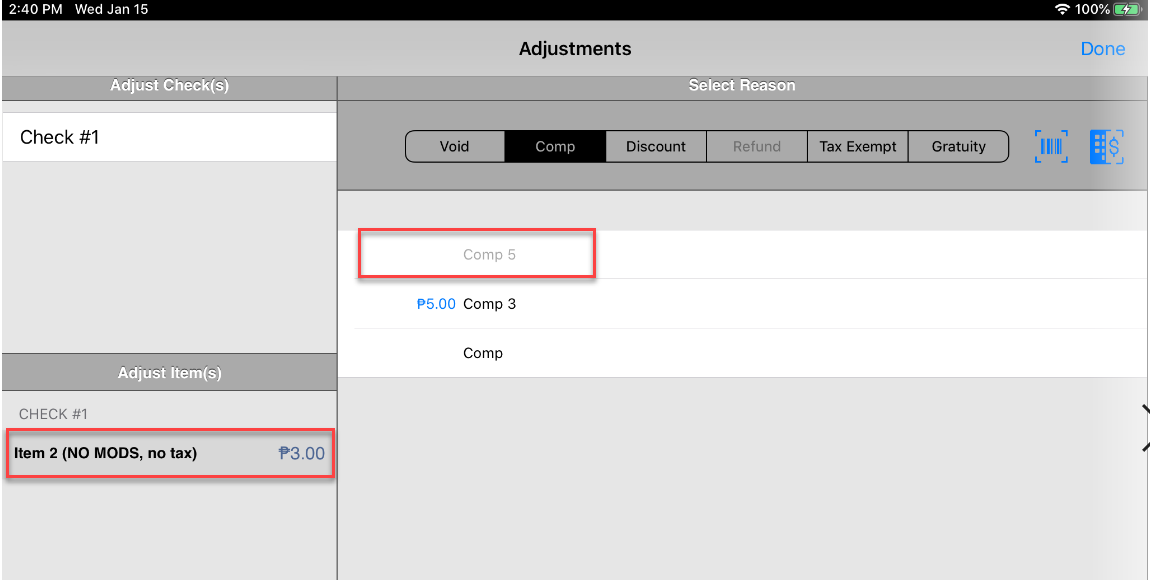
| OE-13814 | When comp adjustment reason is disabled for a menu item category (Financial > Adjustment Reasons), the adjustment reason will be grayed out/disabled on the app. | Path: Financial > Adjustment Reasons
|
|
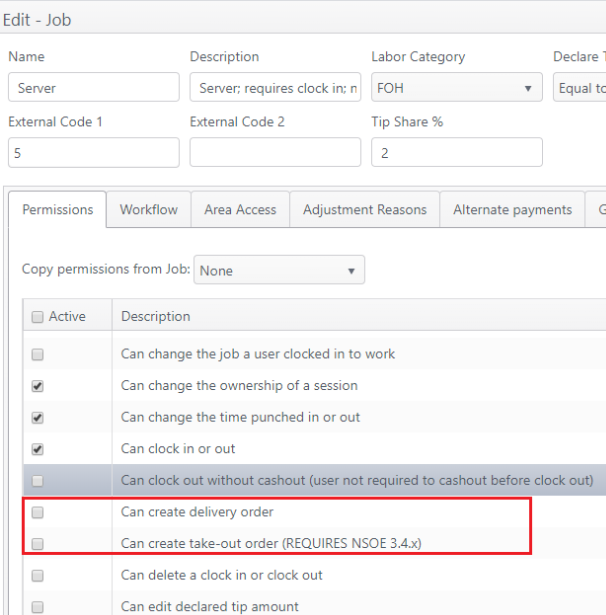
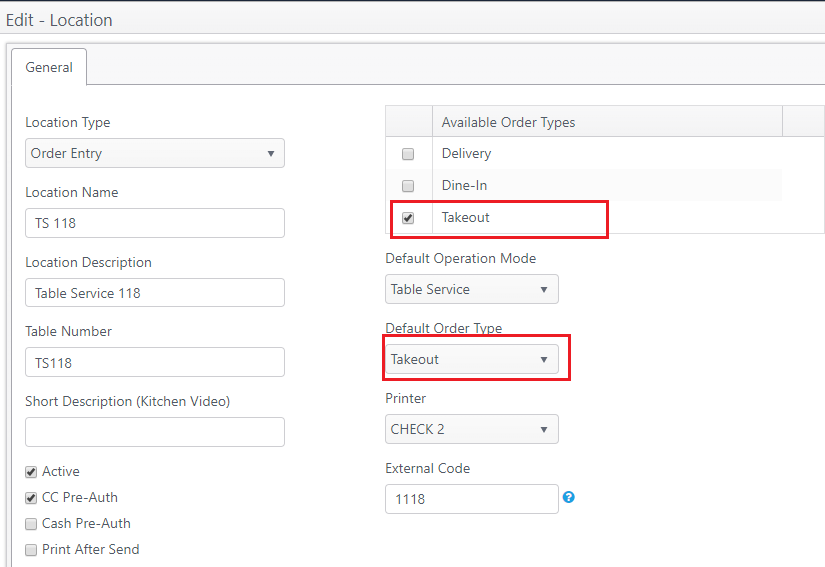
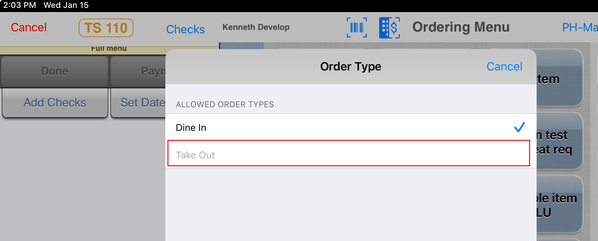
| OE-13782 | Improves the functionality by preventing a user from placing delivery or takeout orders when they do not have permission. | Pre-conditions Path: Users > Job > edit a job
Path: Edit a site > Areas > Location
|
|
| OE-13656 | Combos: Create combo per pricing rules and apply offer when loyalty offer is redeemed A combo can be automatically created from ordered menu items when a loyalty offer is redeemed. The qualifier price rule will be applied to determine if the items qualify for a combo. | Path: Products > Menu items > add/edit a combo menu item
| In this example:
|
| OE-13536 | Kiosk: Menu items with Barcode/PLU can be scanned in kiosk mode In kiosk mode, menu items (standard and combos) can be ordered by scanning the barcode. | Path: Products > Menu items > add/edit a menu item
Path: Edit a site > Devices > add/edit a device
|
|
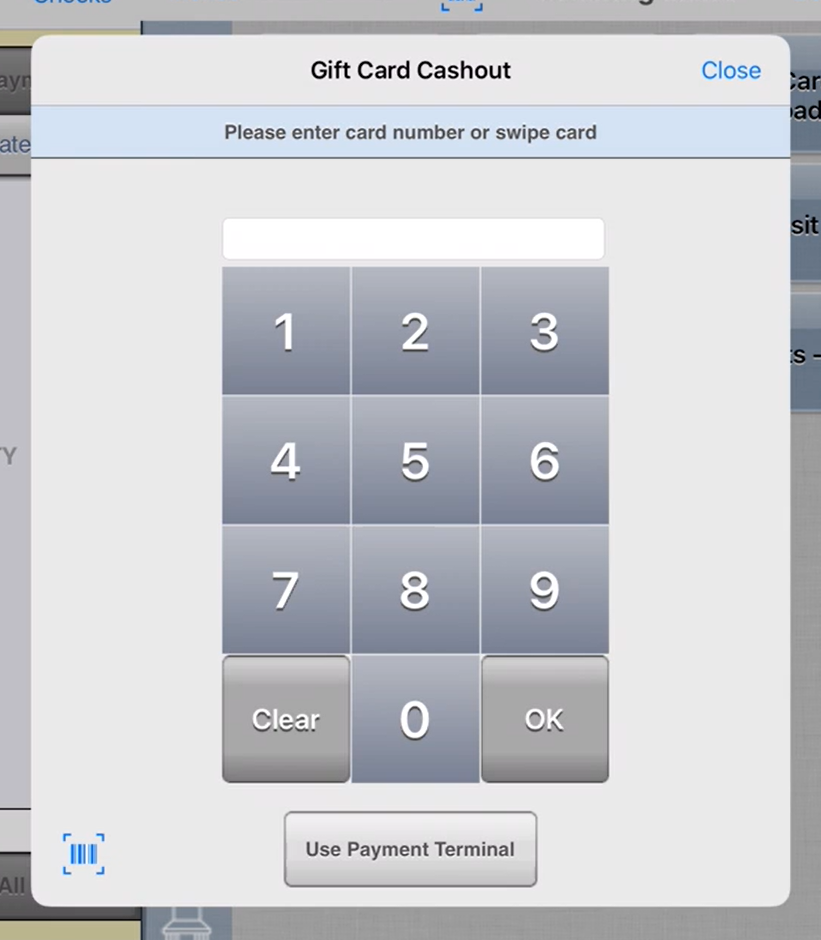
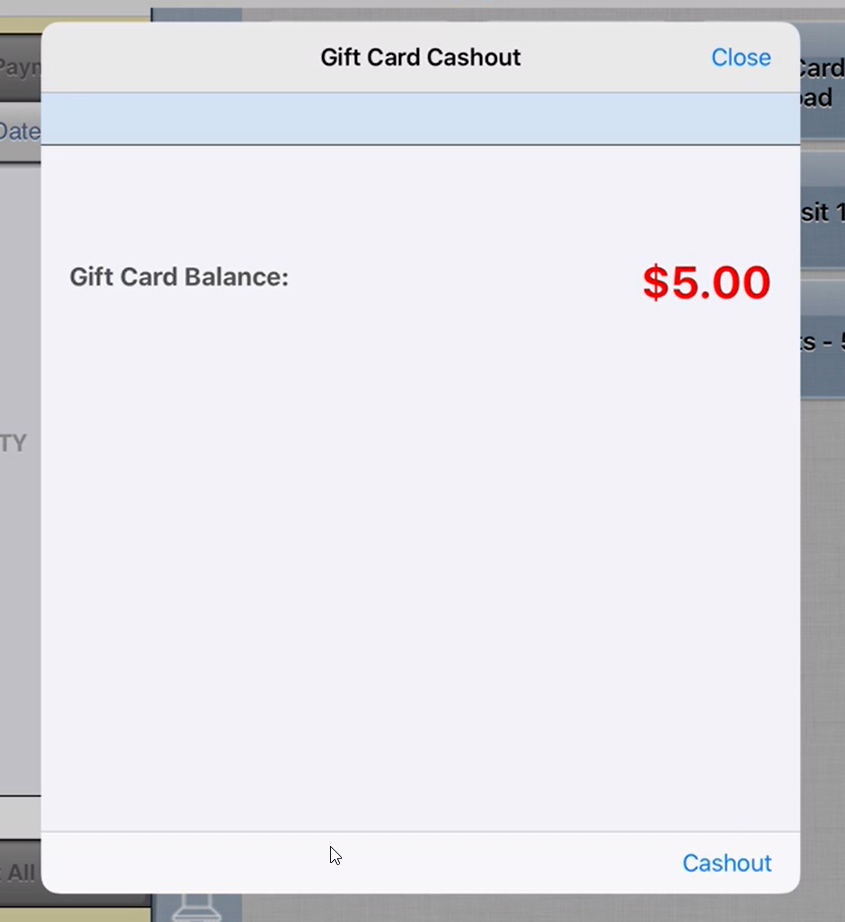
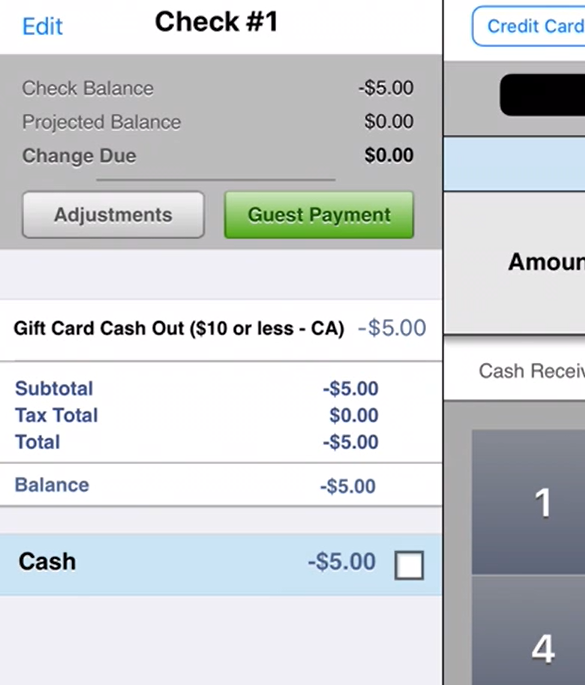
| OE-13518 | Gift Card: Support change in gift card cashout for Midnite Express Gift card cashout when Slipstream (Midnite Express)northsta is the card processor are now supported due to improvements in Midnite Express. | Pre-condition: Slipstream (Midnite Express) is selected as the gift card processor
|
|
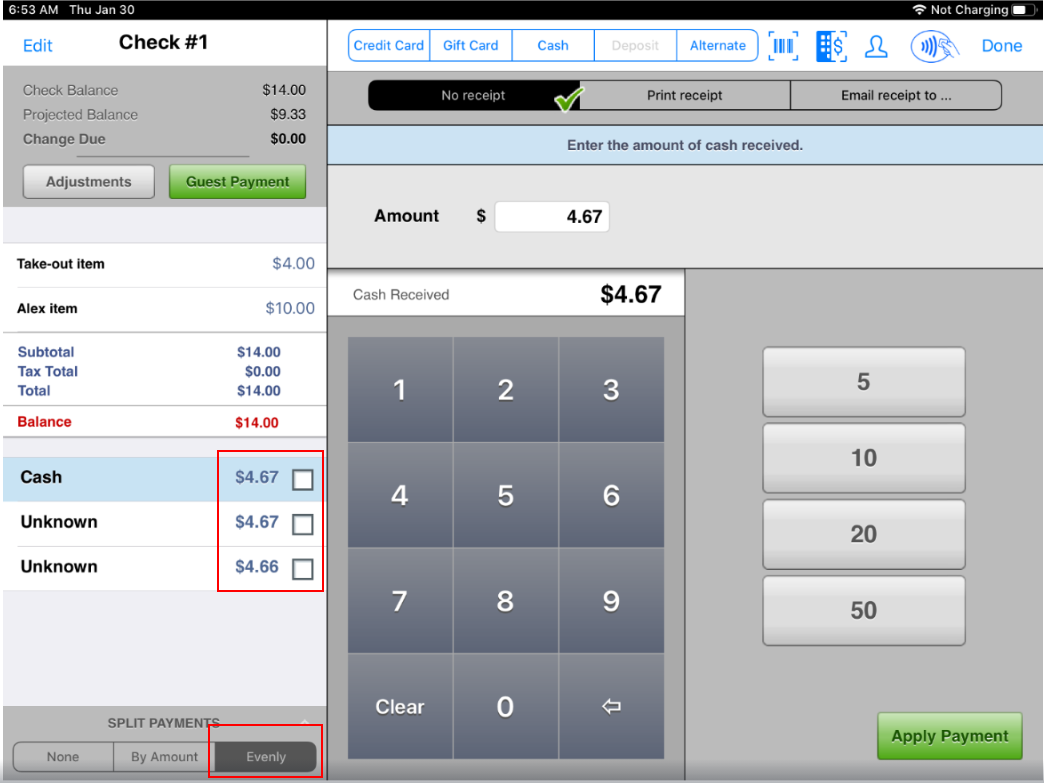
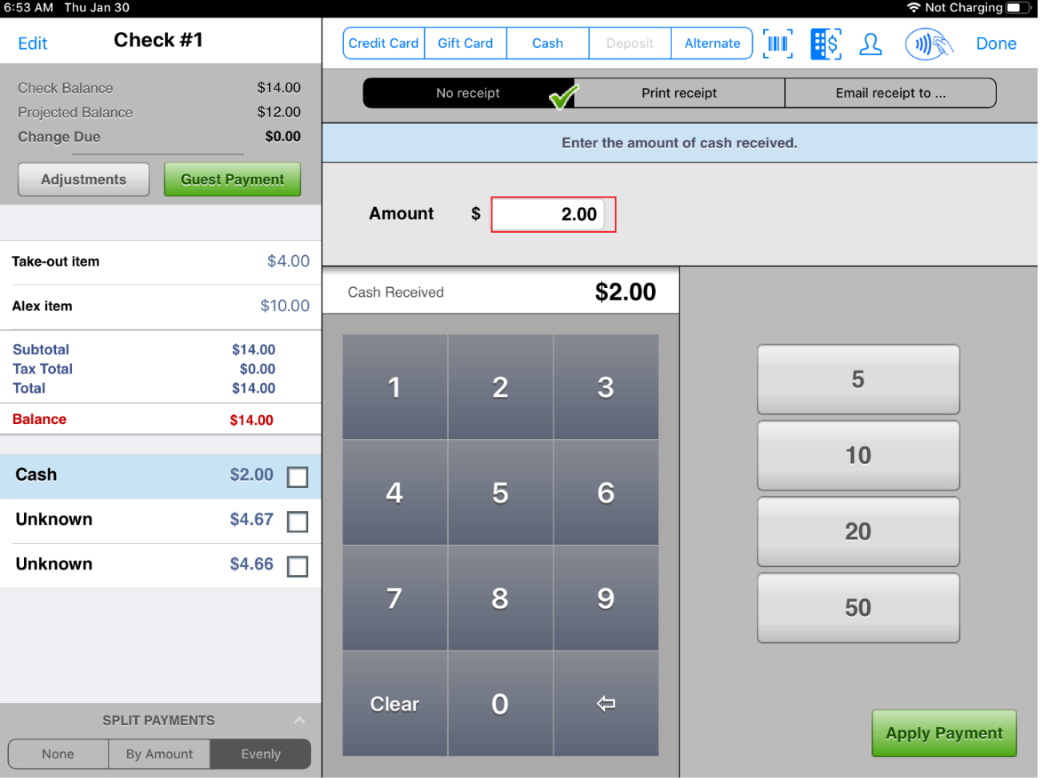
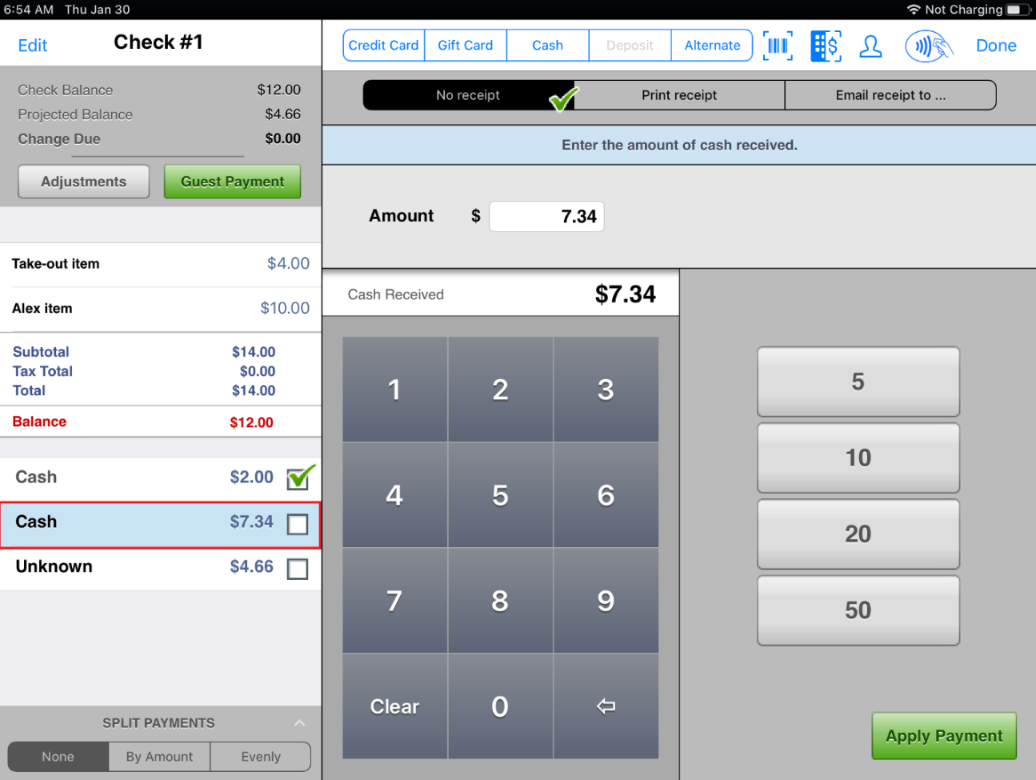
| OE-13290 | Split payments: Allow amounts for evenly split payments to be revised With this improvement, when a check is split evenly between guests, the amounts of each payment can be revised. | N/A |
|
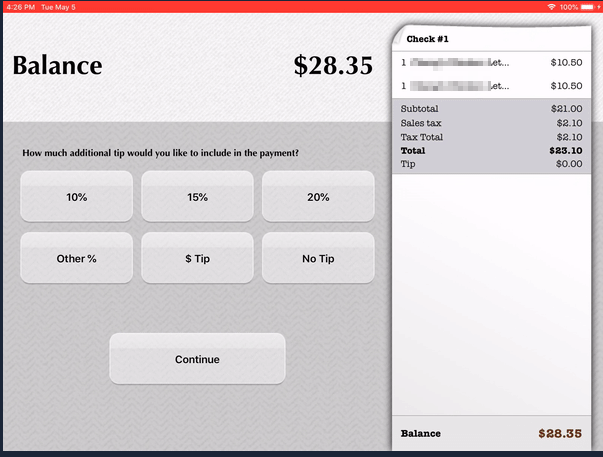
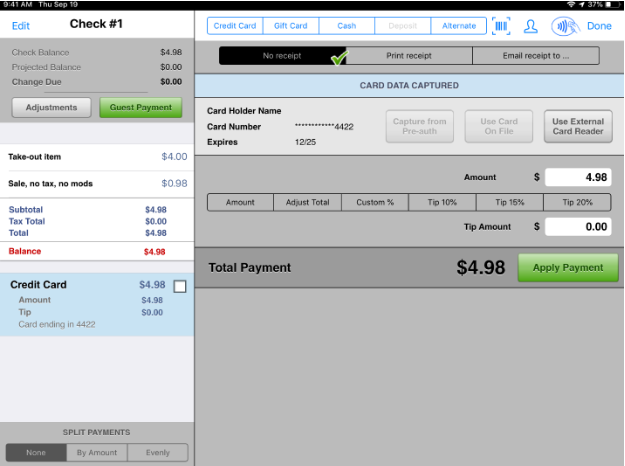
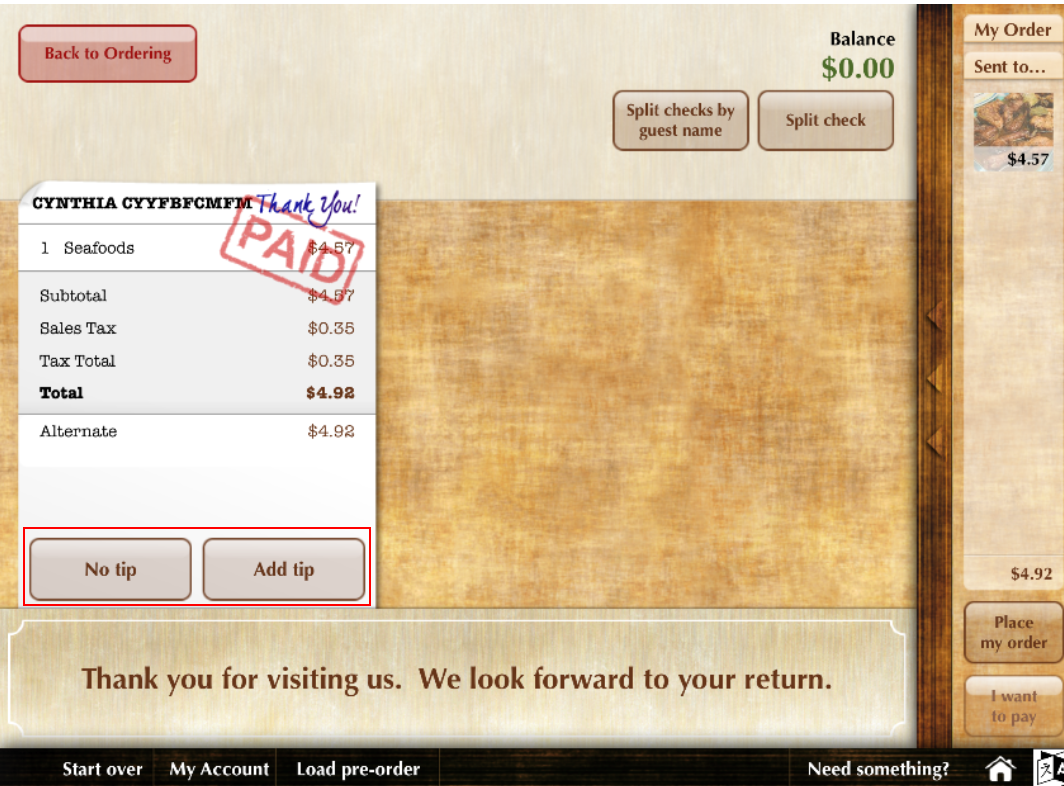
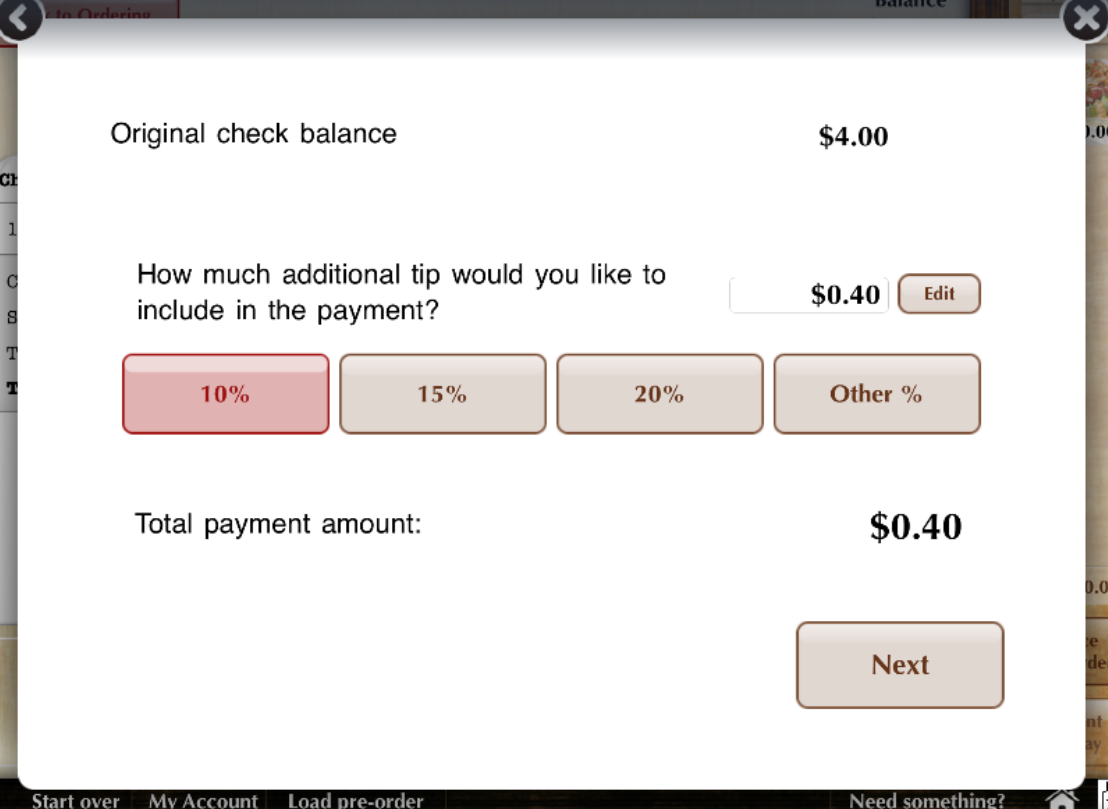
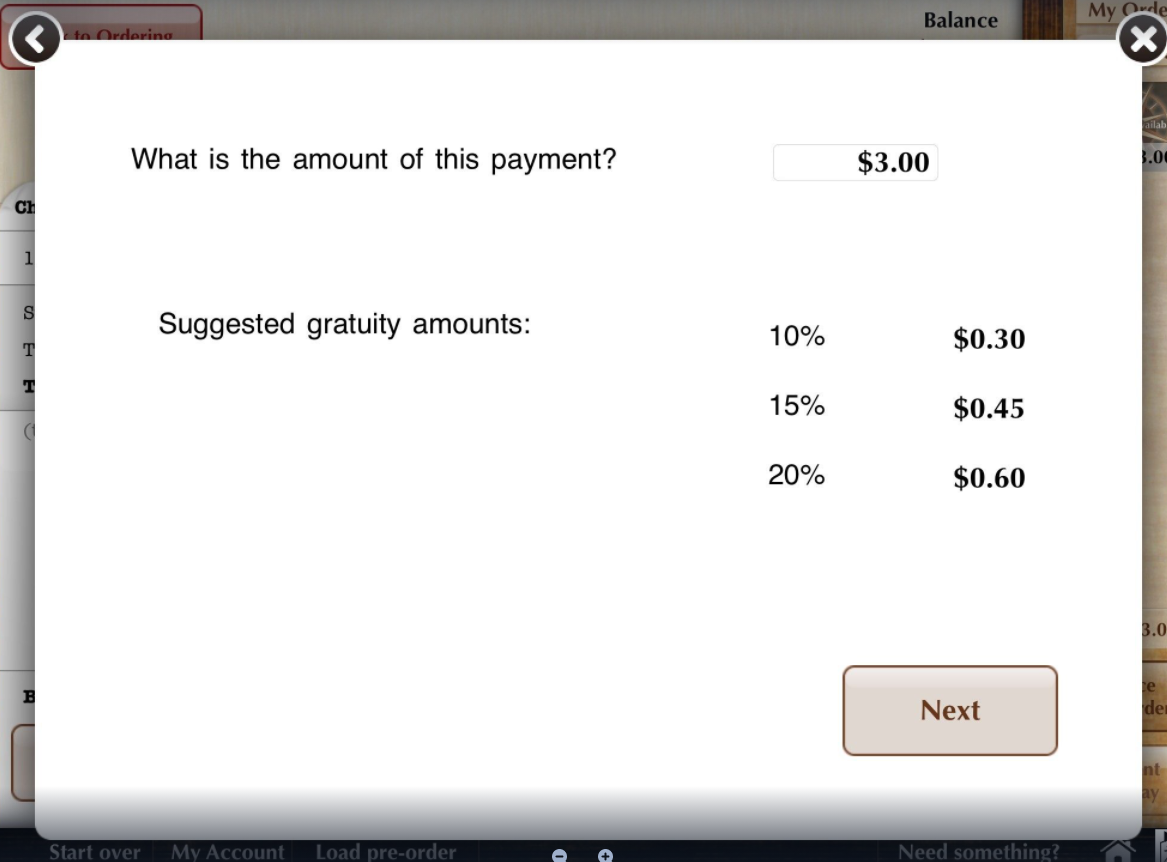
| OE-13044 | Guest-facing Payment: Add ability to add tip to paid check (PMS client only) This client-specific feature for a PMS client allows guests to add a tip to a check that has been:
| N/A |
|
| OE-10455 | Guest Facing: Change "tip" to "gratuity" (nomenclature change only) UI text change for consistency. | N/A |
|
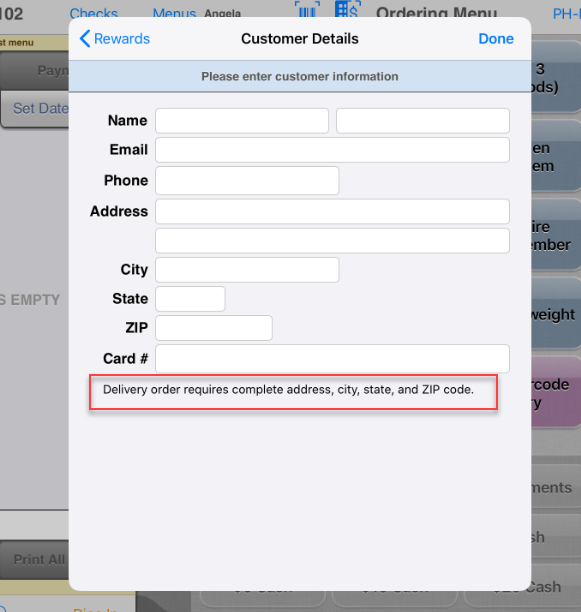
| OE-10345 | New Customer Details pop-up: Add text stating address info required for Delivery orders Add text to Customer Details pop-up advising that complete address is required for delivery orders. | N/A |
|
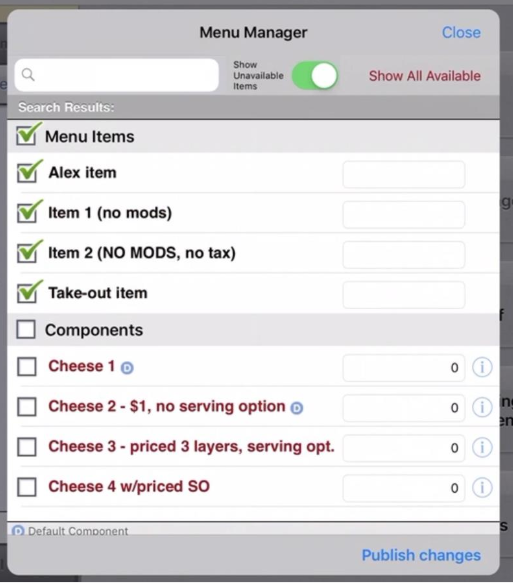
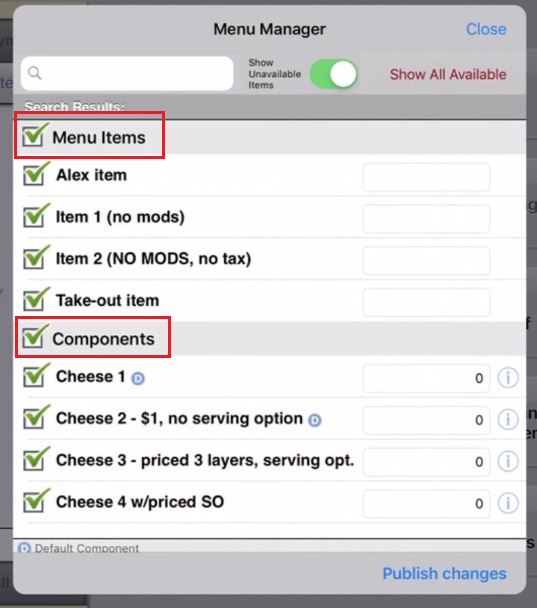
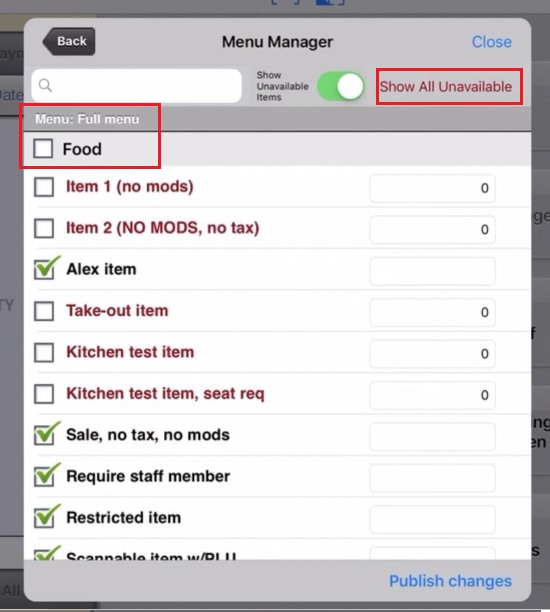
| OE-15247 | Menu Manager: Add ability to select/deselect all items in Menu Manager A checkbox has been added to the top of the list of menu items, allowing users to select all or deselect all items in the list. | N/A |
|


*Please contact your NorthStar representative to have this setting enabled for your account.